Author:
• Monday, May 04th, 2009

Edge joining thin boards, in the 1/4″ to ½” range, presents two special problems, both easily surmounted with the methods described here. These are usually fairly short pieces of wood, such as for panels and drawer bottoms, which permit alternative methods.

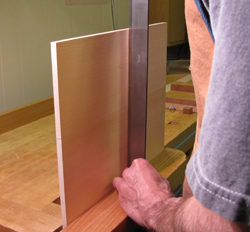
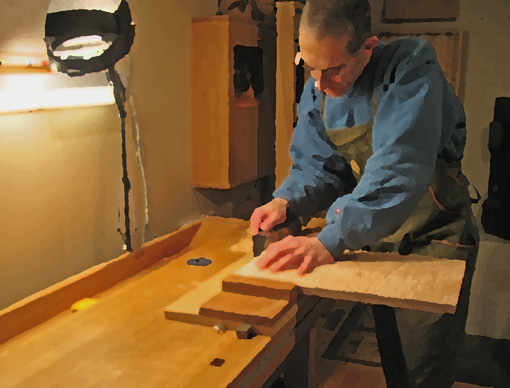
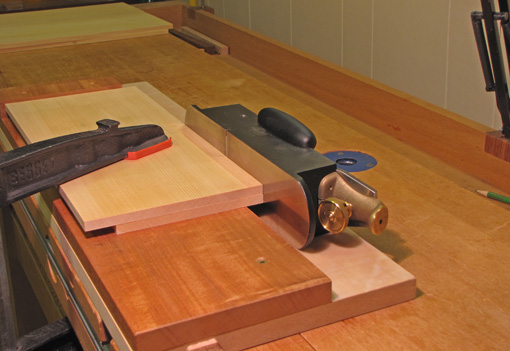
First, it is difficult to plane a straight, square edge using the usual procedure of clamping the board in the front vise and running a bench plane along the edge. The narrow edge provides little purchase to balance the plane consistently square to the face. The solution is the shooting board. I bring the two boards together, like closing a book, and align the working edges. Then I set the pair on the shooting board platform with the edges extended slightly beyond the shooting board’s running edge. The plane is, of course, used on its side, but the sole only touches the edges of the work pieces. Hold the boards firmly or use a clamp. Planing the two edges simultaneously in this manner negates any slight discrepancy from square.

In setting up for an edge joint, care must be taken to match and orient the boards properly. It may not be possible to meet all of these criteria with the available stock, but the first two should not be compromised.

  • Join edges with similar cross-sectional grain orientation, rift to rift, quartered to quartered, flatsawn to flatsawn. Dissimilar edges, such as quartered and flat, will seasonally move differently in thickness to create a step at the joint surface and possibly stress the joint.
  • Avoid figure runout or dissimilar figures at the edges of the boards. For example, do not juxtapose cathedral figure lines running off the edge with riftsawn straight figure. Make it look good. This is partly related to the above.
  • The surface grain of the boards should run in the same direction to facilitate planing the glued-up board.
  • The grain on the edges should run in the same direction when the boards are “folded”. This will make the edges easier to plane simultaneously, but is not a factor for thicker boards that are planed separately.
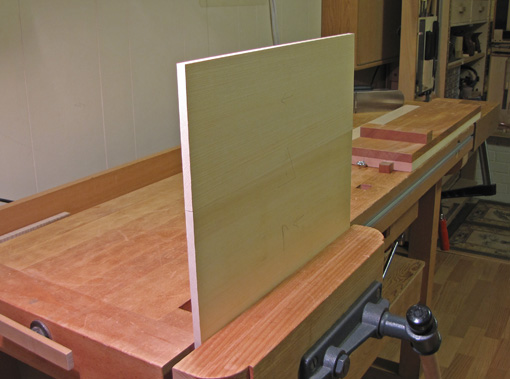
For the enduring question to plane the edge straight or concave, my simple answer is this: I aim for a straight edge allowing the least possible concavity but zero convexity (a one-sided tolerance). The ultimate test is to stand one board on the other and swing the top board. It should barely pivot at the ends, never in the middle. It must also not rock due to twist in the edges. Finally, a straight edge placed along the surfaces should predict a flat glue up. (Contrary to the appearance in the photo at right, I have five fingers on my left hand.)

When joining flatsawn boards I usually look for the nicest appearance and do not worry specifically about whether the heart and bark faces alternate or not.

By the way, it took me longer to write this than to make an edge joint. In the next post, I’ll describe a method to solve problems in clamping the joint.

Category: Techniques  | Tags:  | 2 Comments
Author:
• Tuesday, April 28th, 2009

To a woodworker tooling up a new shop or upgrading an established one, I suggest the second major machine acquisition should be a good quality bandsaw. Nope, not a table saw, not in the number two slot. True, the table saw rips and crosscuts very well but is far less versatile.

The great freedom afforded by a good bandsaw can change your relationship to wood. Here’s a sampling of some bandsaw work:

  • cut curvy legs from 12/4 mahogany
  • resaw a 10″ figured board into bookmatched panels
  • make your own 3/32″ veneer
  • select out furniture parts from stock irrespective of their orientation to the original edge of the board
  • cut tenons
  • cut and dry some wood from a tree felled in your backyard
  • try some sculptural work
  • rip laminates for bent lamination work
  • cut out cartoon characters and toys for your kids

A bandsaw will generally not rip as cleanly as a table saw, but with an excellent blade it does a surprisingly good job that is just a very few hand plane passes away from finished. For clean, accurate, consistent crosscutting, it must be conceded that the table saw is the clear winner. Still, the shooting board can take care of that issue. Nonetheless, if I had to give up one of these two machines, there is no doubt the table saw would go because the lack of a bandsaw would be far more limiting to my range of designs and work.

The bandsaw also takes up much less shop space than a typical table saw. There is an additional, hard to define virtue of bandsawing. It is the machine work that I liken most to hand tool work. I feel in touch with the cutting action and in control of the work, unlike with the table saw where, after the setup for a cut, the machine essentially rules. A bandsaw is also way more just plain fun to use than a table saw, jointer, or planer.

I would strongly suggest a steel frame saw in preference to a cast iron version. While a review of specific machines is beyond the scope of this post, I suggest to look for at least 10″ cutting height, preferably 12″ or more. Lower priced steel frame saws in the $800-900 range, such as the Rikon 10-325 or Grizzly G0457, are not more expensive than a quality cast iron model plus a riser block. Better still, move up to a Minimax or Agazzani.

So just as my New England Patriots (to raise the hackles of lots of readers) produce consistent winners by building the roster based on players’ value and versatility, go ahead and add a quality bandsaw early on in your woodworking lineup. Just remember, the pursuit of perfection is fraught with agony. (Yea, yea, I know: 18-1.)

Category: Tools and Shop  | 14 Comments
Author:
• Sunday, April 26th, 2009

New woodworkers setting up their first shops may wonder which major machines should be purchased first, second, and so forth. Similar issues confront experienced craftsmen looking to upgrade their machine arsenals. Answers to tool questions such as these must always take into consideration the type of projects planned, the methods and skills used, and shop space. Furthermore, quality woodworking is a very personal endeavor which precludes definitive answers in matters such as these.

This discussion applies to the type of woodworking that I think is done by many readers: building mostly furniture and accessories, using a combination of machines and hand tools. Examples of projects, for necessity or just for fun, include tables, chests, jewelery boxes, bookcases, and maybe a chair, using mostly straight but also some curved or sculptural elements. It is assumed that money and time are limited. (Good bet, I think.)

My suggested first major power tool is the portable thickness planer. Why? It accomplishes very well a difficult, essential task with relatively little expense and shop space.

For $350 to $650, one can buy a machine that will perform its job at a very high level. Most woodworking projects start with flat boards of uniform thickness. So why not buy a jointer first? A jointer with the analogous quality and versatility as a portable thickness planer would cost far more, and its tasks are far easier to do by hand than is thicknessing.

A flat surface prepared by hand, preceding thicknessing, can be done reasonably quickly and does not have to be pretty. It may even contain residual furrows from a scrub plane and tearout, so long as it does not contain cup, bow, or twist. Thus it can register properly against the bed of the thicknesser for the other side to be planed, then the board is flipped, and so forth.

Spending much more money on a good jointer, or worse, buying a cheap or narrow jointer destined for early obsolescence, will produce a flat face but leave the arduous task of hand thicknessing. The portable thickness planer quickly frees the woodworker from some of the most limiting habits in woodworking – using pre-dressed wood and defaulting to 3/4″ stock.

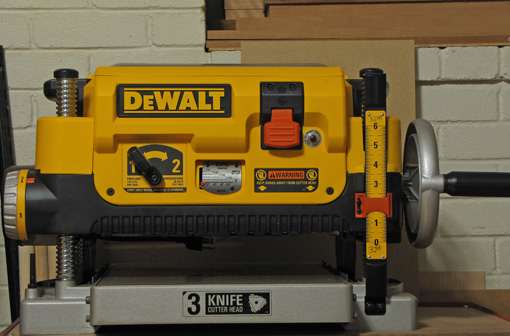
I like my DeWalt DW735. I use it with a dust collector but its blower allows use without one, making it easier to start up a shop.

Next: suggested major machine number two. More money, of course, but here comes the fun. Big hint: it’s not the table saw.

Category: Tools and Shop  | 6 Comments
Author:
• Thursday, April 16th, 2009

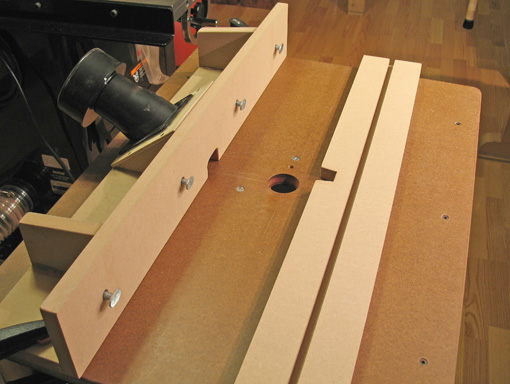
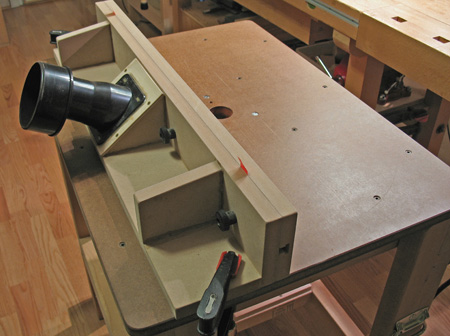
The fence for the router tableuses a removable face with a T groove in its back. Four T bolts penetrate the vertical piece of the base fence, and the heads slide in the groove. The face is secured using knob nuts on the bolts.

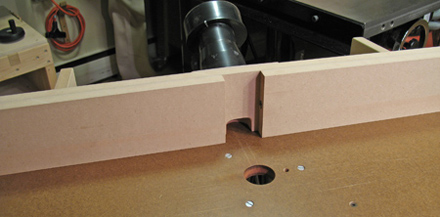
The base fence is constructed from two pieces of 4″ x 28″ MDF, glued and reinforced with 90 degree MDF braces set in with epoxy glue. At the center is a cutout, about 1″ high x 1 ½” wide x 1 3/8″ deep, in the horizontal and vertical components to allow dust to escape. Surrounding the cutout, on the back side of the fence, are two MDF 90 degree triangles with a 1/4″ plywood cover. The cover has a large hole, around which is attached a plastic face plate with a dust port. Attached to this is an adapter to fit a 4″ dust collection hose.

The removable fence has a smaller trapeziodal cutout, 1 1/8″ at its base and 7/8″ high. This accommodates most of the bits I use. Among the advantages of the removable fence face is the option to create additional facings with larger or zero-clearance cutouts. Another option is a split fence facing where the halves can be separated to make room for taller/wider bits. The outfeed half can be also be shimmed for edge jointing. Rockler carries all the fittings required to construct this fence.

When building this fence I tried hard to make it flat and square, knowing, however, that I could later tune it to tolerances of at least .002″, with a “highly sophisticated” microadjustment device: shims. The squareness of the fence can be tuned by placing tape shims under the base fence. The straightness can be tuned by placing plastic or brass shims between the facing and the base fence.

The fence is held to the table with an F clamp at each end. I don’t miss having a fancy microadjuster on the fence. I learned woodworking using hand tools and this has fostered habits of working as directly as possible, using consistency, not dead-on absolute measurements, to make parts fit. I prefer to bring the part to which I am fitting right up to the bit and fence and set them from that. Often this involves using test pieces and incrementally approaching a good fit.

In some cases, if the trial is off a bit and I want to correct it by a measured amount, I might measure the trial cut with a dial calipers, and make the fence adjustment with a leaf gauge and a block. Tiny changes can be made by pivoting the fence at one end and measuring at the other, resulting in a movement at the bit location of half the measured amount.

The important thing is not to mistake this low-tech shimming and matching for sloppiness. This is an intuitive, simple, but highly accurate way to work. Furthermore, you can feel the level of accuracy to which you are working, in much the same way as sawing to a line when cutting joints by hand.

Yup, simple, and it works. Complicated can be so boring.

Author:
• Tuesday, April 07th, 2009

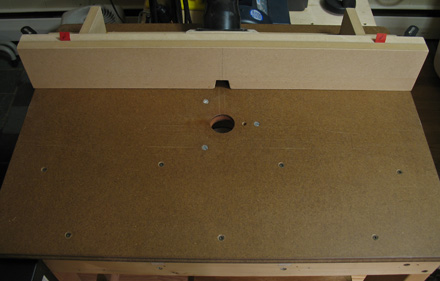
No drop in plate, no router lift, no storage cabinets, no micrometer fence adjuster. So what does this router table have going for it? It’s simple and it works. You cannot buy this one from a catalog. Really, I have nothing against all those gizmos, and maybe they’re right for you, but I don’t think using them will produce better woodwork from my shop.

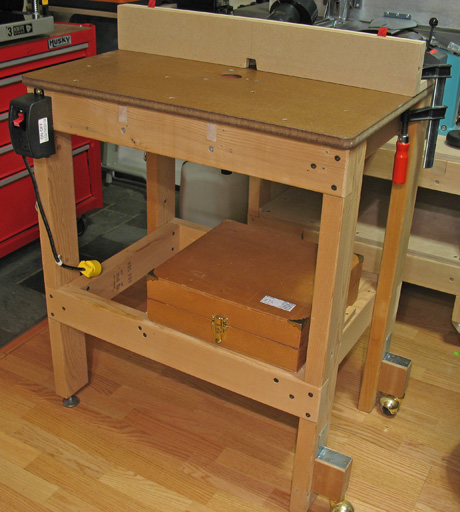
Overall dimensions are 28″ wide x 20″ deep x 33″ high. The frame is constructed from straight, dry 2x4s joined with half-laps, glue, and 3″ screws. Steel “L” brackets hold the two casters just a bit above the floor when table is planted, so the wheels can engage when the table is slightly lifted from the opposite side to move it about. One leg has a leveler. An electrical switch is located at the upper left of the frame. Most of my bits are stored in the box which I slide out of its cradle before using the router table.

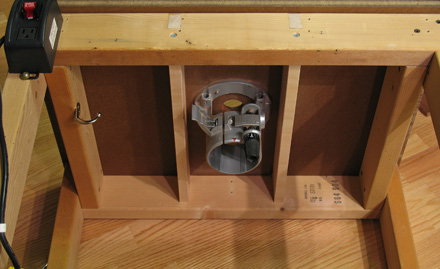
Looking from underneath, you can see two cross supports half-lapped in place to form additional support for the top. After constructing the frame, I used a hand plane, straightedge, winding sticks, and a fair dose of patience to ensure the top edges of the frame composed an accurately flat plane upon which to attach the top.

The top is 3/4″ MDF, toughened with a few coats of oil-varnish mix, screwed to the base. An extra Bosch 1617EVS base always stays screwed underneath. In this decade I haven’t found use for a bit too big for the 1 5/8″ hole which is centered in the top. (Maybe I’m just boring.) The top is ridiculously flat and never sags. (Which keeps me happy.) There is a small hole near the bit opening for a rarely used starter pin.

Yes, I must squat to put the router motor in the base – it’s ok. While down there, it is easy get a good angle of view to set the bit height with a rule, a reference block, or most likely, a previously made part of a project. The Bosch base has a simple micro-adjuster with 1/256″ (about .004″) gradations allowing precise readjustments after running/measuring a test piece. The same Bosch motor is used in a second base for hand held work.

So far we’ve got an inexpensive, extremely stable, accurate table. I credit router expert Pat Warner for this general philosophy of the router table, with modifications. My fence, however, is much simpler than his and will be discussed in an upcoming post.

Author:
• Tuesday, March 31st, 2009

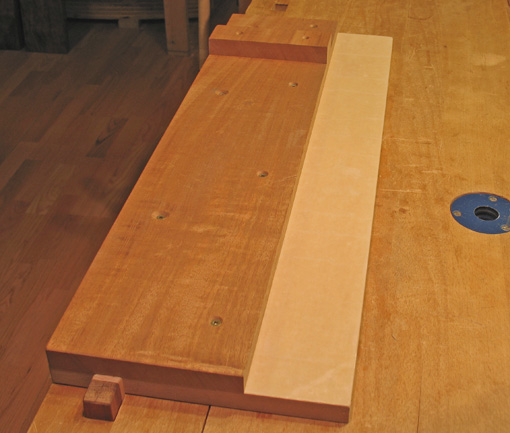
Shooting has no equal for producing an accurately square (or angled) end on a board while incrementally removing minute thicknesses of wood to make a component fit just right. This shooting board has seen many years of use because it meets my preference for jigs to be simple and adjustable for tolerance.

It is easily constructed using a 9″ x 26″ x 3/4″ piece of MDF for the base. Plane the working side of a dressed quartersawn mahogany board, 6″ x 3/4″, straight and square. Attach it to the MDF with screws, leaving a 3″ track on which the side of the plane will ride.

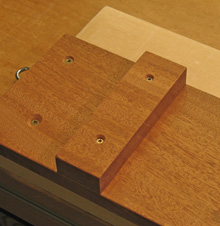
The track is covered with adhesive-backed 1/32″ thick UHMW slick plastic which makes the plane ride like a sled on ice. Screw a short grain fence, about 7/8″ thick, a few inches in from the end. To attach the fence, use oversize clearance holes and adjust the squareness until you’re satisfied.

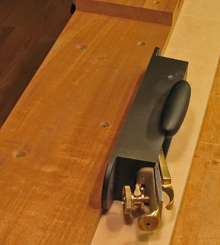
Break in the new jig by taking a few shavings off the side of the mahogany to create a miniscule rabbet. The outermost part of the plane’s sole will ride on the uncut straight edge while the tiny blade projection will nest in the rabbet.

In use, don’t worry if the woodworking gremlins confound your attempts to produce a square end on a board even though the fence is “perfectly” set. Just use a piece of tape or a shaving judiciously placed on the face of the fence to produce the squareness you seek. The same goes for squareness across the end of the board – use shims logically placed on the shooting board surface to get the desired result. This is microadjustability under your control!

A thicker fence can be attached for thicker workpieces or to stack workpieces to distribute blade wear. I seem never to use miters in my work but a fence could be attached at any angle. The scale of this shooting board is more for drawer making but I have used it to shoot carcase boards by using an adjustable support alongside the workbench. Remember, the shooting board also works great for long grain edges on small pieces.

A low angle, bevel up plane is ideal for shooting. I like the compact mass of the Lie-Nielsen “iron miter plane”. Don’t even think about shooting without a very sharp blade.

Author:
• Friday, March 20th, 2009

I enjoy watching the Science Channel television program “How It’s Made”. There is amazing ingenuity and capital investment involved in producing almost all of the human-made things around us. Most of the items the show demonstrates could not be produced at all without sophisticated machinery, and certainly not cheaply enough for practical mass consumption. This is the means by which we get our stuff in today’s world and we can be grateful for what we have earned with technology.

As I sit watching robotic arms assembling a construction vehicle, I wonder where we small scale woodworkers and our products fit into this world. Is our work a quaintness for a few owners to appreciate only in passing, without the consequence of “necessities”? Do we use our method of production, a small shop using small machinery and hand tools, only because there is maybe so little demand for our products, or perhaps because we have not bothered to find a more efficient way to produce? In short, does our work matter, and why?

Yes it matters, because our work is personal, in vision and execution. Our small shop methods are vital because they allow personalization in design, workmanship, and detailing. A craftsman’s work is his song, that he sings, and people appreciate and value it as that.

A modern person is likely to own only a few things of which he knows who is the designer-maker, the person, not just a label or a company. That personal identification and connection make these among the most cherished possessions. That chair, for example, is not any chair, however elegant, it’s a Maloof chair. The table that you, my fellow woodworker, made for yourself or a client will forever be your table, linked to you, with your name on it. A client owner knows exactly from whence it came, perhaps even playing a role in its design, and values this distinction.

That is what we small shop craftsmen have to put forth and, I believe, will never become obsolete. On the contrary, this offering will be increasingly valued in a world filled with growing numbers of nameless technological wonders. Personal woodworking – it matters.

Category: Ideas  | 3 Comments
Author:
• Wednesday, March 18th, 2009

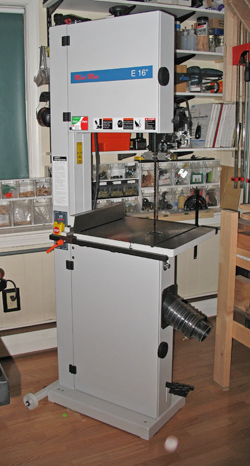
When I was shopping for a new bandsaw last year I was not able to find much written by Minimax E16 users so I am posting this to help woodworkers looking to buy a new bandsaw. I’ve been happy with the E16. It is a very important tool in my shop and I’d buy it again. This is my view of the machine, unprompted by the company in which I have no stake.

The MM16, which has a 4.8 HP motor and resaw capacity of 16″, is probably the better choice for many woodworkers, but I bought the E16 based on its price and size that fit my needs. The E16, with a 2.4 HP motor and resaw capacity of 12″, is about 200 pounds lighter and has a smaller table, making it more maneuverable in my small shop, a critical consideration for me.

The performance of the saw has been excellent. The E16 has ample power to handle everything I’ve thrown at it, showing the moxie, for example, to accurately and smoothly resaw 10 inch wide walnut and some very dense 8 inch pear using a Timberwolf VPC 3/4′ x 0.25″ x 2-3 tpi blade. The blade runs true without barreling. A carbide tipped blade also can be used on this saw.

Set up involved a lot of clean up, though that did give me a chance to learn about the saw. I think this is typical of most major woodworking machinery. You will need to obtain and wire your own power cord. The mobility mechanism, using the lever bar, is easy to use, plants the machine steady on the floor, and saves the hassle of buying and fitting a separate mobile base. The doors do not open separately as was described by the seller, but I really don’t mind.

The manual is poor and, while I have long experience bandsawing, it could be a problem for someone new to it. Virtually everything on the saw can be adjusted as needed and I found most of the tuning to be straightforward and intuitive. The Minimax folks were knowledgeable, helpful, and responsive when questions arose.

I like the simple, heavy cast iron rip fence which is easily adjustable for drift. The table tilt mechanism is solid but can be a bit balky when making large angle adjustments. The trunnions give the table good support. The table insert is easily leveled. Tracking the blade has been easy and so far I haven’t even had to change the factory setting for the lower wheel position on its axis. Blade changes are about as easy as I can imagine on a bandsaw. (It still would be nice if they magically changed themselves!) The spring and frame are easily strong enough to tension the resaw blade. The tension gauge, just a printed sticker, could use an upgrade, but at least it allows for approximate repeatability once you determine good tension for each of your blades.

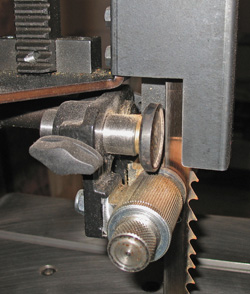
The rack and pinion guide post is a pleasure to use and, over its excursion, accurately maintains the positions of the bearings relative to the blade. I had to hack saw off a bit of the blade guard in the back to allow the upper thrust bearing to move into proper position for some blades. This does not affect the safety aspect of the guard. I think this is a design defect and I have notified Minimax. (photo above right)

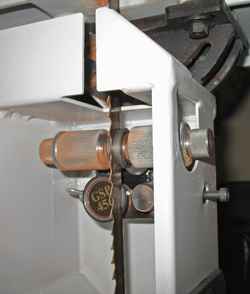
I had wondered if the Euro style blade guides would be a problem, not having prior experience with this type of guide, but was happy to find them easy to adjust and they perform well. The hex head screw that holds the position of the lower thrust bearing was awkward to reach with a wrench so I replaced it with a thumb screw. To allow outside access to the screw that locks the lower blade guide assembly, I drilled a hole in the sheet steel and replaced it with a longer socket head screw. (photo right)

The electro-mechanical brake works fast and is a handy feature to keep work moving along in the shop. I used a file to round the rough corners of the foot pedal.

Dust collection is excellent. The dust port is not a standard 4 inch fit – it’s just a bit too big. I rigged an adapter using a short length of plastic hose.

The videos on the Minimax website are well done and helpful. Particularly instructive are Sam Blasco’s videos using the MM16 machine. Product support from Minimax has been excellent.

In summary, based on my experience with this machine, if this is the general category of bandsaw that will meet your needs, I heartily recommend the Minimax E16. The best thing I can say is that when it’s time to use it in a project, I feel confident and at ease. That’s what you want from a good tool.

Category: Product reviews, Tools and Shop  | Comments off