Author:
• Saturday, June 27th, 2009

What can someone who just likes making things out of wood humbly learn from a musical genius like Beethoven? I remember reading many years ago a quote by Beethoven that struck me with its depiction of his invincible creativity:

I carry my thoughts about me for a long time, often a very long time, before I write them down… I change many things, discard, and try again until I am satisfied. Then, however, there begins in my head the development in every direction, and, inasmuch as I know exactly what I want, the fundamental idea never deserts me, – it arises before me, grows, – I see and hear the picture in all its extent and dimensions stand before my mind like a cast, and there remains nothing for me but the labor of writing it down…

“my ideas…sound, and roar and storm about me until I have set them down in notes.”

What does this have to do with our little world of saws, planes, and wood? I feel that the really difficult, critical aspects of making a woodworking project are consistency and veracity in design and workmanship – the long line. Success comes from keeping sight of the “fundamental idea,” which one hopes and believes is a good one, through the many steps of a project, while bringing forth the commensurate breadth and depth of technique to render it.

This applies to not only a big project or a tour de force of design and technique, but as well to simple, modest work done satisfyingly well. David Pye, in The Nature and Art of Workmanship, states “Regulated workmanship means workmanship where the achievement appears to correspond exactly with the idea”. The force and clarity of the idea must drive its fulfillment. This is not an easy task.

There’s no delusion of grandeur here; this woodworker is not a speck of a Beethoven. Nevertheless, I do like to make things out of wood, to have an idea and make it be there.

Yea, that’s happy woodworking. Best wishes for your ideas.

Category: Ideas  | 4 Comments
Author:
• Friday, June 19th, 2009

What follows are thoughts conjured up while, or recovered from, sweeping the shop floor. Maybe you can relate.

  • Why are so many home shops relegated to the basements? You love woodworking, bring it up to ground level. It is more important than the TV, which somehow seems to always get its own room with a window.
  • Perhaps like many readers here, I started making things from wood because the material is easy to cut, firm enough to be structural, and seems so friendly and harmless, only later discovering its variety and beauty. I would probably like making things from any material, but I cannot resist making things out of wood.
  • We woodworkers are too often deferential to speculative examination of historical work to decide technical issues when the answer may be found with modern, orderly testing and inquiry.
  • Making a one-of-a-kind piece is far more mentally taxing than the easy rhythm of knowing you have previously worked through an entire process, and thus can be fully confident of an outcome that is always in sight. However, new designs are exciting and edifying.
  • I think I may, at some point, acquire “enough” clamps. I am sure, however, that I will never have enough wood.
  • “Dead on”, “dead flat”, and the like, mean to me that the manufacturer doesn’t want to tell you its tolerances. And if a tool needs to be “dead on” (no such thing), shouldn’t I want to know the tolerances?
  • Fine quality wood craftsmanship is financially undervalued. Woodworkers need to better communicate the value of our product. It would be nice if our creations spoke for themselves but it is not enough.
  • Isn’t it exciting that this is the best time in history to obtain high quality woodworking hand tools? What a difference from, say, 20 years ago. And it keeps getting better.

Happy woodworking! And thanks for reading.

Category: Ideas  | 8 Comments
Author:
• Friday, June 12th, 2009

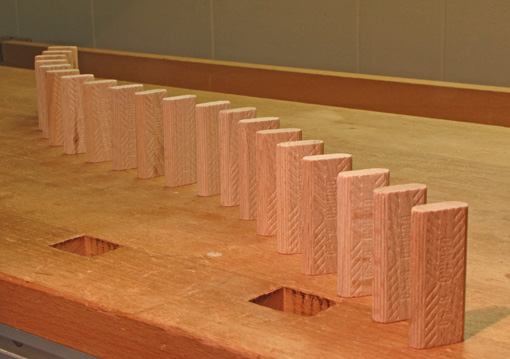
Since buying the Festool Domino joiner about a year ago, I have developed some notions from the viewpoint of one who values hand tool woodworking. Machines, especially one this innovative, can change the way you work, but not automatically for the better. This tool is an invention to facilitate joinery. The principles of good joinery were not reinvented and should not be abandoned for the lure of a new gadget, even one this good.

Am I glad I bought the tool? Yes. Would I use this to join the legs and aprons of a dining table? No, the tenons are too short and do not give me enough options, such as haunched tenons. Does the Domino replace traditional mortise and tenon joinery? Not a chance.

Here are some impressions from working with the Domino:

  • Holding the work and registering the Domino fences on the work surfaces are critical to success with this tool. The plunge must be parallel to the face of a frame member or perpendicular to the surface of a leg.
  • Use the thickest, longest, and most dominos that reasonably fit.
  • When assembling, apply glue on all surfaces to ensure wetting – generous on the mortise walls, light on at least first half of the portion of the domino that will be buried in single mortise.
  • Lightly chamfer the entering edges of the domino to help distribute the glue on the mortise walls and prevent it from being scraped off.
  • The surfaces of the dominos seem somewhat burnished. Consider lightly sanding them to improve glue wetting, but not to remove thickness.
  • Consider putting a bit less of the domino in the long grain member and more in the cross grain member to make it act like a longer tenon. Adjust the mortise depths accordingly.
  • It would be helpful if Festool made additional dominos sized for the full width cut (i.e. mortise length) which is 9.5mm (3/8″) wider than the domino. You could make your own. (Hey, Festool…)
  • Longer dominos would be better but that would involve a different machine design.
  • The dominos fit very tightly in the narrowest mortise length (13.7mm + bit diameter). If you do not have room or do not want to use one of the longer mortises, you can get a slight play by sanding off some of the width of the domino. I use a horizontal belt sander to do this quickly.
  • On the earlier version of the machine with the metal registration pins (which I own), it would be better if the pins could fully retract when you do not want to use them, especially when they happen to be close to the edge of the work piece.

Bottom line: this is a good tool, but to make good projects you still have to be a good woodworker.

Much has been written about the Festool Domino joiner including reviews here and here, helpful discussions at the Festool Owner’s Group, and an excellent supplemental manual.

Category: Tools and Shop  | 5 Comments
Author:
• Thursday, June 04th, 2009


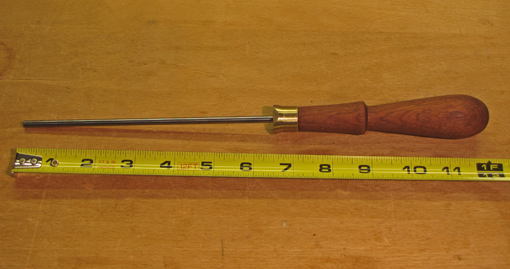
A Google search will yield many references to carbide burnishing tools used to form the hook on a scraper. I first came across the use of carbide in a commercially made burnisher in the old wooden-body version of Veritas’ Variable Burnisher which houses a short carbide rod. (The body of the current version is a molded man-made material.) I later purchased their Burnisher which has a 1/8″ carbide rod projecting 3/4″ from a simple handle. Despite its small size, I found myself using this tool in preference to all of the many (too many) steel burnishers I’ve bought or made over the years. I just needed more length.

Pictured above is my homemade Burnisher for Life. Three and one-half years ago I asked the folks at Innovative Carbide to make a 3/16″ diameter 12″ highly polished carbide rod. I explained the intended use and they recommended an appropriate grade of carbide (10S) with excellent wear resistance. It cost about $50. I drilled a hole in a $4 handle to house 5 ½” of the rod with a press fit, which thus is effectively stored for future use, though I doubt it will be needed any time soon.

This is by far, no contest, the best burnisher I’ve ever used. The very hard and smooth carbide gives effortless, controlled burnishing. The length, though more than necessary, allows a combination of forward and sideways motions creating smooth action against the steel.

There are a few other homemade carbide burnishers to be found on the internet, but currently there is no need to make your own. Lie-Nielsen and Blue Spruce make carbide burnishers that look excellent, as expected from these makers, though I have not used them. The Blue Spruce is listed as 1/4″ in diameter and the Lie-Nielsen appears to be similar. I like the pressure produced by the 3/16″ diameter but I’m sure 1/4″ would work well and, I suppose, be sturdier.

A full size carbide burnisher, store bought or homemade, is relatively expensive but I’ll bet once you try one, it will be the only kind you’ll want to use.

Category: Tools and Shop  | 8 Comments
Author:
• Tuesday, June 02nd, 2009

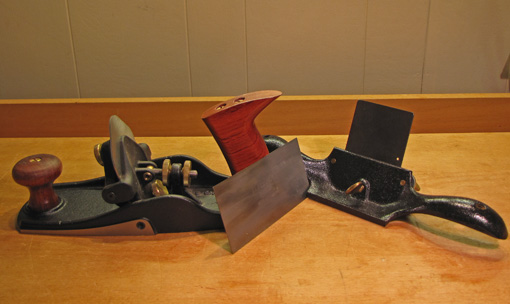
I find myself using only two of the three scraping tools pictured here. The odd one out for me is the #80-type cabinet scraper, with the spokeshave-like wing handles. While there is a wide range of valid opinion on this subject, and a legion of other scraping tools, here are reasons for my preferences.

The humble card scraper is the ultimate in simplicity and utility in a woodworking tool. I use .024″ thick scrapers for general smoothing, and .020″ scrapers for more delicate or focal tasks. I keep a .032″ scraper for unusually heavy work but find it too tiring to bend for general work. I do not use scraper holders since they decrease the sensitive control of the tool in my hands. Since I am using the scrapers for finishing a surface, not dimensioning it, the card scraper works well on areas up to a small table top.

All of these scrapers are hardened to about Rc50. Lie-Nielsen, Bahco, and Lee Valley are fine brands. I keep a few .020″ x 1″ x 2″ mini scrapers (from Lee Valley) that are very handy for touch up work in restricted places. I also keep some softer .020″ scraper stock to easily file into special shapes. Gooseneck and curved scrapers complete the set.

The cabinet scraper’s main disadvantage is its short sole. It lacks both the handiness of the card scraper and the control of the scraper plane. Despite skewing techniques, I find it is unreliable at the beginning and end of boards, and has neither the finger tip control nor the steadiness to avoid occasional blade chatter. The one pictured is a fine quality tool that I’ve owned for over 20 years, and the aftermarket Hock blade is excellent, but it now mostly sits idle. I’ve briefly tried the Veritas model which has a slightly longer sole but it didn’t fly for me.

The folks at Veritas have, fortunately for us, a healthy obsession with scraping, and one product of this is their superb Scraping Plane which has a variable blade angle and the ability to bow the .055″ blade. I once owned a Kunz version but it lacked the ability to bow the blade. Lie-Nielsen makes a similarly large scraper plane, an excellent tool, but its much thicker blade is a different working approach which I found too fastidious to deal with.

With the Veritas, cutting depth is controlled with a combination of the blade angle and the amount of bow. Varying each of these also alters the cutting feel, useful for different woods. The large sole keeps the work flat and prevents digging in, while the tool’s mass helps avoid chatter.

After much experimenting, I find it easier and more effective to prepare the blade with a 90 degree edge (like a card scraper), contrary to the usual recommendation of 45 degrees for scraper planes. This seems to give a more solid, though less aggressive, cutting action, and is pleasingly reminiscent of a card scraper, but with the mass and registration of the big body plane.

Category: Tools and Shop  | 4 Comments
Author:
• Thursday, May 21st, 2009

Trick question. It depends. This post will discuss factors in the amount of camber in the edge of a plane iron with attention to an under-appreciated trigonometric quirk.

The slight convexity or “camber” in the edge of a smoothing plane iron should allow the production of airy shavings that are thickest in the middle, say .001″, and feather out to nothing at a little less than the width of the blade. This produces imperceptible scallops on the wood surface and avoids square-edged tracks or “gutters“.

A similarly small, or perhaps a bit more, camber in the edge of a jointer plane blade allows one to bring down the “high” side of an out-of-square edge without tilting and destabilizing the heavy plane. The camber should be positioned at the center of the blade projection so the plane can be shifted toward the high side of the board’s edge to remove a slightly thicker shaving there.

For jack planes, more camber lets this workhorse take thicker shavings without producing gutters. The more pronounced camber also makes it easier to direct the plane’s cut at the high spots on the surface of a board being dimensioned.

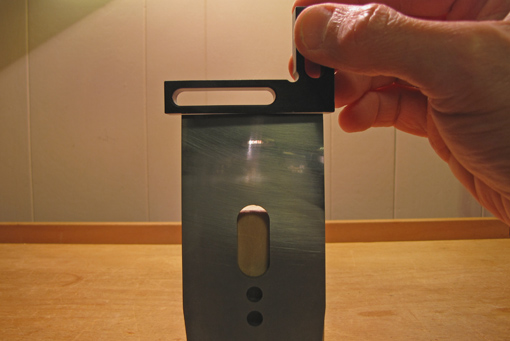
When grinding and honing a plane blade, I check the camber by setting the blade’s edge on a small aluminum straight edge and holding it up to the light to look for the tiny gaps that gradually enlarge from the center to the sides of the blade. (I never measure this amount so I cannot answer the question posed in the title of this post.)

Now some trig. Let’s say the camber – the depth of the convexity of the edge – is .005″. When this blade is installed on a 45 degree frog in a bevel-down plane, the actual functional convexity is reduced. Think of it this way: if the blade were laid flat and you viewed it toward the edge, there would appear to be no camber at all. The functional camber is reduced by the sine of the bed angle.

sin 45* x .005″ = .0035″

Look what happens in a bevel-up plane with a 12 degree bed:

sin 12* x .005″ = .001

Therefore, I sharpen more camber into a blade for a low angle bevel-up plane than for a bevel-down plane to achieve the same functional amount of camber. The camber that you observe sighting 90 degrees to the face of the blade will mostly disappear when you install the blade in a 12 degree-bed, bevel-up plane and sight down the sole to observe the camber. Compensate for this by being generous with camber in the sharpening process. A more direct approach during the sharpening process is to check the camber against a straightedge with the blade tilted at the bed angle.

Again, I do not measure these things but rely on my eye, experience, and especially feedback from the work. Of course, sometimes I’m off, usually by over-cambering. However, since the middle of the blade is thus destined to dull first, it is easy to reduce the camber on the next honing.

There are undoubtedly other factors affecting shaving thickness, such as blade sharpness, blade edge deflection, and wood grain, so it is most important to monitor the performance of the plane and make adjustments when you resharpen.

You can use trial and error or a set of leaf gauges to work this out to your liking. Like just about everything else, there’s more than one good way. Use the principles and find your way.

Category: Techniques  | Tags:  | 9 Comments
Author:
• Wednesday, May 13th, 2009

Here are some brief thoughts on these tools and a good excuse to own both.

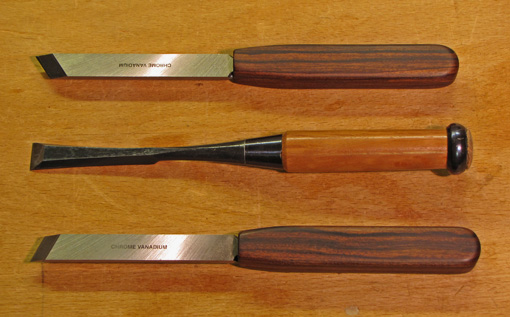
Skew chisels are handy for getting into acute angles, such as the sockets of half-blind dovetails, as well as for easy access to square corners, such as cleaning out a hardware mortise. The skew chisels pictured above are available from Lee Valley, $27.50 for the pair, nothing fancy. They are about ½” wide and come with sturdy, though unattractive, hooped handles. For fun and aesthetics, I made Hondouras rosewood replacement handles intended for pushing, not striking. The edge forms a 65 degree angle with the length of the chisel on the acute side.

An interesting tool sits between them, a Matsumura “bachi nomi” or fishtail chisel, available from The Japan Woodworker in various sizes, $39-$53. The 5/8″ edge forms an 86 degree angle with each side. This allows use in many tight spots but is not sufficiently acute to easily clean out lap dovetail sockets. The geometry of the bach nomi makes it more amenable to striking than that of the skew chisel.

These two types of tool, one common, the other unusual, have some overlap in their function but I feel both are worth owning, especially since I am a big fan of Japanese chisels in general.

Category: Tools and Shop  | 4 Comments
Author:
• Wednesday, May 06th, 2009

The previous post discussed preparing the edge joint for thin boards.

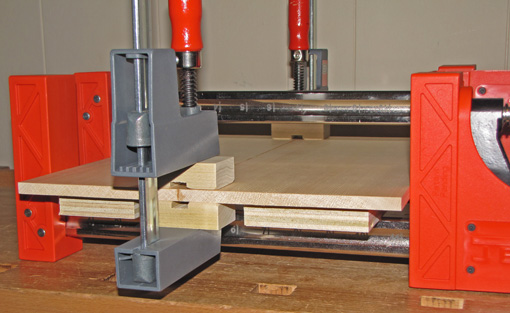
The second problem involves clamping the joint. Because these are thin boards it is desirable to align the edges as accurately as possible to avoid a significant loss of thickness in the final product. More vexing is the tendency of the joint to explode when clamping pressure is applied. This problem is akin to trying to control the writing tip of an 8 inch long pencil held only by the eraser.

I like #20 biscuits for aligning 3/4″ edge glue ups and #0 biscuits could work for ½” boards, but for the 11/32″ boards shown here I would be concerned about biscuit swelling and show-through. Splines are a hassle which I gave up on long ago. The same goes for those elaborate clamps that use wooden battens to apply pressure on the face of the glue-up while the clamp screws apply pressure to the joint. One option that I have not tried but looks good is the Plano Clamping System.

Here is a simple solution that works for me. The boards rest on 3/4″ MDF or plywood platforms. After applying glue and bringing the joint together, I apply just light pressure with the bar clamps. Then I clamp small blocks, with cutouts to vault the glue squeeze-out, across the joint near the ends. I push or tap near the middle of the joint to align it there. Then I apply final pressure with the bar clamps.

There are surely many other methods for edge joining thin stock, notably from instrument makers. I’ve described simple, shop-tested methods that I use. Best wishes for your woodworking.

Category: Techniques  | Tags:  | 5 Comments