Author:
• Saturday, June 26th, 2010

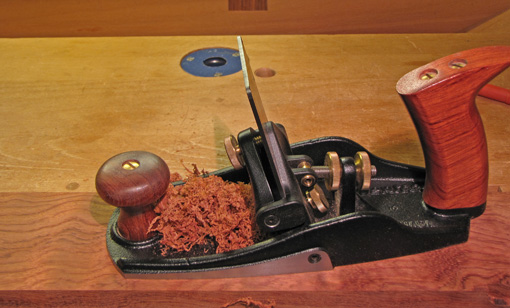
Bevel-up, low-angle smoothing, jack, and jointer planes made by Lie-Nielsen and Lee Valley have 12 degree beds for their blades. This style of plane is simple to set up and especially versatile. The use of a thick blade, 3/16″ or more, supported very close to its cutting edge, and an easily adjustable throat opening contribute to effective planing.

One of the most important advantages of these planes is their ability to employ blades sharpened at different angles to manage a range of woods. With the 12 degree bed, a blade sharpened with a 33 or 38 degree bevel (secondary bevel) results in a 45 or 50 degree cutting angle, respectively. Either would be a reasonable choice for general work.

To get a 60 degree cutting angle for difficult figured woods, the blade needs a 48 degree bevel. The result is effective but this makes the blade more difficult to sharpen to a keen edge. Furthermore, this is a large wedge to drive through the wood. I believe this creates more resistance at the cutting edge, making the tool cut less cleanly and harder to push, even aside from the effects of the higher cutting angle.

If the blade bed was 20 degrees, it would require a more manageable 40 degree blade bevel to achieve the 60 degree cutting angle. A 25 degree (perhaps in O-1 steel) or 30 degree blade bevel (giving a 45 or 50 degree cutting angle, respectively) could be used for tamer woods. Another point, minor but helpful, is that a blade bedded at 20 degrees does not require as much actual camber to achieve the same functional camber as does one bedded at 12 degrees. Explanation here.

I imagine a 20 degree bed would also make the sole of the plane less prone to distortion from the pressure of the lever cap. Supporting this idea, I have not found distortion to be a problem with Lie-Nielsen’s shoulder planes with their 18 degree beds, but Lee Valley’s shoulder planes with their 15 degree beds have been a problem for me, even with rather gentle tightening of the lever cap. The 3 degrees seems to make a difference.

Considering other bevel-up planes, the fabulous Lie-Nielsen #9 “iron miter plane,” which I use for shooting end grain as well as long grain, has a 20 degree bed. Block planes come in 12 and 20 degree beds. The 20 degree tools seem to work just fine on long grain. Karl Holtey’s #98 Smoother has a 22.5 degree bed, and Philip Marcou’s S20A, which is designed to use standard Veritas blades, has a 20 degree bed. I’ve never used the Holtey or Marcou but I can’t imagine they are anything less than wonderful.

I also do not think cutting end grain is good justification for the 12 degree beds on the smoothing, jack, and jointer planes. I do not think end grain requires a 12 degree blade bed and I am skeptical of even an advantage over a 20 degree bed. Indeed, my Lie-Nielsen shoulder plane at 18 degrees works beautifully on end grain.

I own the Veritas bevel-up, low angle smoother and jack and have used the Lie-Nielsen bevel up planes. While their features differ, both makers produce superb planes. It is the 12 degree bed that I question.

I am a plane user, not a plane maker, and certainly have room to learn more. I wonder if any of these makers would care to comment on this issue.

Author:
• Friday, June 25th, 2010

Thoughts arising while sweeping the shop floor, waiting for boards to come out the back end of the thickness planer, or putting away tools . . .

A principle known as Occam’s Razor holds that the simplest explanation for a phenomenon is usually the best among reasonable, verifiable, non-simplistic possibilities. In other words, eliminate the burden of the unnecessary. I propose the Woodworker’s Edge: let this principle apply to woodworking jigs. The simplest jig that gets the job done quickly and well is the best jig. The idea is to make woodworking projects, not elaborate jigs. Simple, effective jigs are cool jigs.

I wish someone would manufacture a 12″ jointer with about a 55″ bed. I mean just the jointer, not a jointer-planer combination and not an aircraft carrier monstrosity. I could use it along with my DW735 portable thickness planer. I imagine it would save a large share of the cost of a combination machine, not to mention changeover hassles, while retaining the advantages of the 12″ width. 

I wish Lie-Nielsen would make a 55 degree frog for their #4 smoothing plane (2″ blade width) as they do for their #4 ½ (2 3/8″ blade width). 45 and 50 degree frogs are available for both planes. I’ve used the #4 bronze nearly since it was first produced, and later replaced its 45 degree frog when the 50 became available. It is my all-round smoother and I’ve never used the 45 frog since. It seems the 55 would make even more sense for difficult woods in a #4 than in a #4 ½ since the narrower plane would reduce the pushing force required.

Speaking of planes, the rear handles on Veritas bench planes are . . . well, if you use them you know . . . not exactly agreeable to human hands, at least not to mine. I do understand that they are fixed with two bolts instead of the usual one and the straighter profile accommodates this. I have two of their low angle planes and otherwise like them very much. Lee Valley is a wonderful company. But the handles, please, guys, can you do something?

I wish more wood was sawn into different thicknesses within one flitch. That way table legs, aprons, and tops could be made from consistent wood taken from one flitch without having to resaw the dried lumber. I guess this would be a lot of trouble for the sawmill and maybe just too impractical, but it would be nice to have such lumber widely available. Using 8/4 lumber for all the parts of a table requires a lot of resawing.  There is always a bit of a gamble, certainly considerable waste, and more work in resawing 8/4 lumber to get 3/4″ finished stock.

I don’t think techniques need to be advertised as they so often are in woodworking publications: “foolproof, super-easy, super-quick, perfect every time,” etc. Woodworking is wonderfully accessible, but it is not that easy, not that quick, nothing works out perfectly every time, and techniques do not need to be foolproof because woodworkers are not fools. I guess the following is less marketable: “Here’s a clear, sensible procedure that works for me, and, after some practice, will give you excellent results as long as you are careful, patient, and use the proper tools.”

I’d buy that.

Category: Ideas  | 6 Comments
Author:
• Tuesday, June 15th, 2010

The bandsaw holds a truly special place among woodworking machines because the woodworker interacts with it differently. I steadfastly contend that developing skill with a quality bandsaw can have greater effect on a craftsman’s development than with any other machine.

In use, the bandsaw feels to me more like a motorized hand tool. In contrast to operating a table saw, where the idea is to make the outcome of the cut a done-deal as much as possible beforehand, cutting at the bandsaw usually has an aspect of freedom. With the exception of resawing, I much more often cut to a line by eye than by using a fence, using it as a mostly non-jigged power tool. As evidence of the creativity fostered by the bandsaw, I use it almost exclusively in sawing pieces for mock ups. I can also feel the bandsaw’s cutting action – much like a hand tool – much more than with a table saw or router.

The bandsaw also allows us to use wood in ways no other power tool can. Resawing, cutting curves in thick stock, and cutting non-parallel to the edge of a board are tasks at the heart of how I build with wood. True, I could do those jobs with hand saws, but I prefer the bandsaw the great majority of the time. For woodworkers doing other types of work, such as turning, chairmaking, shop-made veneering, boatbuilding, and musical instrument making, the bandsaw is pivotal in getting the most from nature’s bounty of wood.

Consider what is involved with setting up and tuning a bandsaw compared with other machines. When setting up a jointer, it is a fairly clear-cut, though hardly easy, task: tables flat and parallel, all knife edges parallel to the tables, fence square to the table, etc. Lots of imperatives, not many decisions.

The bandsaw, on the other hand, leaves more room for personal preferences within a range of reasonable options. Do you like the wheels flat or crowned? What style of blade guides do you prefer? Where do you like to set the thrust bearing? How much tension on the blade? On these and many other bandsaw tuning issues, reasonable people can disagree. Though only two different blades cover almost all of my needs, it took me considerable research and trial and error to refine those choices from the myriad available, leaving aside many other good ones.

This is another way of saying that the bandsaw allows for personalization. In fact, it really demands that a skilled user exercise his preferences more than with other machines.

So, while I might sound like a bandsaw salesman, my real purpose in this post is to encourage woodworkers who are building their tool set, and who might be, ahem, on the fence, to put the bandsaw– and bandsaw skills – high on the list. It has the versatility and freedom of a hand tool, with a machine’s muscle.

Category: Tools and Shop  | 6 Comments
Author:
• Sunday, May 30th, 2010

Sometimes an inexpensive tool can be designed and made perfectly well enough to do its job.

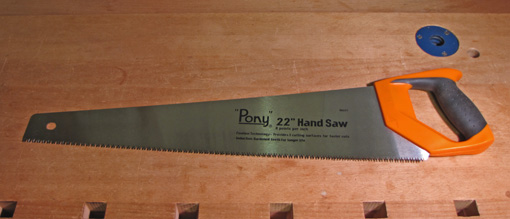
I wanted a new crosscut saw for breaking down stock, something faster than what I had been using. I found it at my local Woodcraft store: a Pony brand 22″ handsaw, manufacturer’s model #66221, for $15.99. For the inelegant task of rough crosscutting, this tool vastly exceeded my expectations. It cuts like a Tasmanian devil and tracks surprisingly well.

The diamond ground teeth, 8 ppi, each have 3 bevels which make them essentially Japanese cross cut teeth with a negative rake. The induction hardening makes them unable to be sharpened in the shop, so when they dull, no doubt after a very long time, the saw will go to the metal recycling pile. The manufacturer states that the saw cuts on both the push and pull stroke, though the push stroke does most of the work. Not surprisingly, the saw does not rip very well.

I measured the saw plate, which is straight enough, at 0.040″ with 0.004″ set, each side. The plate is not taper ground (of course, it’s $15.99!) so it is helpful to keep it waxed to avoid pitch build up from some woods and thus slower sawing. The soft-grip handle is adequate, though it tends to lure my hand into a hammer grip rather than a better grip with the index finger extended. The handle acts as a 45/90 square, quick and handy for stock breakdown.

Several times in this blog, I’ve made the case for buying the best quality tools one can afford, going beyond tools that are just “OK.” Yet, I really like this saw because it does its job, which requires more power than finesse, very well and with ease. I think that makes it a good saw even though it lacks certain refinements that I can do without. That leaves more of my woodworking budget to devote elsewhere. Where? Take your pick of great saw makers – Lie-Nielsen, Bad Axe, Wenzloff, Lunn, etc., or what I own several of: Gramercy.

[As with other tool reviews on this blog, this is unsolicited and unpaid.]

Author:
• Tuesday, May 25th, 2010

Thoughtfully managing the wood right from the start is one of the most critical elements in the success of a project. I find it to be also one of the most exciting aspects of woodworking. Here I show how I managed a board of 8/4 lacewood to get the desired figure and sizes of wood needed for a project.

I pieced back together the sawn board to recreate the decision process. Below is an end-grain view. The more prominent lines in lacewood, here running across the board’s width, are rays. The faint annual rings are nearly vertical and approximately perpendicular to the rays. At the top of the board, the rays meet the edge at an angle and so produce a rather fine figure on the surface. This is not quite what I wanted.

The two photos below shows the board flipped over. Now, at the top of board, the rays are nearly parallel with the edge and so produce a broad flake figure on the surface. To my eye, this is not the most attractive look for lacewood.

To get the desired figure and have all the surfaces consistent, I resawed the board at an angle such that the rays, as they traverse the core of the board, meet the cut line at an angle, but at a lower angle than at the top surface in the first photo (at top). To give this a test, I made a 1 ½” end cut, marked a resaw line and cut it to reveal the new surfaces. They looked good so I went ahead, set my bandsaw table, and resawed the board at that angle.

The photo below shows the resawn surfaces. I also ripped the resawn boards to produce pieces from which I can get 1″ and 3/4″ thicknesses, which will fit the needs of the planned project. Of course, since the resawn surfaces were all originally adjacent to each other, there is excellent consistency in the figure. (The surfaces have been hit-or-miss jointed.)

Some of these pieces will be gently shaped, primarily along their lengths. Because this will not appreciably change the angle at which the rays meet the surface, there should be no noticeable change in the figure pattern. There will be a bit of shaping across the width of some of the pieces, but I will keep this to a bare minimum because that will change the angle at which the rays meet the surface and thus change the figure.

This was fun – especially since the wood came out the way I had hoped. Sure, sometimes things won’t work out because, as Dr. Hoadley reminds us in the first sentence of chapter one in his seminal book, Understanding Wood, “wood comes from trees.” Careful strategy in breaking down stock is essential to the success of a woodworking project. This thinking should start even as you are selecting the wood from the supplier.

Category: Wood  | 5 Comments
Author:
• Friday, May 21st, 2010

The chalk line, a tool usually found on a job site, can also be very useful in the woodshop. When breaking down stock, it is good practice to not automatically accept the long edges as they come from the mill. Ripping a new edge may improve the figure pattern or location, and maximize the yield of quality pieces from a board.

A few examples: you can eliminate some “runout” of the annual ring pattern off the edge of a board that will be part of a glued-up table top by relocating the long edge to be closer to parallel with the figure lines and to match the mating board’s edge. A waney edge may be removed to produce a maximum of clear wood and prepare the board for the jointer. A new edge can adjust figure patterns in the wood to coordinate with how the wood will later be shaped.

Snapping a chalk line quickly and easily marks a new edge to be ripped. The chalk line produces a much more visible line than does a pencil on rough-surfaced wood as it comes from the mill. It is far easier to handle and has more capacity than a long straightedge. Blue chalk shows up well on light or dark woods.

Though most any chalk line from a hardware store would probably be adequate, I prefer a Shinwa brand tool which uses a thin string and very fine chalk to produce a distinct, fine line. (Tajima also makes what appear to be similar chalk lines.) I insert the push pin at the end of the line into the desired spot on the end grain and then draw out line to the opposite end of the board, adjust the location of the line, hold down the line, reach out, lift the string straight up, and let it snap to produce the line.

I usually use the bandsaw to rip rough lumber, never the table saw where uneven surfaces and unpredictable wood create safety hazards. Sometimes a hand saw or jig saw are more practical for this cut.

Strategically managing the wood in the early breakdown stages is one of the most important factors to producing quality woodwork. The simple chalk line can help.

Category: Tools and Shop  | 3 Comments
Author:
• Tuesday, May 18th, 2010

At this point you very much want the piece to exist, to stand on its own, and so you are driven to build. You want it to “turn out” to be what you envision and hope for. Yet in between the compelling vision and the fulfilling object is the potential chasm of disappointment. This, frankly, evokes some fear.

To your rescue comes the teacher, and ultimately, the teacher is you. Let us consider what the teacher does, followed by an example for each:

  • He charts an effective course. This is the strategic order of the steps of construction. Will you glue up the wall cabinet case before or after building the doors?
  • He points out the critical junctures where you must bear down and get things right. Those last few plane shavings off the drawer sides greatly affect the fit and feel of the drawer.
  • He alerts you to possible pitfalls, many of them sneaky. How will the figure change when a piece is shaped into a convex curve?
  • He keeps a steady perspective on the big picture of the project, maintaining your faith. Are the little errors you’ve made so far going to significantly affect the final piece or should you not worry about them?

The teacher may be another person whose experience you borrow, but in due time (meaning after making your quota of mistakes) you must be your own teacher even as you remain a student. The important thing is to think through the four points listed above. Further exploration of how exactly to avoid that chasm of disappointment in creating a work in wood is a larger topic for another time, but the steps discussed in this series will go a long way to helping your project “turn out” the way you want it to.

As you build, there are still small but important decisions to be made because, as noted in the previous post in this series, drawings cannot fully represent the piece. This is much as a musician uses tools such as phrasing, articulation, and tone color to produce his personal interpretation of written music, staying within the fundamental conception of the composer.

Thus the music, or the woodworking creation, comes alive. You’ve done it, now it is there.

And yes, that is . . . happy woodworking. Best wishes to you as you pursue your ideas!

Author:
• Friday, April 30th, 2010

In developing your woodwork creation, you have so far: developed ideas into a strong concept to be made with beautiful wood, researched design, construction, skills, and tools, and used mock-ups to work out various issues. Is it time to make sawdust? Not yet. You should first build the project on paper or CAD with measured drawings.

Drafting the project allows you to work through the specifics of the construction and create an invaluable guide to keep you on course in making the piece. If this step is neglected, if you “wing it,” the odds are high of coming to an impasse in the course of building the project. It is better to use an eraser now than to add to the firewood pile later. Though the drawing process will include plenty of erasing/deleting, backtracking, more work with the mock-up, and some tedium, it is worth it.

Orthographic projection drawings – front elevation, side elevation, and plan views – are the most practical and useful of the pencil-and-paper methods. These are made to scale for the piece as a whole. It is helpful to draw certain key areas full size, especially to work out joinery and other details. It is generally not necessary to codify all of the innards of a piece with a pretty drawing, but it is not wise to leave things to chance and risk getting stuck in the middle of a project. The drawings also serve to plan the wood requirements, and are a record that may be referred to for future projects.

For the wall mirror, the example piece for this series, pictured below are front and side elevations and two modified plan views.

copyright 2010 Robert Porcaro

While it is possible to do some simpler and/or very familiar constructions working from a mock-up without drawings, I believe a woodworker should at least have basic drafting skills. The methods are far beyond the scope of the present discussion. I suggest Bob Lang’s Drafting and Design for Woodworkers as a manual for understanding and making drawings, as well to get going on SketchUp 3-D CAD. Bob now has an extensive set of video lessons, SketchUp for Woodworkers.

A word of context is in order. Valuable though they are, drawings and CAD are never more than graphic representations of a piece and cannot fully define it. They do not contain the workmanship and subtle personal details, such as refined edges and textures, that contribute immeasurably to a piece. This is part of the life that a craftsman imbues into the piece as he works.

And so you must build the piece, which is the subject of the next installment in the series.