Author:
• Saturday, August 14th, 2010

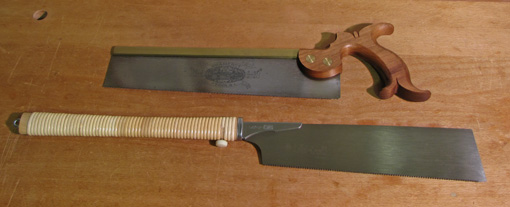
For general small to medium crosscut work, including precision cutting of tenon shoulders, the Gramercy crosscut carcase saw, pictured at top, above, is a great performer. I seem to always be picking it up for something or other.

Like other saws from maestro Joel Moskowitz at Tools for Working Wood, this relatively lightweight saw starts precisely and moves through the cut with smoothness and efficiency rather than brute power. I find the balance and feel of the saw give me a good sense of the vertical orientation of the blade. The blade is 12″ long, 0.020″ thick, and the 14ppi crosscut teeth are filed with a 14̊ rake and 20-22̊ degrees of fleam, and set about 0.004″ each side. It costs $189.95.

Note that the blade is “canted,” meaning that the depth decreases toward the toe. A feature often found on old saws, it is lacking in most new backsaws. I strongly favor this design. The workpiece being sawn with a backsaw is typically at workbench height. There your natural forward push stroke is augmented by the tooth line sinking deeper as the momentum of the stroke builds. This slicing attack gives controlled power to the cut.

Look at nearly all Japanese saws. They too are canted, but, of course, in the opposite direction since they cut on the pull stroke. The tooth line is not parallel to the handle.

Sharing some of the duties of the Western carcase saw is the Gyokucho “05” kataba (single-edge) 255 mm (10″) crosscut saw. This has a 0.020″ (0.5 mm) saw plate, 0.030″ kerf, and 20 tpi. It is available from Japan Woodworker for $36, item #19.105.0, with replacement blades for $20, and from Hida Tool for $28.40, item #D-GC-#105, with replacement blades for $19.50. This very clean-cutting saw tracks a line extremely well, but, unlike a Western backsaw I don’t get the same feel for vertical with the light, backless kataba. Because this saw is backless, it can make deeper cuts than the Western backsaw, but is not suited for shoulder cutting, a job handled by the stiffer crosscut dozuki or Western carcase saw.
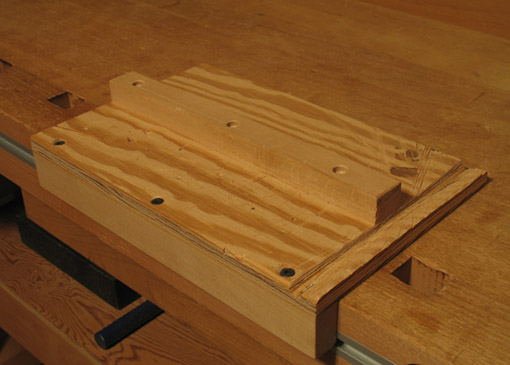
These saws are often used with a bench hook and, as you might guess, my workaday version, seen above, (which really looks like it’s due for an upgraded replacement) accommodates both push and pull saws by having its fence in the middle. When cutting small work with a pull saw, I place the wood on the far side of the fence, and the bench hook itself is stabilized by leaning my weight on the heel of my left hand against the fence. Alternatively, for larger work, the bench hook is simply clamped in the front vise. The push of a Western saw automatically stabilizes the bench hook against the edge of the bench as my hand pushes the work against the near side of the fence.

Once again, we have more than one good way of getting a job done.

Next: handsaws for stock breakdown.

Category: Tools and Shop  | Tags:  | Comments off
Author:
• Friday, August 13th, 2010

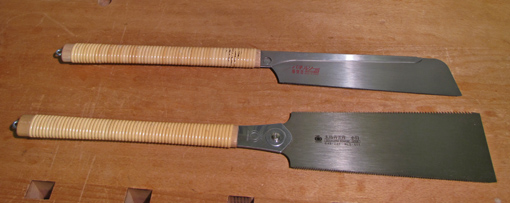
I cut tenons with a Japanese ryoba saw, the larger of the two saws pictured above. The reasons are simple: I get excellent results and have been using ryobas for more than 25 years.

I have tried several excellent Western tenon saws from top makers and I must admit that I have not found the comfortable accuracy and reliably clean cut surfaces that I get from the ryoba. I concede this probably is a matter of habit and I would eventually become as comfortable with the right Western tenon saw as I am with my ryoba. So, rather than saying one type of saw is better than the other, I am sharing my preferences, and the reasons for them, in the hope that this may help other woodworkers find what works for them.

My saw is a Gyokucho model #611, 240 mm (9 ½”), available from Japan Woodworker, item # 19.611.0, $38. Replacement blades are $24.50. This saw has a 0.018″ saw plate, rip teeth that grade from 10 tpi at the handle end to 7 tpi at the far end, and 20 tpi crosscut teeth, both set 0.005″ each side.

I start cutting a tenon using the crosscut teeth to split the layout lines at the corners, establishing shallow kerfs. Switching to the rip teeth, I connect those starter kerfs across the end of the tenon. Once the rip teeth are buried, I cut on a diagonal on the layout line down the length of the tenon on one side, then the other. Finally, I saw away the remaining triangle of wood at the base of the tenon.

The backless ryoba, with a generous width of almost 4″ at its far end, gives excellent sight lines. The sawing is done with a surprisingly light touch since the progressively coarser rip teeth provide plenty of aggressiveness on their own. This allows me to watch the layout line when sawing diagonally down one side of the tenon while feeling the saw riding in the kerf that was established at the top of the tenon. The key point is that I don’t want to fight the kerf that was already established. The lightness of the ryoba and, paradoxically, its flexibility and aggressive teeth, convey excellent sensitivity to do this. (The eyes cannot precisely sight two separate lines at the very same moment.)

The low cost and replaceable blades belie the excellent performance of this saw. I suppose a handmade ryoba costing a few hundred dollars (that I would not have the skill to sharpen on my own) would be subtly better but I don’t feel compelled to go there, at least now. The quality control and value in Japanese machine-made saws such as the Gyokucho and Z brands are amazing.

The ryoba also does general small to medium scale ripping and crosscutting, such as cutting a haunch in a tenon. In my opinion, Japanese backsaws are the wrong tool for cutting furniture size tenon cheeks. However, a tiny tenon, such as in a small drawer handle, can be cut with a Japanese or Western dovetail backsaw. For very large tenons in low to medium density woods, a large Japanese single-edge (kataba) ripsaw is a good option. I will discuss such a saw later in this series.

The other saw in the picture is a crosscut dozuki saw which I like for cutting the tenon shoulders. It is a Z brand saw, 240 mm (9 ½”), 25 tpi, 0.012″ saw plate, 0.016″ kerf, available from Rockler, item #65607, for $44.99, replacement blades $27.49. (Why do they insist on calling it a “dovetail saw?” It is not.) It is thin, straight, and sharp enough to settle against a knifed and deepened shoulder line. A Western “carcase saw,” discussed in the next post, is another good option for this task.

Next: small to medium crosscut work and the carcase saw

Author:
• Wednesday, August 11th, 2010

A reasonable, basic set of saws for furniture making consists of joinery saws for dovetails and tenons, small to medium crosscut saws for general work and shoulders, and big handsaws for crosscutting and ripping boards. There are many other good approaches to the basic saw kit that are used effectively by excellent craftsmen. There is no single “right” way! For example, the late, great teacher Tage Frid used his Danish rip-sharpened bowsaw for everything from dovetails and tenons to ripping and crosscutting boards.

My saw kit has evolved over many years and this will doubtless continue. I think, however, that I am now comfortable enough with my arsenal that I would like to share my approach with readers. It includes both Western and Japanese saws, with some redundancy, because I like both styles. It does not bother me a bit to go back and forth between the two. While I would not advocate that all woodworkers take my one-world, kumbaya approach, I vehemently disagree with those who contend that East or West is definitively better. They are simply two highly evolved, effective methods of sawing wood and you can make wonderful furniture with either if you get good quality tools matched to their function.

The discussion will not include the many other saws, some essential, some specialty, such as flush cut, keyhole, coping, turning (bow), fret, chain, hack, and veneer saws. No seesaws either.

Let’s start with dovetail saws:

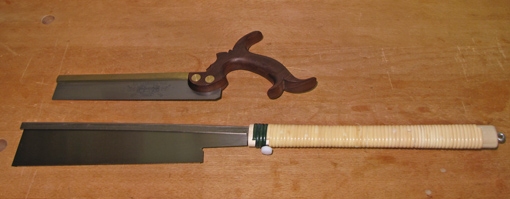
1. Gramercy dovetail saw. Gee, I love this tool. 9″ canted blade, 0.018″ saw plate, 19 ppi beautifully sharpened and hammer-set rip teeth, zero rake, 0.003″ set each side. $149.95 from Tools for Working Wood. This is a light, smallish saw that starts easily and cuts smoothly. It is perfect for drawer making but also can do larger casework dovetailing. For current (or former) Japanese saw users, it is a natural transition. In fact . . .

2. Hishiki rip dovetail saw. 9 ½” blade, 0.012″ saw plate, 19 tpi true rip teeth, set about 0.002″ each side. $42 from Japan Woodworker, item #07.116.240. Replacement blade $28. I feel this is an Eastern cousin with the convenience of an inexpensive replaceable blade. Please don’t use a crosscut or hybrid (ibara-me or nezumi-ba) tooth dozuki for cutting dovetails, which involves essentially rip cuts. They tend to wander in the rip cut, and are so slow that you cannot tell if you are tracking the line with each stroke. Wrong tool for the purpose. I have tried more expensive Japanese dovetail saws, though not those in the several hundred dollar range, but I now prefer this low priced Hishiki.

Yes, these two saws are mostly redundant. They both start well, track well and are reasonably fast. Frankly, the difference for me mostly comes down to a different feel and vision in following the line. The Gramercy pushes sawdust away from me and is a bit more responsive in tracking the line, while the Hishiki is more fastidious in requiring accurate starting strokes. The pull-cut can drag enough sawdust to partially obscure the line unless I exhale strongly – ahh, the Zen of it all. Contrary to what is often stated, the thinner kerf does not increase accuracy. A clean-sided kerf increases accuracy and both of these saws produce that. Really, some days I just feel better with the Japanese saw but if I could have only one, well, it’s the Gramercy.

But it’s my shop and I get to have both. So take your pick(s) – they both work – and go make something.

Next: tenon saws.

Author:
• Tuesday, July 20th, 2010

If you’ve read the two previous posts on this topic, you might think that I’ve thus settled contentedly into scraping plane heaven. Not quite, there is one more thing.

The scraping plane is generally thought of as a finishing tool, analogous to a smoothing plane, suited for difficult, figured, dense woods that are prone to dreaded tearout. However, there are times when I use the scraping plane one step prior to finishing the surface. I will explain.

Like most woodworkers, I dimension almost all my wood by machine. With figured woods, shallow tearout often remains despite using good technique and well-tuned machinery. One method to get rid of this shallow tearout would be to first use the jack plane cross grain, possibly initially with a toothed blade, then go to the scraping plane.

Now I’ve got another option that is on a finer scale. I have prepared one of my Hock scraping plane blades with what I will call “microtoothing.” This toothed blade is not quite like those that are commercially available and often used to prepare a substrate for hammer veneering. I abrade, lengthwise, the unbeveled side of a 0.094″ thick Hock blade using a coarse file and very coarse abrasive paper, then make very shallow cuts with a fine saw file, about 20 or more per inch. I then file and medium hone the 45̊ bevel and burnish as usual at 15̊.

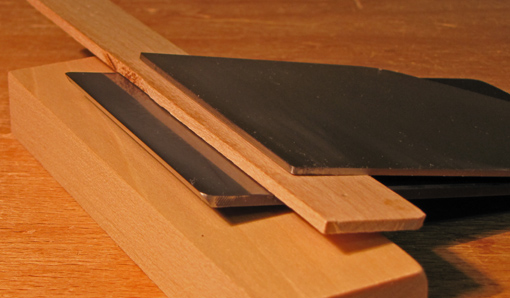
The photo below shows the microtoothed blade below a conventionally prepared blade.

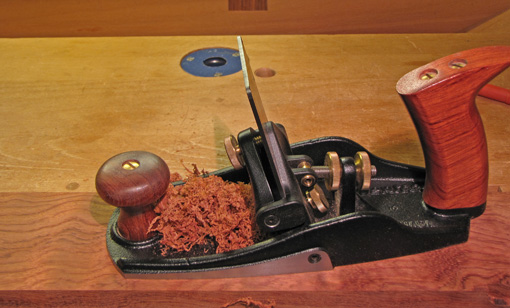
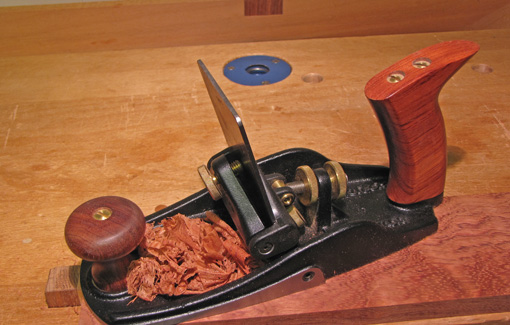
The result is not a dull scraper. It is sharp, but has “microteeth.” It does not produce dust, as would a dull scraper blade, but rather shavings that resemble ultra thin cheese shreddings. (See photo at top.) The fine or coarse serrations split the shavings at every depth of cut. The huge advantage is the extremely smooth cutting action. There’s never a hang-up, slice, or chatter. The plane can be worked back and forth on the wood with abandon. The very shallow ridges that remain on the wood are quickly dispensed with by a conventionally prepared blade in the scraping plane.

This has been a very effective way to reliably remove shallow tearout with the scraping plane in the worst of woods. I use it when the jack plane procedure would be too much, but going to a clean, conventionally sharpened scraping plane blade would take too many fastidious passes. It has even allowed me to do away with thoughts of purchasing a drum sander.

Author:
• Sunday, July 18th, 2010

Now for the blades. Veritas offers three choices: a 0.055″ thick blade that is meant to be bowed, a 0.125″ (1/8″) that is not bowed because of its thickness, and a 0.125″ (1/8″) thick toothed blade. I find that the 0.055″ blade, when sharpened with a 45̊ bevel and burnished at 15̊, as recommended, is too thin to fully avoid chatter on tough woods, even with a skewed stroke. I sharpen this blade at 90̊ and burnish at about 7-8̊, just like a card scraper. This avoids chatter and works well, but I would like the cutting action to be more aggressive. As for the 0.125″ blade, I feel it has the disadvantages of a thick, unbowed scraper blade: the tendencies to catch, dig in, and slice out of control.

Here is what I now like best in the Veritas plane: Ron Hock’s 0.094″ (3/32″) blade. I think it’s just right! It can bend in the Veritas plane just enough to take a slight bow and is thick enough to eliminate chatter. Preparing the blade with a clean edge, 45̊ bevel, 15̊ (off horizontal) burnishing, setting the angle as described in the previous post, and adjusting for a light cut, produces a nice cutting action and a beautiful surface on wildly figured, dense woods – just the kind of wood that you need this tool for.

The photo below shows the Veritas 0.055″ blade on top and the Hock 0.094″ blade underneath.

I prefer to sharpen the blades with a straight, not cambered, edge because when the plane bows the blade, a sufficiently cambered blade projection is automatically produced. I’ve tried sharpening with a cambered edge and have found that it is more difficult to file and stone the edge. Furthermore, it is more difficult to initially set a cambered-edged blade into the plane with a centered, symmetrical projection because it can rock against the bench surface. A straight-edge blade produces no doubt.

In summary, I love the Veritas large scraping plane with a Hock blade. Hopefully, I will be able to upgrade the rear handle soon, though for some reason the Veritas tote doesn’t bother me as much on the scraping plane as it does on their bevel-up bench planes.

In the next post, I will describe an unconventional preparation for a second Hock blade in the arsenal which further expands the usefulness of this plane.

Author:
• Saturday, July 17th, 2010

Here are my preferences in a scraping plane, followed by the styles that are thus disqualified in parentheses:

  • a sole long enough relative to its width to register on the work and not “fall off” at the end of a stroke (not: Stanley #80 and other spokeshave-like styles)
  • an adjustable frog angle (not: #’s 80, 85, Veritas small scraping plane)
  • a mechanism to camber (bow) the blade (not: #’s 80, 85, 12, 112, 212, Veritas small)
  • a mechanism to easily and precisely fine tune the depth of cut (not: #’s 80, 85, Veritas small)

I know of only one manufactured tool that meets all these criteria: the Veritas large scraping plane. All of this is a matter of personal preference, and there are many other high quality scraping planes available, most notably from Lie-Nielsen, that you may like better. I will explain why I like the Veritas, a patented, unique tool.

The deal-sealer for me is that the blade can be bowed. This is done by simply applying pressure with a thumbscrew which meets the lower back of the blade. This does more than just avoid the corners of the blade from digging in. That effect, after all, could be accomplished on a non-bowed blade just by cambering the cutting edge (and/or rounding the corners) in the sharpening process, just as one might do with a plane blade. More important, this bowing pre-tensions the cutting edge, just as you do with your fingers when using a card scraper. This greatly helps reduce blade chatter.

The frog angle adjustment mechanism can be set just right considering the angle at which you burnished the blade, the wood, the desired aggressiveness of the cut, and the state of wear of the blade’s hook. I sharpen the blade bevel at about the standard 45̊, and take the final burnishing passes at about 15̊ off horizontal. I set the frog at the same angle that the blade lightly bites into the wood when held by hand. This is usually somewhere around 10-12̊ forward of vertical for a fresh hook.

Just as important, this mechanism acts as a very precise depth of cut adjuster. Because the pivot point of the frog is slightly behind (closer to the tote than) the point where the blade meets the wood, slightly tilting the frog further forward from vertical will deepen the blade projection (depth of cut).

The procedure to do this precisely is somewhat counterintuitive. To tilt the frog less (shallower cut), spin the front nut away from the thread housing to create clearance, put light forward pressure against the frog, and “tighten” the rear nut against the housing. Retighten the front nut. To tilt the frog more (deeper cut), spin the rear nut away from the housing, put light rearward pressure against the frog, and turn the front nut against the housing. Retighten the rear nut. This method allows you to see and feel the frog moving slowly and precisely.

Next, I will discuss blade options.

Author:
• Saturday, July 10th, 2010

I like my Veritas low-angle, bevel-up smoothing and jack planes, but I do not like their rear handles (totes). The handle has broad flat sides, and is more vertical and less curvy than a classic Stanley or Lie-Nielsen.  

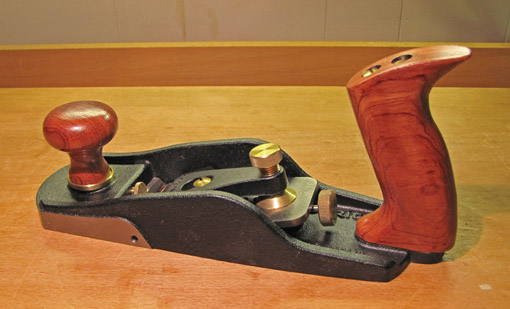
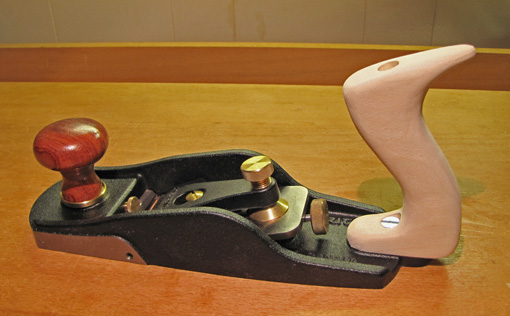
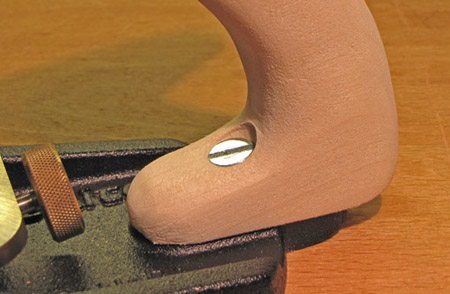
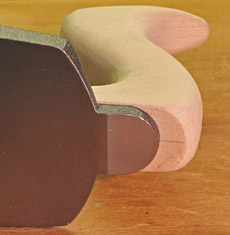
While some woodworkers may like the design, I find it to be unfriendly to my hand. Here is my prototype (in poplar wood) of an alternative. The shape is based on the classic handles. It feels right to me.

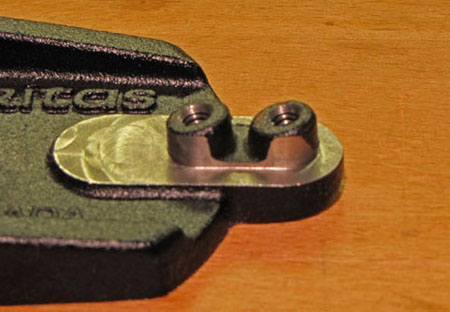
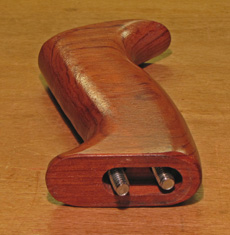
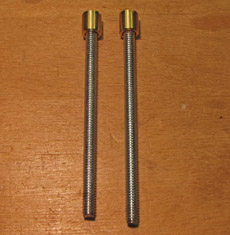
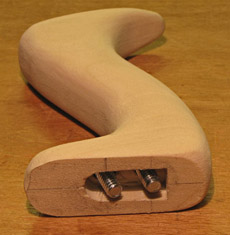
Adapting this shape to the Veritas handle mount takes some engineering. The Veritas handle is secured with two bolts that enter the base at an angle. The company supplies a full-scale measured drawing of its handle that also helps to design your own version. However, the two-bolt system prevents what I consider a nicely shaped handle because the curve intersects one or both of the bolt pathways.


My solution involves using a short front bolt to replace the stock bolt. The counterbored stock rear bolt runs through the full length of the handle while the countersunk replacement front bolt goes through just the front projection of wood to enter its hole on the mount. This allows the wood above it to be cut away to create a hand-friendly curve in a classic style. The back of the new handle projects beyond the mount.


For a permanent handle, bubinga would be the best choice because of its strength. It is also a beautiful wood and will match the Veritas front knob.

I mentioned my dislike of the Veritas bench plane totes in a previous post. Since then I learned from Chris Schwarz’ blog that Bill Rittner is making superb quality replacement handles for old Stanley planes. I asked Bill if he was making an alternative for the Veritas handles. He is not yet but is interested. I hope he will because, while I enjoyed developing a solution to the Veritas tote “problem,” it was painstaking to make even the prototype in easy-going poplar, inelegantly sanded to 120 grit. I’d rather make furniture. Pending further testing and refinement, I think that many otherwise happy Veritas bench plane users would appreciate this kind of tote professionally made.

A helpful article, “Totes and Knobs for Handplanes,” by Charles Murray, in the November 2009 Popular Woodworking describes the use of a shop-made jig to make a plane tote. The resulting tote has flat sides with roundovers made on the router table. However, it would take considerable additional hand work, starting with a thicker blank, to produce the nice elliptical cross section seen in Bill’s totes. 

I will have more detail on the design and construction in a future post, and possibly an update from Bill. I also have to do more shop testing of the prototype.

Category: Tools and Shop  | 8 Comments
Author:
• Tuesday, July 06th, 2010

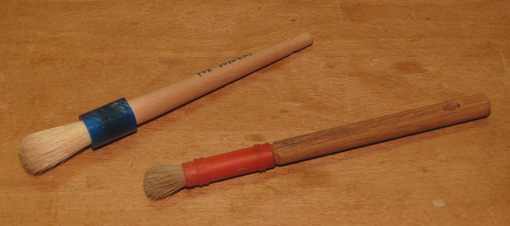
Here’s a little tip that you may find helpful. I use these little brushes constantly in the shop.

The lower one in the picture, with the red collar, is labeled “oily.” I use it often to clear plane and spokeshave throats of dust and jammed shavings, especially when I need a clear look to adjust the projection of a blade. The bristles have been shortened to give them helpful stiffness. This brush gets all sorts of other duties clearing dust and chips in small tool places and spaces, including where there may be some oil hanging around. This might include bandsaw bearings, screw heads in machinery, plane and blade parts, and so forth.

When cutting joinery, I do not want to use that brush for clearing chips and dust that didn’t get blown away from tiny spaces. So, I use the other brush in the photo, labeled “for joinery.” It stays away from any oil.

I doubt this simple work habit would be found in woodworking books and articles. It’s the kind of thing that I imagine an apprentice might pick up from his teacher without it ever being mentioned. That’s one place where blogs are handy, to share this kind of tip.

Category: Tools and Shop  | 3 Comments