Author:
• Tuesday, October 19th, 2010

Gimlets can be handy tools especially when you need to bore a small hole and the usual drilling tools cannot fit in a tight space. I usually find myself using them if I’m in a jam, meaning that I need to drill a hole that I should have made at an earlier stage in construction. I find gimlets useful in small diameters, from 5/64″ to 5/32″, and mostly use them to pre-bore for screws.

The problem is that gimlets do not work very well – they tend to split the wood. I am referring to the commonly available gimlet with a screw point followed by drill flutes further up the shaft. Lee Valley, Highland Hardware, Garrett Wade, and others sell what appears to be the same set of seven for about $14-$15.

For the record and to distinguish, there are other, fussier-looking, more expensive types of gimlets that more resemble a tapered drill bit, some meant to be used in a brace, that are less widely available and not dealt with here. There is also a Japanese gimlet, the kiri, that resembles a miniature sharply angled spade bit on a tapered dowel handle that is rotated between the palms to bore a hole. Still another tool altogether is the very useful brad awl or bird cage awl.

The design of the common gimlet, pictured above, causes the screw threads to feed aggressively into the wood and squeeze past the wood fibers while doing little, if any, actual severing of the fibers. It’s not really much improvement over just pounding a round nail into the wood.

However, consider the design of auger point screws, shown below, such as the type used for pocket-screwed joints. These break some wood fibers as they are driven and so reduce splitting. They do not, however, appreciably clear chips from the hole because the screw threads are not designed to do that. What if the gimlet screw point was altered to mimic an auger screw point so it could cut fibers, and pass the chips onto the drill flutes so they could be cleared?

I made this alteration to the points on my set of gimlets. I found that the edge of a Japanese feather saw file (hatsuke-yasuri) did the job quickly and well, even on the 5/64″ gimlet, and better than a diamond paddle or a triangular Western saw file. I cut two slots on each gimlet, 180̊ apart.

The 75 mm “full cut” Japanese file that I used:

Does it work? Yes, fairly well and certainly a big improvement over the unaltered gimlets! The modified screw point cuts some fibers, makes boring easier, and produces some chips, although the chips don’t get cleared very well by the drill flutes. To compensate, I simply periodically pull out the gimlet to clear chips. Splitting is virtually eliminated. 

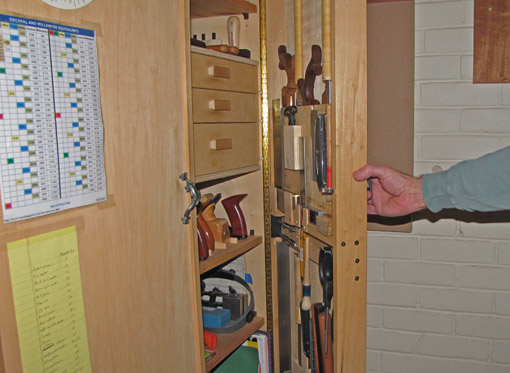
This simple modification turns a frustrating tool into a life-saver in a bind. In fact, I’ve gone from almost having given up on these tools to valuing them enough to make a nice little holder for them which attaches to the inside of a door of my hand tool cabinet.

Addendum: (10/21/10)

By “fairly well” I mean that gimlets still have their drawbacks. They are, after all, very simple tools that are substitutes for more mechanically sophisticated tools that are preferable – like a drill. So, in the context of a gimlet, I think I can say that this modification makes them work, here goes, “well!”

It helps to use the Japanese file to create a clean slot with an approximately 90° attacking edge, as pictured. This edge meets the wood aggressively and breaks the fibers. A sloppy “V” groove would have, in effect, a relaxed “rake” angle to meet the wood and thus be less effective.

Category: Tools and Shop  | 15 Comments
Author:
• Tuesday, October 12th, 2010

Following up on the problem posed in the previous post, here is how I managed this board. Most important, I proceeded step by step, watching the wood. The procedure below may seem complicated, but it really is simply a matter of understanding wood and using good sense.

Before doing anything else, it pays to perform the casehardening test. This will require cutting an inch of length off the end of the board and sawing out the core of the offcut to create a long “U” shape. Please refer to the method described in an earlier post. This board, like most thick stock, had some casehardening stress in it.

Starting with rough stock nearly 1 ½” thick and about 9″ wide, the final thickness at the center of the 25″ length will be just under 11/16″ and, at the outer ends, just under 1 3/16″, for a curve depth of ½”.

The diagram is only roughly to scale. It really is intended to give a qualitative sense of how the board was managed. The numbers in the diagram refer to the steps discussed below.

1. I investigated the board by skimming the faces on the jointer just enough to decide if the board will look nice and to choose the show face which will be the curved face on the outside of the cabinet.

2. The opposite (inside) face was hit-or-miss jointed enough to establish flatness. This leaves some rough areas remaining, but enough of the face is smooth and flat to serve as a reference for marking out the curve. At this point, there is less than 1 3/8″ of thickness remaining. I also did a light pass through the thickness planer (with the flat side down, of course) to get a better look at the show side and to estimate how much thickness would be surviving.

3. I sawed the curve with the bandsaw. The layout line was drawn almost up to the surface of the board at the ends. (I had left an inch or so of extra length at each end.) I sawed away from the line, guided by a second line drawn less than 1/16″ away from the original line. This allows for clean up later.

Because substantial thickness was now removed from one side of the board, it promptly distorted so the flat side wasn’t flat anymore.

4. I then removed wood from the inside face which neutralized some of the distortion and re-established the flatness of this face. I did this mostly by hand planing which gave me a chance to keep an eye on things as I went along.

I then cleaned up and refined the curved face, rechecking the flat face as I went along and making minor corrections as needed. At this stage only small quantities of wood were being removed so only minimal correction was required.

The board now sits on stickers as it awaits its role in the construction of the cabinet.

Despite all of this forethought and care, it still helps to have some luck with wood, but it’s not so wicked after all.

Category: Wood  | 2 Comments
Author:
• Sunday, September 26th, 2010

It’s really not fair that I say that about wood. After all, I am forever cognizant of one of the first few sentences of Bruce Hoadley’s Understanding Wood : “Wood evolved as a functional tissue of plants and not as a material designed to satisfy the needs of woodworkers.” We cannot cut down the tree, cook the wood, and expect it to do just what we want.

Understanding is indeed the key to a successful relationship with wood as we work with what it is, rather than what we might wish it to be. One of the prime reasons a project can fall short of expectations is the failure to anticipate insidious changes in the wood.

For the top board of a cherry wall cabinet, I wanted a lengthwise curve in its thickness to produce an appealing motif borrowed from the Japanese torii gate. Starting with rough stock nearly 1 ½” thick and about 9″ wide, the final thickness at the center of the 25″ length will be just under 11/16″ and, at the outer ends, just under 1 3/16″, for a curve depth of ½”.

A simple approach would be to joint and thickness the rough board to a bit more than 1 3/16″, then cut and smooth the curve on one face. Done, right? Wrong. Removing a substantial thickness from one side of a kiln-dried board is almost sure to distort it, transforming the opposite flat face that was previously true into a potato chip that will wreak havoc with subsequent attempts at joinery.

We know from resawing wood that most boards retain some internal stress from casehardening. This usually causes the halves of a resawn board to cup toward the inner face. This is not always the case but there is a test for it. This is not a problem of moisture exchange. (Though that could also be present as another issue.) The stresses present in the dried wood cause it to occur even in a board with uniform moisture content through its full thickness. The distortion happens immediately after the board is resawn.

The photos below show the offcut within minutes after sawing. The outside face was flat before sawing. With that face placed on the table saw top, it can be seen that the piece has curved toward the inner (sawn) face in both along its length and across its width.

I’ve left out some steps which I will show in the next post. With this board, I did not have much extra thickness to work with after getting past the rough sawn surfaces, so I needed to anticipate what the wood had in store and have a good plan going in. I will detail the solution in the next post, though I think most readers will be one step ahead of it.

Category: Wood  | 2 Comments
Author:
• Saturday, September 11th, 2010

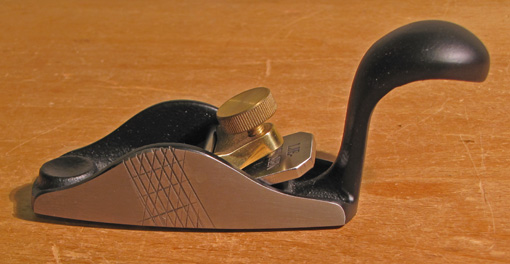
Before using this unimposing little plane I was doubtful that it could get much work done but having put it to work in the shop I am convinced that it really performs. It brings an effective combination of toughness and control to curved work and hollowing.

The plane has a bevel-up A2 blade bedded at 20̊ and a 3 1/2″ long double convex sole with a shallow 27″ radius along its length and a steeper 3″ radius across its width. The blade is secured with a simple cap and thumbscrew mechanism and is adjusted by hand or by tapping with a small hammer. Nothing complicated with this tool, it goes right to work.

The “squirrel tail” handle is the key to controlling the plane. The dome of the tail nestles in the lower part of the palm of the hand while the fingers surround the plane’s body with the index finger settling on the round depression at the front of the tool. This allows one to adjust and balance hand pressure toward the front or back of the tool as needed in order to engage the blade to cut on a curved surface. I find this makes it easier and more natural to control than other convex sole tools such as a spokeshave.

The mouth opening is quite wide which, along with the curved blade, and lightweight handiness of the plane, allow quick back and forth strokes, much like the action of a scrub or jack plane. I find this tool is best used as a sort of mini jack plane for hollowing. The photo below shows an example.

I bandsawed a shallow lengthwise curve into a 27″ long piece of plump 5/4 9″ wide cherry which will be used as the top of a wall cabinet. I used the convex sole plane to efficiently remove the bandsaw marks and refine the curve. The plane felt like an extension of my hand allowing me to work intuitively as I formed the curve to my liking. The shallow scallops that remained were easily removed first with a curved Surform rasp followed by an Auriou curved “ironing rasp,” hand scraper, and sandpaper.

[I will mention that removing a substantial portion of wood from one side of a board like this is likely to create problems as the internal stresses in the board become unbalanced. I plan to discuss in a future post how I anticipated and worked around this sneaky problem.]

While I’m very happy with the L-N convex sole plane and recommend it, I would consider some design changes if I could have my preferences. It is a bit undersized for medium scale work, although an increase in size might sacrifice some of its handiness. A slightly larger radius across the width of the sole would suit more of my work. Perhaps a choice of sizes and soles could be made. Finally, knurling or a coarse surface on the widest parts of the sides would allow a better finger tip grip. I guess I can add that myself.

This tool review is unsolicited and uncompensated.

Author:
• Thursday, September 09th, 2010


Thank you, Heartwood blog readers


I started this blog two years ago believing that woodworkers have a lot to gain from sharing information and ideas in this format. That belief has been reinforced, the readership has grown far beyond anything I anticipated, and there has been much gracious and encouraging feedback. This is not a farewell, just a juncture at which to say, “Thank you,” dear readers.

Of course, you have a wealth of choices in the internet woodworking world, so I am very appreciative of the time you spend here in this little corner of it. I hope the Heartwood blog has advanced your woodworking and spurred your enjoyment of it.

I will continue to present thoughtful, useful content. The topics arise from the sawdust and shavings of my shop, devoid of hype and armchair pretenses. The writing will continue to be largely technical though often laced with reflections and sentiments that accompany my woodworking.

If you are even slightly inclined, do leave comments on the posts, please. Other readers and I would like to hear from you. I must continue to hold all comments for approval because even though the Akismet program filters out many thousands of spam comments, some do find their way through.

So far I’ve posted about 45,000 words and 200 photographs, enough to fill a nonfiction book. This is a labor of love and I can only say that I hope to continue to be able to devote the time.

For now, thanks for reading and happy woodworking!

Rob

Category: Ideas  | 14 Comments
Author:
• Sunday, August 29th, 2010

Here are three finishing tools that are very useful for controlling surface sheen and removing surface imperfections. I am discussing them here because among woodworkers these are probably generally less known than most finishing products and each has earned a solid place in my lineup.

Fibral Abrasive Wool can be used in place of steel or bronze wool. My sense is that the “Fine” wool, listed as 800 grit, is about equivalent to 4/0 metal wool. However, Fibral is a fundamentally different product than metal wool in that the abrasive grit which is bonded to the fibers, rather than the fibers themselves, does the actual cutting. While in this sense it is like Scotch Brite, it has the advantage of metal wool in that a wad of it can be formed into any size and shape.

Fibral is much more pleasant to use than steel and bronze wools and has almost completely supplanted them in my shop. I use it for everything where I formerly used metal wool, such as for controlling the final sheen of finished surfaces, especially irregular shapes, and for removing small imperfections. It can also be used like metal wool for smoothing dust nibs between coats of finish. For accessible flat surfaces, however, a light touch with fine sandpaper is still better and faster for that job, particularly since, as Bob Flexner teaches us, steel wool and grit-fiber products round over dust nibs rather than cut them off. Fibral, also available in medium and coarse grades, is not widely sold but can found at Beall Tool Company.

Mirlon Total is a wonderful product that combines surprisingly aggressive cutting action with great control and comes in ultrafine grits. It is densely grit-coated fiber available in 360, 1500, and 2500 grit pads and rolls. The two finest grits have become indispensable in my shop. For certain film finishes, especially water base poly/acrylic, I rub out the final dried coat with a 2500 pad (sometimes 1500) to produce an even, delicate satin sheen and remove all imperfections. A light buffing with wax completes the look. To work flat surfaces, I usually wrap the pad around a felt block. The pads are very flexible to easily get into confined areas and can even be crumpled to work almost like steel wool or Fibral but in finer grits. Mirlon Total is available in packages of three pads from Woodcraft, but a Google search will turn up at least several sources selling in quantities of 25 for less than half the unit price. 

By the way, for the rare times when I need to cut back and level a fairly heavy film finish, such as on a table top, these are not the products of choice. Sandpaper is best for that job.

The third “product” that bears mention along with Fibral and Mirlon Total is Bob Flexner’s tip to use the slightly abrasive property of brown paper. Just tear off a piece from an ordinary supermarket brown paper bag and use it for ultrafine final rubbing out of finished wood. If you’ve spent hours handling brown cardboard boxes, the effect on your hands must have convinced you of the abrasive action of heavy brown paper.

The project ain’t over ‘till it’s finished.

These reviews are unsolicited and uncompensated.

Category: Tools and Shop  | Comments off
Author:
• Friday, August 20th, 2010

My long journey around the world of saws has come full circle.

In my youth, I enjoyed basic woodworking with low quality, dull handsaws thinking power tools must be better. I wondered if any serious work was done with hand tools, and, at 15 years of age, bought a jigsaw from Sears. Later, while learning more skills, especially joinery, I was experimenting and struggling with poor quality Western saws, especially backsaws, and inexpensive Japanese saws.

I recognized that the Japanese woodworking culture, unlike most of the West’s, had retained without interruption its support of the production of high quality woodworking hand tools by small-scale makers. My choices in the 1980s consisted mostly of Japanese saws which I had learned to use well and which intrigued me, vintage Western saws which I did not feel ready to research and rehabilitate, some European middling quality saws, and Tage Frid’s good old Danish bow saw.

Look at what is available today. We are so fortunate! There are Wenzloff, Lie-Nielsen, Gramercy, Bad Axe, Adria, Eccentric, Medallion, and others making saws that are surely at least the equals of historical Western saws. Furthermore, there are now many sources for wonderful quality handmade Japanese tools while technology has given us remarkable quality machine-made Japanese saws.

Ironically, it was the recent addition of a good old American Disston that was the last step to reach a feeling of ease with my eclectic bunch of saws.

My aim in these posts has been to tell you why I use what I do in the hope that this can help you find your own way around the world of saws. I will certainly continue to explore, and I hope your saw explorations are enjoyable and productive.

Happy sawing.

Author:
• Tuesday, August 17th, 2010

For breaking down rough stock into the approximately dimensioned components of a project, I usually go to the bandsaw. Big boards usually need to be first crosscut into manageable pieces. For that job, I use the Pony crosscut saw that I praised in an earlier post and is pictured below. It’s not pretty but it sure gets the work done. Specs: 22″ 0.040″blade, 8 tpi Japanese-style hardened crosscut teeth that cut primarily on the push stroke, set 0.004″ each side. Best of all: $15.99, from Woodcraft, item #149039.

Despite my affection for the bandsaw, sometimes I prefer to rip with a handsaw. Maybe I don’t feel like setting up the bandsaw for a few short cuts, just prefer the relative quiet, or even prefer the relatively slower cutting to give me a chance to think.

I had been using my Japanese rip saw (top photo) for this but was never really happy with its performance in this job. The main drawback was that I could not put my weight into the cutting stroke. This saw does, however, shine for certain other cuts, especially small resawing and, as I mentioned in an earlier post, for cutting some large tenons. It can produce surprisingly clean surfaces for these type of cuts. It is also a handy saw for shorter ripping at the workbench. For these reasons, it certainly earns its place in the shop. Specs: Z brand 300 mm (11 3/4″), 0.027″ saw plate, 0.036″ kerf, rip teeth grading from 8 tpi at the handle end to 4 tpi at the far end. It is available from Hida Tool. Their item #D-ZS-#300 is the crosscut version for $38.90 but the rip replacement blade is item #D-ZS-S300R ($21.30) which perhaps you can ask them to install instead of the crosscut blade.

Now for big ripping, I wanted a full 26″ Western handsaw which I could put my weight into with the classic position of my left knee on the board. After some hunting around I bought a Disston D-7 (top photo) in great functional condition from Jim Bode. This is a straight back workhorse saw marked 5 ½ ppi (it measures more like 4 ½ ppi), vintage 1940-47. The saw plate is about 0.037″ near the slightly breasted tooth line and is, of course, taper ground as you go away from the teeth and toward the toe.

And it rips big time – just what I was looking for.

Next: the final installment in the series – reflections on a long saw journey