Author:
• Sunday, January 15th, 2012

When I built this tool cabinet 25 years ago, I did not expect it to last this long. You know how it is: “I’ll just build something plain and practical now and make something nicer sometime later.” It was a time of stress and joy with a new family in a new house, and, of course, a new shop. My previous systems of tool storage using chests, shelves, cabinets, and even a closet, needed an upgrade and I wanted to make it quickly.

Well, “sometime later” has come and gone, and this old dog is still doing its job well. It is not perfect (what is?) but I feel no need to build a new one. In this series of posts (not necessarily contiguous), I will discuss the construction and features of the cabinet and why it works for me. Though a few readers may want to make one just like it, more likely this discussion will be a source for ideas to incorporate into your own designs for tool storage. I used ideas, many from sources I’ve long forgotten, plus some of my own, for this cabinet, for which I make no pretense of originality.

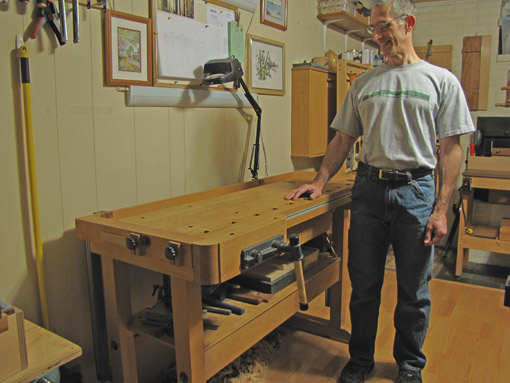
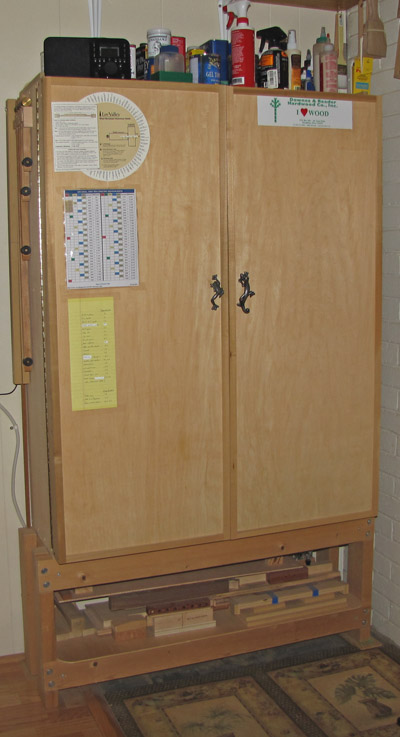
The overall design – a cabinet with two large, deep doors, standing on a low frame – allows a wide-open presentation of my hand tools. When I open those doors, it’s time to work. The great majority of tools can be reached directly, with little or no bending, and without shifting other tools out of the way. Being right-handed, I placed the cabinet immediately to the right of the workbench, giving me quick physical and mental access to the tools. In a small footprint of about 4 feet by 14 inches, a remarkable quantity of tools is stored.

There are many good ways to store hand tools. Everyone is entitled to his preference, but personally, I do not care for dandified tool wall cabinets or dovetailed chests that sit on the floor.

Here we go. The overall dimensions are 48″ high by 37″ wide by 14″ deep. The inside of the cabinet case has a depth of 11 1/4″. It contains three adjustable shelves and an 11″ high drawer bank with six drawers. Four drawers have inside depths of 2 ½”, and two have 3 ½”. The doors have an inside usable depth of 2″. The stand elevates the cabinet 16 ½” off the ground. The back panel extends 2 1/4″ above the surface of the top which has 7/8″ high guard rails on each side. If I was to do it over, I’d probably make the case an inch or two deeper, but this one is doing just fine.
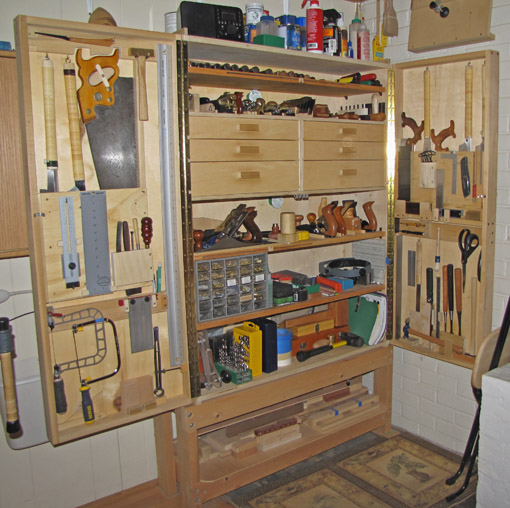
The case is decent quality 3/4″ poplar 7-ply, butt-jointed, glued, and screwed. The rabbeted 1/4″ plywood back and the three-piece drawer bank frame make the case plenty resistant to racking, though it would be better to rabbet the case corners.

The doors are 1×3 poplar assembled with simple glued and screwed butt joints. Each door is nonetheless very sturdy because the 1/4″ plywood panel is glued in grooves all around, and there are several frame structures on the interior. The doors are joined to the case with piano hinges.

The stand is constructed of notched and screwed 2x4s and contains a shelf for storing jigs and templates. The cabinet is actually standing on the bottom edges of its sides which extend ½” below the bottom. The stiles of the stand extend 1/4″ above the rails to help position the cabinet.
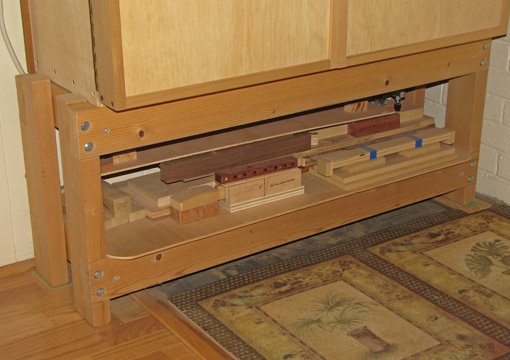
Next: we’ll look at space management, starting with the outside surfaces of the cabinet, and then the overall organization inside.


Author:
• Saturday, December 31st, 2011

This installment includes questions from readers about the Shelix cutterhead, choosing a plane for shooting, and building a set of tools and skills. Also, several readers have noticed and asked about the tool cabinet in my shop.

I’ve been looking at the Byrd Shelix and can’t decide if I should get it for my 8″ jointer or my DW735 13″ planer. I can’t afford it for both.

The Shelix for the planer is the better option for almost all shops. Here’s why. The main purpose of the jointer is to produce a flat surface and an edge square to it. It does not really need to produce very good surface quality on the face of the board. The jointed face, even if it has tearout and missed areas, will register on the planer bed as the Shelix makes opposite face flat and parallel with excellent surface quality. Once that is done, the board is flipped over and the jointed face is cleaned up with the Shelix.

Tearout is rarely a significant problem when jointing the edge of the board. Even if there are some defects, they should disappear when the edge is handplaned, such as for an edge joint. Jointer defects can also be ripped away on the table saw after you have ripped the second edge parallel.

A segmented cutterhead is not a bad idea for a jointer, but the point is that it is far more valuable on a thickness planer.

By the way, hand planing to flatten the first face of a board too wide for your jointer is not so hard once it is realized that you do not need a perfect surface. You just need a hit-or-miss surface, however ugly, that registers on the planer bed without rocking. Then do the flip procedure as described above.

I recently bought Tico’s shooting board (the Super Chute 2.0). I didn’t want to buy a dedicated plane for shooting and thought a low-angle #5 would be a good choice. I also have a #4, #7, and a block plane.

A LA #5 would work very well and I think would be the best choice of the planes you have. For a plane for shooting, you want a lot of concentrated mass and a thick bevel-up blade which is supported close to its cutting edge. A #7 BU plane has more mass but may get a bit awkward on a shooting board of that size. A 6″ block plane is too small and light. Even the #4 is too light.

A dedicated heavy miter plane is the best choice if you can afford it, such as the Lie-Nielsen #9, which I use with the “hot dog” handle, or the new beast #51. However, even a bevel-down jack or jointer can be used successfully. Most important, use a very sharp blade. Add shooting to your repertoire and watch your capabilities grow.

A woodworker building his set of tools and skills asks: I’d like to add a new tool to my small collection of chisels, saw, marking gauge, and squares. You suggest buying a jack plane first but I already own a #5 and a small power thickness planer. Should I buy a second plane or a pair of rip and crosscut saws. Also, can you recommend a book for learning the basics of woodworking?

Because the jack plane is so versatile, I suggest that you not buy another plane for your next tool. More planes can come later. Instead, you would probably benefit most from buying saws for joinery. If your next project is a table, using mortise and tenon joinery, get a ripcut tenon saw for the cheeks and a crosscut carcase saw for the shoulders. If your next project is a box, get a ripcut dovetail saw to cut the dovetails and a coping saw to remove most of the waste.
Of course, you will need saws to prepare the stock. You will also need gauges, chisels, and so forth. Do not try to accumulate all the tools at once. It is better to choose a type of project that you would like to build now – stick and board construction such as tables, or case construction such as boxes or chests – and get the tools for that. In time, you will acquire more tools. Buy the best you can afford. It can be very frustrating to outgrow cheaper tools as your skills improve. It is much better to have fewer excellent tools than lots of cheap tools.

Start with manageable projects. A small, simply designed project that is well executed will be more satisfying and more instructive than getting overwhelmed with a project that gets out of control.

I suggest Peter Korn’s book, Woodworking Basics, as a very good place to start.

Regarding my tool cabinet, I will soon post about that. I’ve been using it for 25 years, and, though there are a few things about the dimensions that I would make different, the basic design has served me well.

Dear readers, I thank you for reading and for your questions. May 2012 bring you many happy hours in the shop!

Rob

Category: Tools and Shop  | 4 Comments
Author:
• Thursday, December 22nd, 2011

Steve Jobs understood, and was able to bring to fruition, not merely the intersection of technology and design, but that they are inseparable aspects of a desirable product. High tech devices are, after all, valuable only if humans can interact with them, and it is via design that we do so. The inviting look and feel of Apple products draw us to them. So often, while we see other brands in the store, we readily sense that we want an Apple – leaving aside whether we can afford it.

Jobs recounted that a course in calligraphy that he took years before he began designing computers was a great influence in developing his appreciation for the importance of nuance and subtlety in comprising an overall style and look. In that art, the smallest details of spacing and line weight, for example, matter decisively in creating the whole image.

Phones, laptops, and other electronic devices are all basically the same shape, but the details of an Apple product add up to produce an unmistakable attractiveness. When you know the underlying functional quality is also there, the product is a real winner.

So what does this have to do with woodworking? Well, looking at a Maloof chair or a Krenov cabinet, I think the question is answered. These masters made things that invite our interaction, are the ultimate in refinement of style, conveyed largely with judicious details, and, of course, embody honest quality. When seeing their work, all this adds up to evoke that wonderful “ahhh.” It is the masterful execution of inspired intent. So intimately human, so wonderfully functional, the piece calls to us, and we reach out to it.

This is what we strive for as we take our best shot at making fine things. In Krenov’s words, a “quiet joy.” 

[About the photo: The apple depicted in this post has absolutely nothing to do with the text. The author, a non-attorney, has better things to do than research the legal intricacies of product and personal publicity rights, and also does not want to tread near copyright infringement. Thus, no photographs are shown of products or persons that might relate to the text. While the author does enjoy eating apples, he did not wish to take a bite out of this one prior to publication. Aha ha ha ha.]
Category: Ideas  | Comments off
Author:
• Wednesday, December 21st, 2011

One of the enjoyable upsides of writing this blog and contributing articles for several magazines has been receiving emails from fellow woodworkers around the world with questions about everything from shop setup to furniture design. While I am honored to receive these inquiries, it has become time consuming to answer them with individual emails, and it would probably be helpful to share some of this information with more readers. So from time to time, I will answer some questions in a “mailbag” post on the blog.

I invite your questions. Unless you request otherwise, your name and email address will be kept private. Please put “woodworking question,” or something similar, in the subject line of the email.

I’ll only answer a question if I think I know what the heck I’m talking about, based on the “sawdust and shavings of my shop,” and, of course, I can offer just one person’s viewpoint. I hope readers will also enter comments with their own take on the topic. The goal is to be usefully informative. The many internet forums contain tons of information and this is simply a small addition to that.

Topics include: wood, joinery, the selection, use, and preparation of tools, shop setup, and furniture construction. Haha, don’t ask me about turning, relationships, or finance because I don’t own a lathe and you could end up lonely and bankrupt.

Examples:

  • A technique or tool that you’re struggling with: How much camber should there be in a smoothing plane blade?
  • How to: What steps do you use to cut tenons by hand?
  • An opinion: Do you like Japanese or Western bench chisels, and why?
  • A construction question: Which joint would you suggest for . . .?

As always, thanks for reading, and happy woodworking!

Rob

Category: Resources  | Comments off
Author:
• Sunday, December 11th, 2011

A key question for any woodworker acquiring a basic set of tools is which handplane to buy first. As with all tool questions, the answer depends on the type of work you will do and your available money. Furthermore, these issues always involve a large dose of opinion because there are multiple ways to get jobs done in woodworking. 

For general furniture making, I suggest first get a jack plane. If you have a lot of money and can make a strong commitment to woodworking, go ahead and get a top quality set of these six planes: smoothing, jack, jointer, block, shoulder, and miter. For such a set of Lie-Nielsens, the cost would approach $2000 and, though surely worth it for an avid woodworker, is hardly a likely leap for a novice. Yet, you must start somewhere, and an incremental acquisition of tools, with adjustments based on the work you decide to do, is a reasonable path.

A jack plane is an excellent tool for stock preparation and can perform well, though admittedly not ideal, for smoothing, jointing, and shooting. As an only plane, a smoother would be deficient in truing work, and it would be very awkward to use a jointer for finish smoothing. Later, when you get the full set of planes, the jack will still be very useful. I originally used my Record jack for all those tasks and gradually got more planes. With a full complement of planes, I still use it more than any of the others and I also have a bevel-up jack.

The options are: buy a new Lie-Nielsen or other high quality plane, fix up a high quality vintage plane, fix up a mediocre new or old plane, or make your own wooden plane. With the exception of the first option or two, it is best to get a good aftermarket blade such as a Hock. The edge durability of A2 steel makes it a good choice for a jack. Keep in mind that the potential of a fixer upper will be limited by its inherent qualities such as the frog design, weight of the casting, and the adjustment mechanisms. 

Bevel-down and bevel-up both work. For either, it is helpful to have one or two extra blades sharpened to different angles and cambers to accommodate different work. You can shoot with a BD plane (I did for years) though for this a BU design has the advantage of a heavy blade that is supported very close to its cutting edge. A BU plane makes it easy to change to a blade sharpened to a higher angle for figured woods, but a back bevel can similarly be used on a spare blade for a BD plane. I find BU blades harder to sharpen, primarily because of the wear created in use on the flat side of the blade. To choose for an only plane, I’d go with the BD, but this is my bias. The bigger issues are quality, tool preparation, and skill.

Please don’t buy a block plane as your first plane, as is often recommended! While useful, it is far more limited than the jack. It is a one-handed tool used mostly for chamfering and small trimming work that can often be done with a sanding block. You cannot prepare stock with it, true surfaces and edges, or use it as a smoother. Step up to the big leagues right from the start and get the jack.

Even woodworkers who do almost all machine work will benefit from a jack plane. For most hand-machine blended woodworking, you could do quite well with a jack plane to joint the faces and edges of boards and a portable thickness planer to get the brute work done. Add saws, chisels, marking tools, clamps, sharpening equipment, and, of course, a workbench and you’re in business. Get a bandsaw soon.

Go make something – anything – and enjoy it!

Category: Tools and Shop  | 4 Comments
Author:
• Tuesday, November 29th, 2011

I was browsing in a Woodcraft store a while ago and saw some blank knife blades to which only a wooden handle needed to be attached to produce a nice knife. I am not a knife maker but I certainly like tools, including knives, and figured this would be an easy diversion for me, an experienced woodworker, while more profound projects ruminated in my head. Ha! Yeah, right.

I bought two. I was thinking vaguely, without fully admitting to myself, that one was to screw up and learn on, while the second had a shot at turning out OK. Really, it was not a difficult project, but even such a seemingly straightforward job as this harbored glitches that, lacking specific experience, I was unlikely to anticipate.

How was I to know that the quick-set epoxy would make an ugly thick glue line, or that blending the handle near the heel of the blade would be tricky? Even though I’ve handled knives for many years, decisions for the figure, weight, thickness, and contours of the handle were confusing. I also was not accustomed to seeing sparks fly off the drum sander along with the usual wood dust.

In short, after irretrievably messing up my first attempt, the next try resulted in a decent handle. The process still felt awkward, and I know there is plenty of room for improvement.

So, while not wholly unfamiliar, this was new territory for me. The experience reminded me how damn difficult it is to make things, especially to make them come out the way you really want them to come out. It’s not quick, easy, or perfect every time.

To students of woodworking, and that means all of us, I suggest we ignore the popular trend of hawking this or that technique as easy-peasy, quick as a flash, or (ugh) “perfect every time.” Woodworking is none of those. Sure, you and I can and will learn new skills and do excellent work, but it’s really not easy.

So, ignore the hype and keep making sawdust. Happy woodworking!

Category: Ideas  | 4 Comments
Author:
• Monday, November 21st, 2011

Here is a practical way to choose the height of the workbench that you are planning to buy or build: First, consider the tasks you will commonly perform at the bench. One height will not be ideal for all of them. So, prioritize them, and then try out heights for the major tasks.

I think this method is better than a formula. The most commonly quoted of these states that the top of the workbench should be at the level of your palm when you stand with your arm straight down with your hand extended forward, or simply at the level of your wrist. That might work for you but it might not. I know it does not work for me.

I dissuade you from using a simple formula because this is a personal matter like many aspects of craft. It is not only your height and arm length, but also your back, neck, eyes, posture, and style of work that come into play. The best way to integrate all these factors is to simply try out different heights. Here’s how.

First consider your tasks. As an example, here is my list.

Very common jobs, at which I often spend a long time: planing, sawing dovetails and tenons (sometimes using an auxiliary vise), chopping joinery (often while seated), shooting, scraping, sanding, and finishing.

Shorter duration or less frequent tasks: marking out, paring, sawing with the bench hook, and assembly.

Machine work at the bench: mortising with the router, Domino and biscuit joinery, and using a benchtop drill press and portable electric drill.

Maybe you do lots of carving or inlay, maybe you do all your joinery with machine jigs and the bench is mostly for fitting and sanding, or maybe you prepare all of your stock by hand, and so forth. Remember too, that workbenches are not saw horses; ripping and crosscutting stock to size with handsaws require much lower support.

The next step is to use a sturdy table, Workmate, or a friend’s workbench along with some clamps, and stack/remove 3/4″ or ½” plywood or MDF on it to create various heights to try out the tasks on your list. Pay attention to:

  • your posture – neck, shoulders, back, core, knees
  • reach
  • range of eyesight
  • how you tire
  • any physical limitations you may have.

Find what feels right for you. Your most common and long duration tasks should govern your final choice of height, along with some accounting for the other tasks.

If you are getting a new bench, you get to choose, of course. However, you can easily raise an existing bench by attaching blocks at the bottom. While lowering a bench is a bigger job, it can be done because you’re a woodworker.

There are other approaches. Adjustable height benches and plans to make your own are available which could be used as a primary or secondary bench. Japanese woodworkers do much of their work on the floor and on an angled heavy beam.

In summary, I suggest forget the formulas and trust yourself. You will, after all, be spending a lot of hopefully happy hours at the bench.

This is what works for me, but who cares, find what works for you!

Category: Tools and Shop  | 2 Comments
Author:
• Friday, November 11th, 2011

Isn’t learning wonderful? You acquire new things that become part of you, you can do it all you want, it’s good for you, and you don’t ever have to stop. It does, however, require humility in that it must start with the admission of the enormity of what you do not know. Thus, I am a permanent student of woodworking. The learning I like best is the kind that I can put into action in the shop.

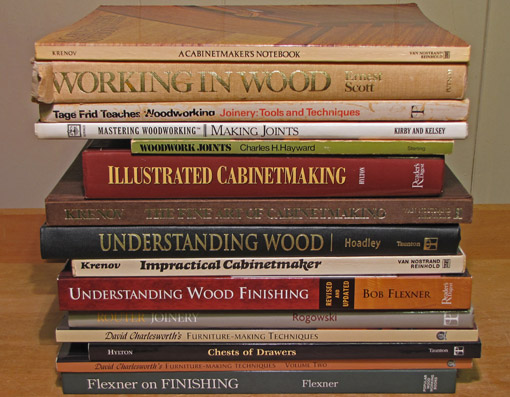
When asked, I say that I am a self-taught woodworker, true in the usual sense. In reality, I have had countless teachers, almost all from afar. I would like to share with you the woodworking teachers from whom I have learned the most.

James Krenov has to head the list. His writings and work catalyzed my intuition that making high quality things in wood, with a personal touch, is powerfully meaningful. Further, his level of technical refinement continues to set a standard.

Ernest Scott’s Working in Wood, published in 1980 and, as far as I know, long out of print, was an encyclopedic challenge to absorb, especially for learning joinery. I would literally blow the sawdust off the pages as I turned them and practiced making joints. Tage Frid had a legendary breadth of practical woodworking knowledge. His Taunton Press books and articles remain directly usable at the bench. Ian Kirby offers clearly reasoned explanations of techniques that advanced my understanding and helped develop my habit of thinking through woodworking processes instead of accepting them by rote.

There are many more. To learn about wood, I turn to Bruce Hoadley (Understanding Wood), and the wonderful Fine Woodworking articles on different species authored by Jon Arno. Bob Flexner’s lucid demystifying of finishing in his books, and articles in Popular Woodworking, is some of the best explanatory writing I’ve read on any topic. I still refer to Charles Hayward’s Woodwork Joints, copyright 1975, to sort out joinery. David Charlesworth’s incisive understanding of technique is top of the line.

For furniture construction, I often look to the writings of the following woodworkers in numerous sources. Bill Hylton must have taken five lifetimes to learn his range of ability. Chris Becksvoort gives reliable advice borne of long experience. I keep rereading Will Neptune’s articles, there is so much in every paragraph. I’ve always enjoyed Gary Rogowski’s enabling way of teaching several different ways to accomplish a job.

Still, there are so many more. Without a doubt, every devoted woodworker has his favorite teachers and sources. The explosion of woodworking information on the internet adds immeasurably to our learning opportunities. To all of the above and the many more unmentioned, thank you.

Category: Ideas  | 2 Comments