Author:
• Saturday, October 10th, 2015

mortise and tenon

In building furniture, woodworkers wonder if the joints will be strong enough to withstand the many years of rigors to which they will be subjected.

As we parse the elements of joint design, figuring if a tenon is long enough, dovetails deep enough, and so forth, we rely upon hundreds of years of cumulative experience in furniture design and observation of how pieces have fared over the years. We also can benefit from some of the joint testing done by the magazines, data from the Forest Products Laboratory, and of course, a healthy dose of intuition.

However, there is a shortcoming in viewing joint design too narrowly.

Assuming competent joinery skills, answers to structural strength questions are more likely to come from broadening one’s view beyond the joint under consideration and looking at the whole structure of the piece. This will make the requirements for a particular joint more evident.

Here we must ask:

  • What is going on in the overall design of the piece that will transfer stress to that joint, and on the other hand, help it to resist stress?
  • How will normal use, and perhaps abuse, stress the joint?

table design

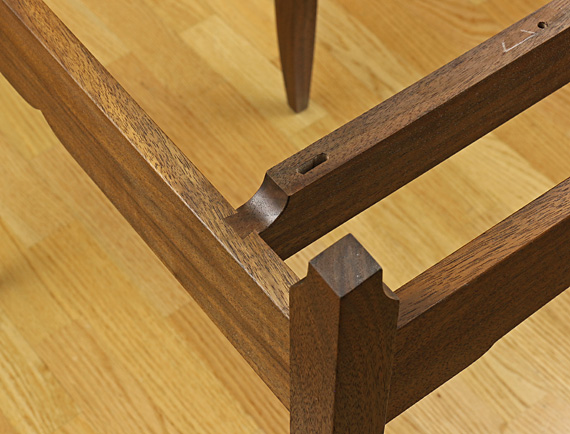
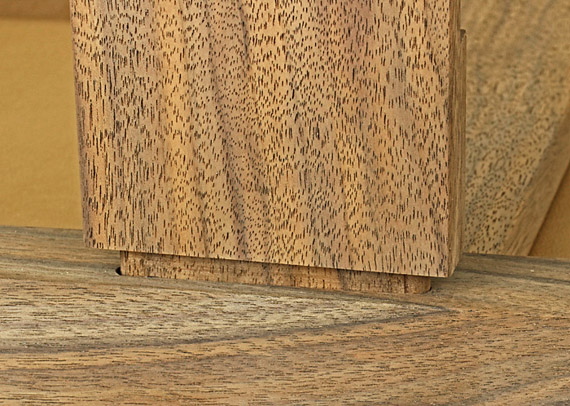
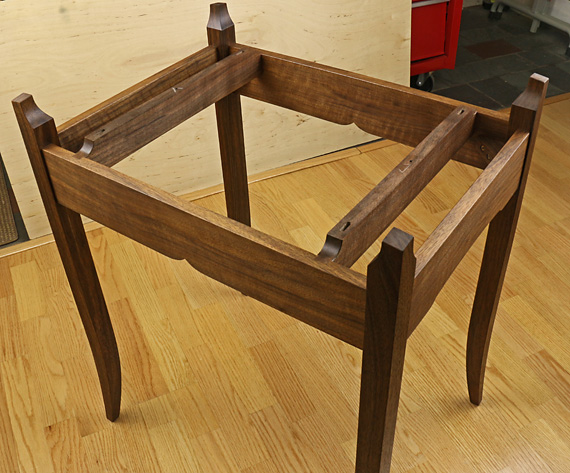
For example, this table has fairly narrow legs that allow only shallow mortise and tenon joints. Force applied to the lower part of a leg produces considerable moment at the joints. Racking in the horizontal plane could also be a problem.

However, looking beyond the leg joints shows they have plenty of help. The two cross stretchers are joined to the aprons with sliding dovetails, and there is a corner block behind each pair of leg joints.

table design

As another example, in a bookcase, the joints attaching the horizontal to the vertical members are subject to huge racking forces. Yet, a thin plywood back fastened to the back changes everything.

The point is that when designing furniture and wondering if a particular joint will be strong enough, let the big picture inform your engineering decisions.

Category: Techniques  | Comments off
Author:
• Wednesday, September 30th, 2015
mountains

Woodworking is such a small matter.
We take little pieces
Of what robes mountains and valleys
Then reconnect them in ways so naive.

Yet in making things
The joy of choosing is large.
Maple or cherry?
More or less curved?

Not only the trees
And us
But also from God,
Is this gift of freedom.

trail

Category: Ideas  | 4 Comments
Author:
• Monday, September 28th, 2015

Suehiro Gokumyo 20,000

My new, new (ugh) favorite fine finishing stone, the Suehiro Gokumyo, is a real thoroughbred. Nominally 20,000 grit/0.5 µ with a tight distribution of particle size, it can produce magnificently sharp, clean edges.

This is a very hard stone in all respects. A hard, tough binder makes it extremely wear resistant, so it retains a flat surface very well and requires little maintenance. It is virtually non-porous, so no soaking is required – just splash and go.

When first using the Gokumyo, do not expect the genial feel of a Chosera 10K or a soft waterstone. The hard feel of this stone under the steel is initially formidable. However, once you tune in to just how awesomely fast and smooth it is removing steel and adjust your sense of feedback, it becomes an efficient joy to use. Nonetheless, to get the most out of it, you do need good sharpening skills.

The Gukomyo comes with a 1K/3K nagura but I prefer my shop-made 1200-grit diamond nagura to quickly enhance feel and performance. I have not encountered the grabbing or stiction that many of the Shapton stones tend to produce, and one does not need to baby this stone like the Chosera 10K.

Having worked with this stone for several months now, it produces great edges in all the main steels in my shop – ­A-2, O-1, and Japanese blue and white. I transition from the 8000/3µ DMT Dia-Sharp diamond stone, used with a light touch, to the 20K Gokumyo. True, that is a sizable leap but it works, and it minimizes the number of stones and speeds the process.

The Gukomyo 20K is discussed fairly widely on the internet among straight razor aficionados but has not received much attention from woodworkers. The best and least expensive source for Suehiro Gukomyo finishing stones is Tools From Japan, which is actually based in Japan. Proprietor Stu Tierney is tremendously knowledgeable and generously helpful. [This review is unsolicited and uncompensated.] Yes, this is an expensive connoisseur’s stone but at 20mm thick and so wear resistant, it should last an extremely long time.

With this and the transition to diamond stones, the revolving door of sharpening stones in my shop seems to have thankfully reached an end.

By the way, anyone want to buy some used Shapton glass stones or other sharpening gear at a nice price? (Please send me an mail.)

Author:
• Saturday, September 26th, 2015

diamond stone sharpening

Sharpening tools should integrate into a logical system. Here is how and why I have revamped my system to use diamond stones as the workhorses.

The tools

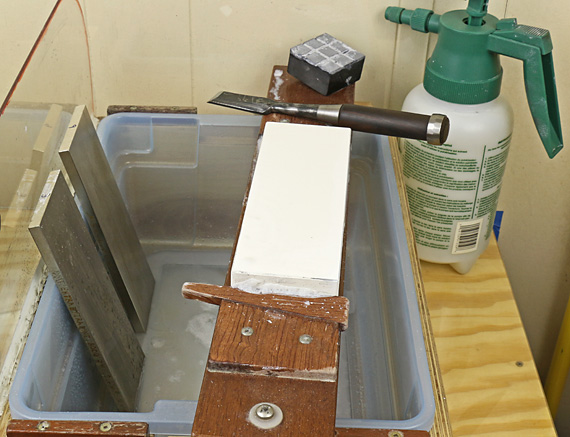
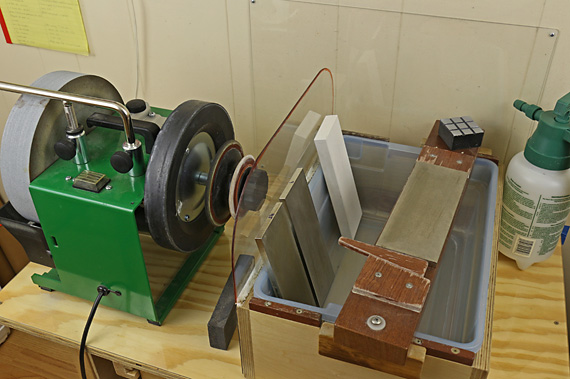
The system uses three DMT Dia-Sharp 8″ x 3″ continuous surface diamond stones, a very fine ceramic finishing stone (about 1/2µ), and the Tormek 10″ grinding wheel. The diamond stones are: 45µ (325 mesh), (1200 mesh), and (8000 mesh).

At this size, these diamond stones fit in the same holding device as most waterstones and provide enough length to accommodate a honing guide, if desired. I measured the flatness of each using a Starrett straightedge to be better than 0.0005″ (half a thou) over the whole surface.

Diamond stones cut wonderfully fast, require minimal maintenance, and last a long time. Compared with coarse and medium waterstones, they create less mess, and minimize the chance of transferring grit from stone to stone via the blade or a honing guide.

The processes

A tool makes only infrequent trips to the Tormek to reconstruct the primary bevel. The 10″-diameter grinding wheel creates a mild hollow. I usually grind barely out to the edge or just short of it. Next, I clean up the primary bevel with the /1200 diamond stone by creating small flats on both ends of the hollow, and sometimes use it to start the secondary bevel (e.g. to start a slight camber). Then I use the /8000 diamond stone to form the secondary bevel, and finally, the 1/2µ ceramic stone with my diamond nagura to bring it to an exquisite edge.

The 45µ/325 diamond stone supplements the Tormek, such as for forming the primary bevel on certain awkward or small tools, or for adjusting a large camber.

For resharpening on the secondary bevel, which is what we are doing most of the time, I use the finest stone I can, based on how dull the edge is. The idea is to strike an efficient balance that avoids spending too much time on the finer stones while minimizing the depth of the initial scratches that later must be removed.

Thus, if just a bit of touch up is needed, the ceramic finishing stone alone may suffice. More often, I’ll start with the 8K diamond, or, if the edge is quite dull, the 1200 diamond, and work down from there.

When working on the secondary bevel, it is important to use a light touch on the diamond stones. I back off any remaining burr or use the “ruler trick” only on the ceramic finishing stone to preserve the polish on the back of the tool.

The key to this system is that diamond stones comprise the literally central position in the process where their speed and responsiveness quickly get the edge ready for the “money” stone – the finest stone.

For the most critical edges, such as a preparing a smoothing plane blade for the finest work, I finish off the edge by stropping it on leather charged with diamond paste down to 1/8µ, perhaps just to make me feel better.

Though these are my usual processes, the great speed of the diamond stones makes it easy to improvise steps to accommodate different situations such as edge nicks, different steels, edge reshaping, etc.

Why these three grits of diamond stones?
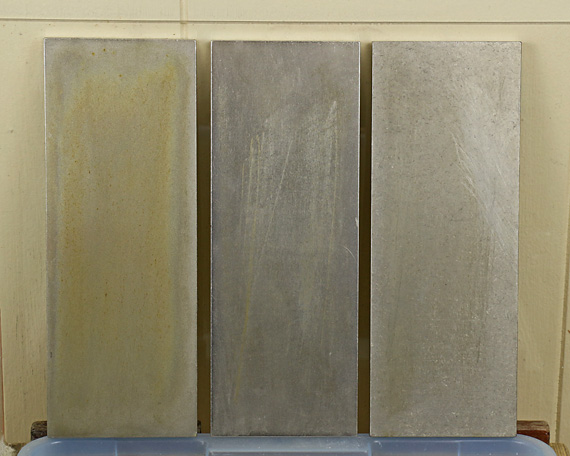
DMT diamond stones

I chose these stones (45µ, 9µ, and 3µ) empirically by experimenting with small stones, basing my judgments on sharpening efficiency and edge performance. The key point is that this set of stones works well for me as a system.

Factors in sharpening stone performance are numerous and complex; grit size is only one of them. A diamond stone performs quite differently than a waterstone of the same nominal grit, so using the same numbers for choosing a series of each type of stone would make little sense. Trial and observation work best.

This set of stones yields for me an efficient balance between minimizing the number of stones and minimizing time. I can maintain proper edge geometry, and get very good responsiveness and feel of the steel on the stones at each stage of sharpening. Overall, the increments in grits seem just about right.

Such choices are certainly subject to personal preferences. For example, many woodworkers may prefer the 8K diamond to be the final stone and finish off the edge with some stropping, or prefer to use larger or smaller increments in grit size.
Category: Tools and Shop  | Comments off
Author:
• Monday, August 31st, 2015

dovetail instruction guide

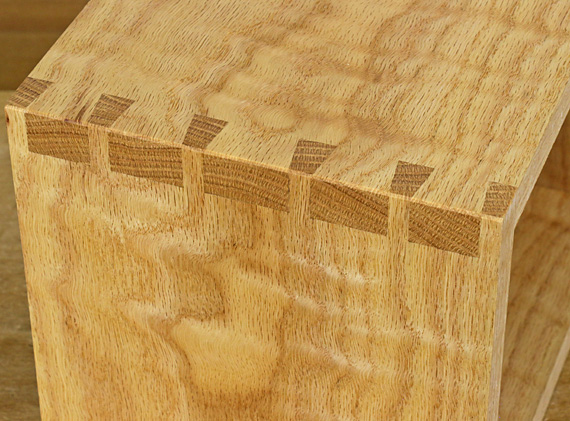
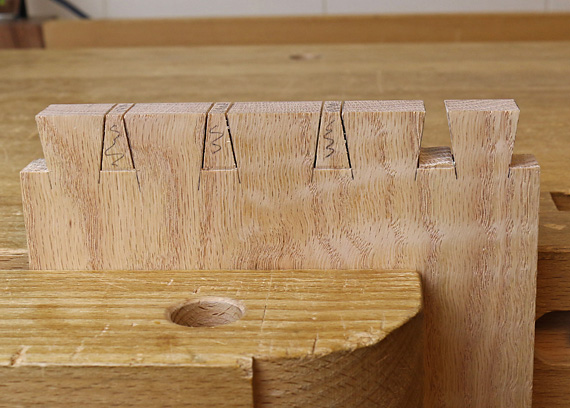
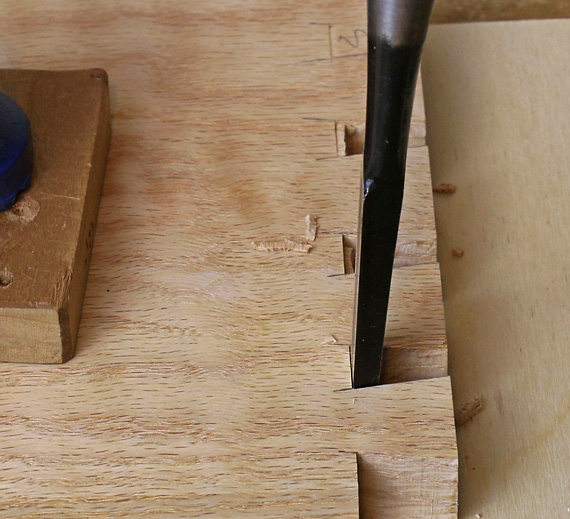
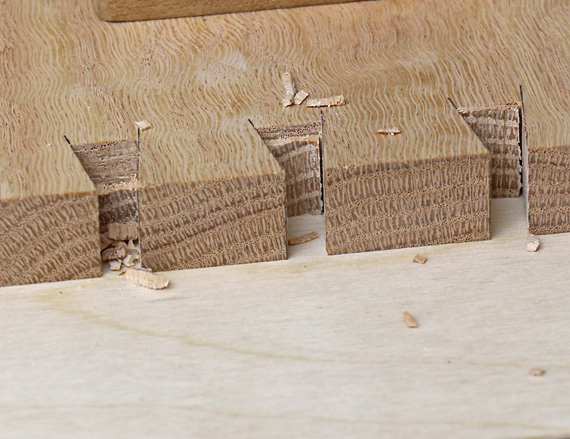
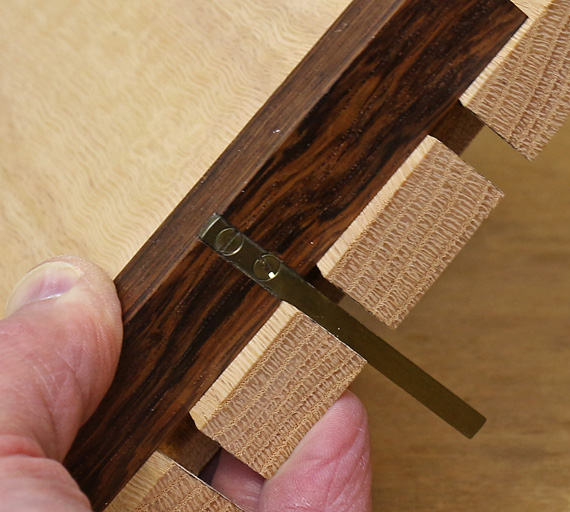
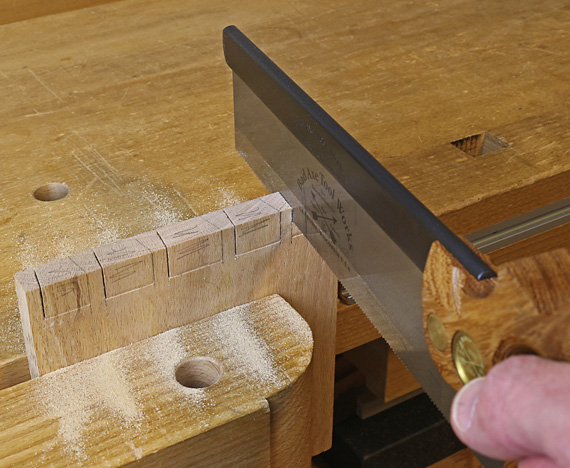
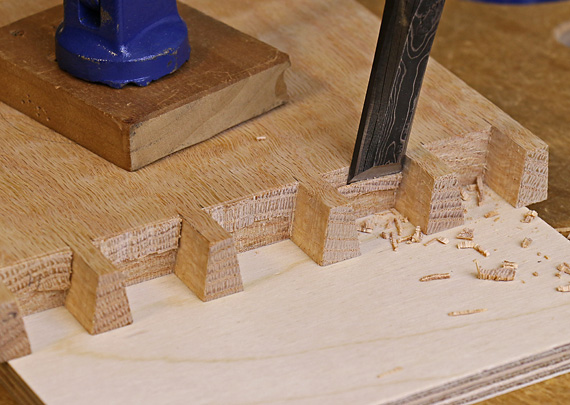
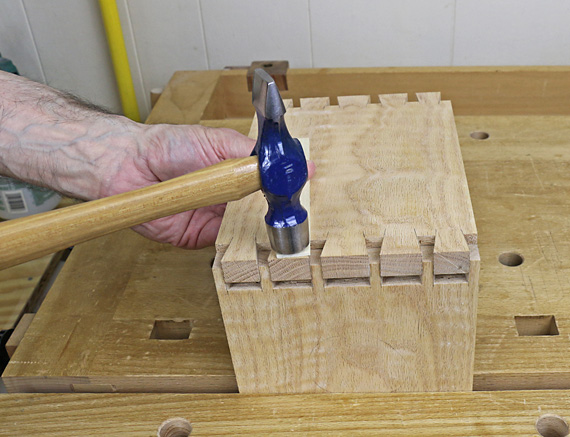
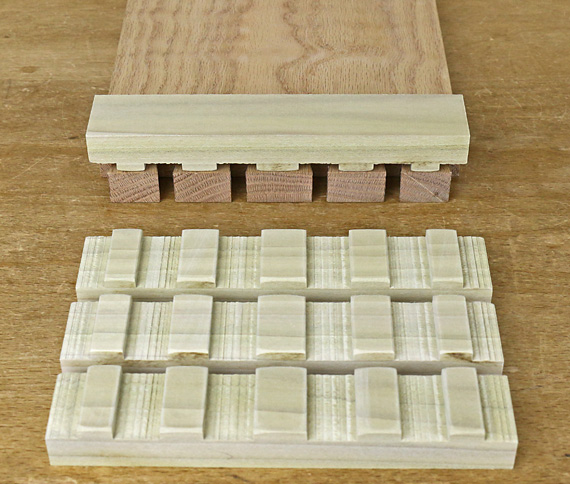
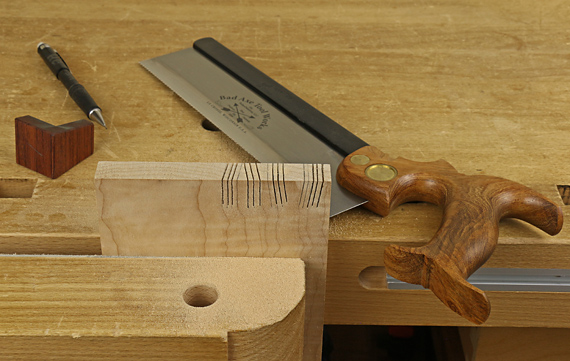
I wrote this 42-page, step-by-step guide to making the through dovetail joint for Craftsy. Compiled from a series of blog posts I wrote for them last year, it is available for free here. I think you will find it helpful.

With over 8000 words and 75 detailed photos, the guide walks you through the process. I don’t just say what to do but show you how – exactly how – and what it looks like in detail, right at the workbench. I explain it so you can truly understand it.

If you’ve wondered about matters such as how close is close enough when sawing to layout lines, just how much to angle the chisel when chopping to the baseline, and what are the critical junctures that make or break success, this guide is for you. There are also several nice tricks in there, including an expedient method for making clamping cauls.

Below, and at the top of this post, is a sampling of the photos in the guide.

Novice and intermediate woodworkers will find in the guide an effective progression to make the joint, while more advanced woodworkers may find useful alternatives and refinements to their techniques. Many will find some things with which to disagree, but I think almost all will find it to be solid information. In any case, I use the demonstrated techniques in my shop and they work for me. There is more than one good way to do almost everything in woodworking.

By the way, the preview to the guide on the Craftsy site shows a cover photo of an awfully proportioned, machine-cut joint. Don’t let it dissuade you; it is not mine and not part of the guide. It was added by an editor and not yet removed.

I hope you enjoy the dovetail guide and find it helpful.

Happy woodworking,

Rob

dovetails

chopping dovetails

chopping dovetails

dovetail square

sawing dovetail pins

chopping dovetail pins

fitting dovetails

dovetail cauls

Category: Resources  | 8 Comments
Author:
• Sunday, August 16th, 2015

sawing warm-ups

There are lots of recommendations available for warming up to saw joinery but here I will concentrate on two aspects:

  • The progression of the warm-up
  • Core muscle activation

The progression

Any good warm-up should include aspects of the main event. To prepare for sawing dovetails, for example, saw to a series of lines that mimic dovetails. As you begin, recall and concentrate on basic technique and mechanics without being primarily concerned about hitting the lines perfectly. You’re like a baseball player before a game, at first taking easy batting practice pitches while just trying to execute sound form and make good contact. Address any neglect of the fundamentals.

Then bear down and try to make a couple of dead-on cuts. Observe the results, sharpen your mind, and clean up your technique accordingly. Find your familiar physical and mental groove.

Make sure there are no deficiencies in your tools and setup, including the lighting. The warm-up also gives you a chance to sense the density and grain of the particular wood at hand and make appropriate adjustments in technique.

For work that you do frequently, the warm-up should be very brief. Even if you’re a bit rusty, it should only take a few minutes, provided your skills are fundamentally sound.

An exercise to engage the core

sawing warm-up

Only when the core – glutes, hips, upper back – is strong, engaged, and balanced, can the peripheral parts – shoulder, arm, and hands – move with accuracy and precision.

Try this exercise. Make a small, shallow pile of sawdust on your benchtop or scrap of wood. Attempt to create “kerfs” in the pile by pushing the dust with the teeth of your saw without the teeth making contact with the benchtop.

It can only be done with your core muscles engaged, along with a balanced stance.

When sawing joinery with a backsaw, the saw should not be helping to support you. If it is, it is being partly diverted from its primary function, which is to make a kerf, and it won’t be as consistently accurate.

The hand without the saw can rest on the bench or work piece to aid in balance. It should bear the weight of no more than itself and the arm.

By the way, core activation does not mean being stiff. Think of the shock absorbers on a car. They are very strong but allow movement, always maintaining an equilibrium that allows all the other parts of the car to function smoothly and precisely. This discussion is about sawing with a backsaw but even with a handsaw where the entire body moves more, the core is still in primary control of all the motions.

Note to readers: Uncommon tips 1-6 can be found here. More on the way.

Category: Techniques  | Tags:  | 5 Comments
Author:
• Friday, July 31st, 2015

dowel former

The otherwise excellent square hole punches from Lee Valley have a practical problem that I detailed on this blog more than two years ago, along with a suggested solution.

In brief, the punches work beautifully to square the upper section of a round hole in applications such as a pegged mortise and tenon joint. The punches are sized from 3/16″ to 1/2″ in 1/16″ increments. Each requires boring a round hole 3/64″ less than the width of the punch and thus the use of unusually sized dowel pegs.

Lee Valley square hole punches

For example, a 13/64″ hole is used with the 1/4″ punch. After forming the square portion, the round hole could reasonably be enlarged to 7/32″ but anything further would risk damaging the edges of the square. So, here’s the problem: how to obtain round pegs in diameters such as 13/64″, 7/32″, and so forth. Even Lee Valley, despite my suggestion, does not supply the equipment to make such dowels.

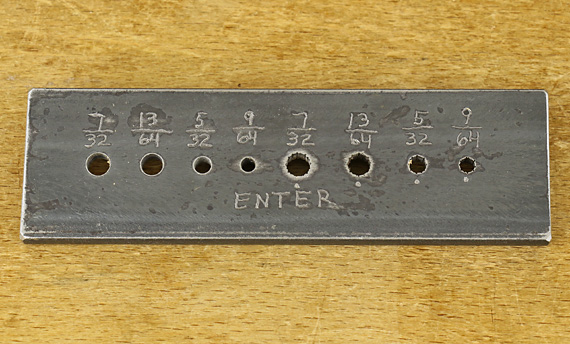
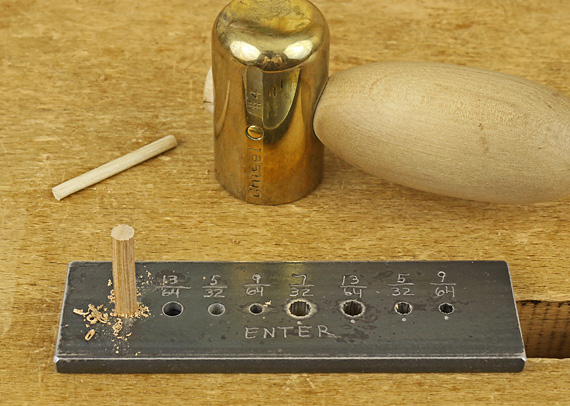
There are methods demonstrated on the internet for making dowels using a portable power drill and clever shop-made cutters, but I prefer a simple dowel-former plate to make these short pegs. This is easily made from a piece of unhardened weldable steel, 1/4″ x 1 1/2″ x 5″, from the local hardware store. Rough-shaped stock is pounded through the holes to form the dowels.

Construction

Use a drill press to bore two holes for each diameter, one for rough cutting and the other for finish cutting. The roughing holes are on the right side of the plate in the photo at top. Relieve the diameter of all holes by reaming from the exit end using a General #130 6° tapered reamer, going to full depth for the roughing holes and about 1/2 depth for the finishing holes.

Deeply score the sidewalls of the roughing holes with a 2/0 blade in a fret saw and a 4″ double extra slim saw file. Use a small sharpening stone to cleanly remove the burr and create a sharp edge on the entry side of the holes. Use a countersink bit to lightly chamfer only the exit side of all holes.

Use

Start by making stock from straight-grained wood, ideally riven, to a width slightly more than 1/64″ larger than the hole diameter. Trim the corners to make an approximately octagonal cross section. I prefer to use a small handplane for this step.

Directions for using this type of plate usually recommend whittling an approximate taper on the blank to ease its entry into the hole. However, I’ve found the forming cutting goes much smoother and more balanced with a nicely centered blunt entry point formed on the blank with a pencil sharpener or dowel pointer.

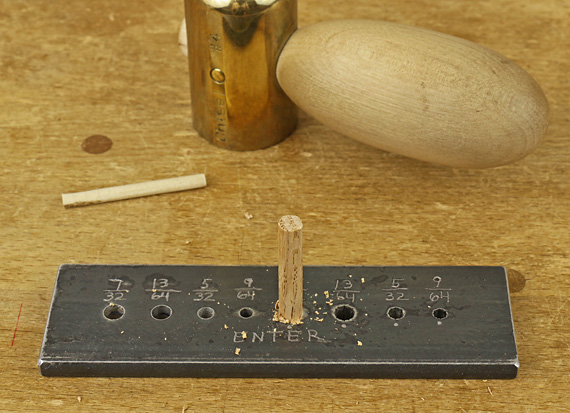
Place the former hole over a dog hole in the workbench top. Use the roughing hole first, followed by the finishing hole. Pound the wood blank with a mallet, taking care to keep the blank perpendicular. Proceed until the blank is nearly flush with the plate, then use a narrower peg to tap it the rest of the way though. A piece of blue tape under the dog hole will catch the dowel, saving the frustration of looking for it on the floor.

shop-made dowel former

shop-made dowel former

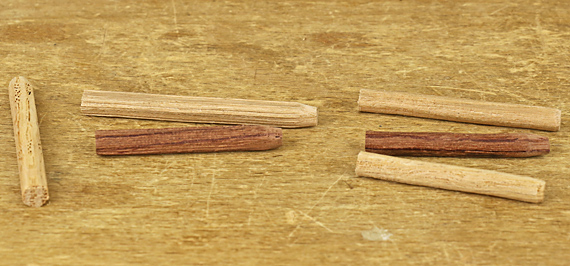
I have found that the two-stage process produces smoother cutting and better dowels. The photo below shows, from left to right, a piece of shaped stock, rough dowels formed by the first step, and straight, smooth finished dowels in cherry, bubinga, and red oak.

shop-made dowel pegs

Ideally, this tool would be made of hardened tool steel like a genuine Veritas or Lie-Nielsen but that is beyond what I can accomplish in my shop. However, the shop-made version is inexpensive, easy to make, has any hole size you want, solves the problem with the square chisels, and works surprisingly well.

Category: Jigs and Fixtures  | Comments off
Author:
• Tuesday, June 23rd, 2015

designing furniture

Renowned furniture designer Wendell Castle, in a wonderful 2008 interview by the late Neil Lamens, covered many aspects of the design process including the need to do a lot of sketchbook drawing and the importance of challenging yourself. He reminded us that mistakes can be evidence of having challenged oneself and their complete absence suggests one should “move the target back.”

Unfortunately, the videos of the interview do not seem to be available on Neil’s Furnitology site and blog, which are still online, so we cannot see his infectious enthusiasm as he spoke with Castle. Neil was a force of inspiration from which many woodworkers were fortunate to benefit. His kind and generous spirit left me encouraged and uplifted after every chat or email exchange.

There are two points I recall from the interview that particularly struck me.

First, Castle held that, far from dwelling on a design too much, there generally is not enough time spent on designing. Yes, we woodworkers like to git’r done and put a finished piece into a room. But good design takes work, sweat, revisions, and, at least for me, a degree of angst.

So I remind myself often of this sage advice from one of the great designers of our time. Furthermore, I forgive myself when struggling for seemingly too long with proportions, edge details, or whatever.

Second, in discussing how design is such an endeavor unto itself, Castle remarked, “You almost don’t have to build it.” Now, of course, he said “almost,” and keep in mind, he is a phenomenally prolific producer of furniture, but the remark prompted me to say, “Oh yes I do!”

In other words, juxtaposed to the first idea is the imperative to get to the point where all of the design hangs together and feels right. Maybe it will be refined on the next round but now it is time to build – time to make it real.

It’s important to recognize that time, neither arriving too soon nor deferred too long. I try to remember both.

Category: Ideas  | 4 Comments