Archive for the Category ◊ Tools and Shop ◊

Author:
• Sunday, June 12th, 2016

Sensgard Zem hearing protectors

These Sensgard Zem hearing protectors are the best I have ever used. Before elaborating, I will explain the problems I have had with some other protectors.

I do not like stuffing things into my ear canals. This includes foam plugs that are first compressed with the fingers, which are often dirty, then jammed in where they are uncomfortable and then tend to work their way loose. Various silicon, latex, or high tech torpedoes that are also held in the ear canal much as a cork is held in a wine bottle are also unwelcome in my ears.

Bulky, cumbersome earmuffs are at the other end of the range of options. I have top-quality Peltor muffs but even with their soft padding, they squeeze the temples of my eyeglasses uncomfortably against my skull. It isn’t long before I decide the noise is more tolerable than the headache.

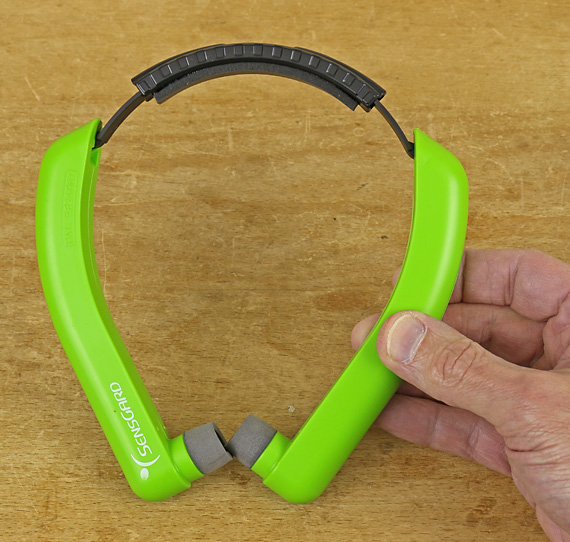
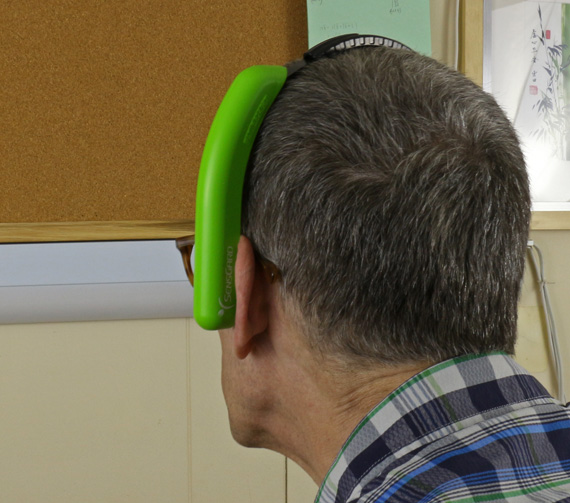
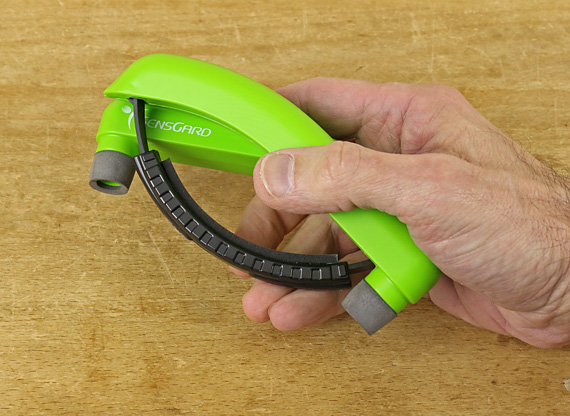
Finally, all problems are solved with Zem hearing protectors by Sensgard. The replaceable foam cuffs of these extremely lightweight protectors comfortably skirt the entrance to the ear canal. The acoustic chambers (the arms) vault my eyeglass temples – no more skull aches. They go on and off in a snap, and when not in use, hang around the neck or fold compactly for storage.

Sensgard

Sensgard Zem

All these advantages would be enough but here is the best part: the noise reduction is phenomenal. I powered up my DW735 thickness planer, measured 100 dB(A) at 2 feet under no load, and then put on the Sensgards. I was flabbergasted at the dramatic but even, pleasant noise diminishment. The nominal NRR (Noise Reduction Rating) is 31 but they are far more superior to my Peltor model, listed at 28, than the numbers might suggest.

I actually had to accustom myself to remaining alert to the ferocity of woodshop machinery while enjoying the auditory peace. Yet, I could adequately hear important shop sounds such as speech.

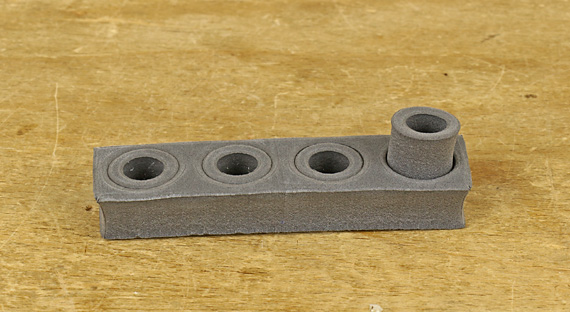
More information about the Zem technology is available on the Sensgard website. I have the NRR31 model in easy-to-find lime green. Put them on according to the simple package instructions; that makes a big difference. I found the lowest price on Amazon. Extra foam cuffs are good to have.

Sensgard extra foam cuffs

[This review is unsolicited and uncompensated. I have no connection with Sensgard.]

Author:
• Saturday, January 30th, 2016

Corradi rasps

These Corradi rasps are the ones I reach for most often. Several years ago, I wrote on choosing and using rasps, highlighting the excellence of hand-cut rasps, specifically the Auriou brand, based on the feel and feedback they provide.

In this regard, for a 10″ cabinet rasp in the finest grain, I still prefer the Auriou #13. However, I’ve come to prefer the Corradi rasps in the coarse and medium ranges. Furthermore, I don’t think there is a big difference between the finest Corradi #10 and its close equivalent, the Auriou #13. Practically, I tend to save the Auriou for the most sensitive work, much like a carefully tuned smoothing plane.

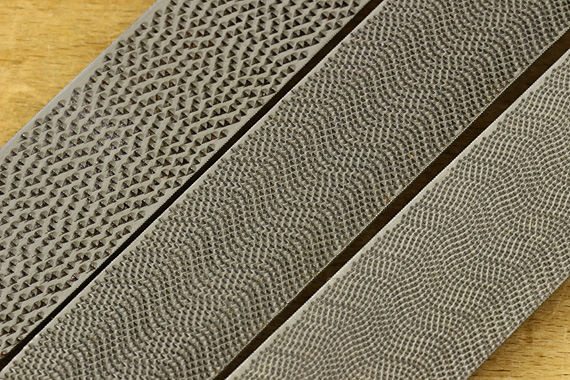
The Corradi rasps have uniform, densely packed, machine-cut teeth with a surface hardness of Rc 65-66, which the manufacturer claims is harder than the best hand-cut rasps at Rc 59-60. In my experience, which is not controlled testing, the Corradi rasps have indeed maintained their sharpness better than the Aurious.

The swirl pattern of the teeth produces a very smooth cutting action, though again, just slightly lacking the superb feedback of the Auriou in the finest grain models. In the medium and coarse grains, I prefer the consistent smoothness of the Corradis. I do, however, wish the Corradi cabinet rasps were shaped to a point like the Aurious.

Heresy, some may say, but I’m only telling you what the wood and my hands have told me. These comments, unsolicited and uncompensated, are only meant to help readers make their own choices.

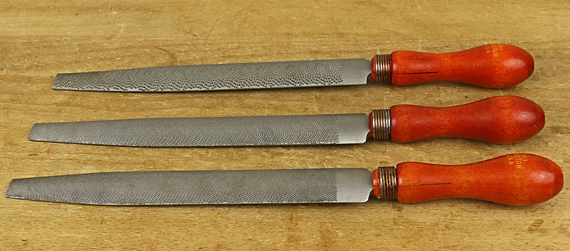
Corradi 5, 8, 10 grain

My set of Corradi 10″ half-round cabinet rasps consists of the “Gold” #10 and #8, and the Cabinet #5, from right to left in the photo above. This set is an excellent value at a current total price of $134. By comparison, a single 10″ half-round Auriou #9 costs from $110 – $135, and the finer grains cost still more.

For reference, in 10″ rasps, I estimate the Corradi #10 about the equivalent of the Auriou #13, though the latter is probably a trace finer. Either allows a very easy transition to scraping or sanding.

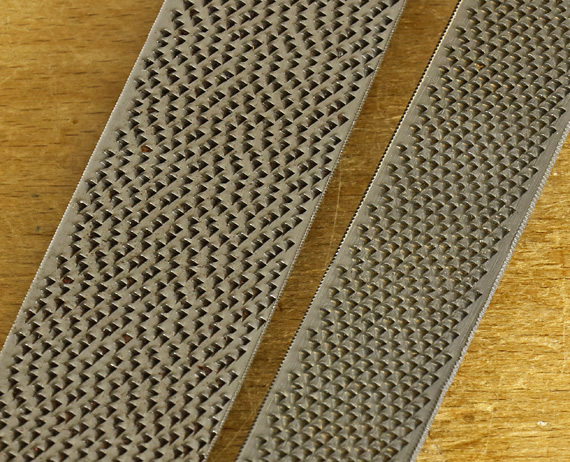
At the coarse end, the Corradi #5 is about equivalent to an old Nicholson #49 (below, at left and right, respectively), but broader and better. (The Auriou #9 approximates a Nicholson #50.) Looking at the photo above, it seems like a fairly large jump from the Corradi #5 to the #8 but in practice the transition works well.

Corradi 5 grain vs Nicholson #49

The three 10″ half-round Corradis – #5, 8, and 10 – plus an inexpensive Shinto double-sided “saw” rasp and a cheap Surform Shaver, with the modification described in an earlier post, form a versatile basic set. I wish Corradi made “ironing” rasps in the form I described in a recent post.

Aside from cabinet rasps, I like the Corradi Gold 6″ #10 flat (“hand”) rasp with one safe edge for smaller scale work such as rounding over tenons. The 4″ Auriou half-round #14 remains the finest rasp in my drawer.

Rasps are often underestimated but high quality versions, skillfully employed, are capable of sensitive, refined work.

Author:
• Thursday, December 31st, 2015

square to check dovetails

When making dovetail joints, it is important that the tails, which you’ve cut first (of course, right?), have their sides square to the reference (inside) face of the board.

In practice, depending on the compressibility of the wood species being worked, it may be acceptable or even helpful for the inside width of the tail to be a hair narrower than the outside face. This creates a slight wedge effect that helps ensure tightly meeting surfaces at the outside face of the completed joint.

There should never be the opposite arrangement where the entering width of the tail is wider than the outside face of the tail. That would directly, by the geometry of it, leave gaps on the show face of the joint, making it weaker and less attractive. It would also indirectly create these gaps by corrupting the marking out of the pins from the inside-face edges of the tails.

Thus, as with many aspects of woodworking, this is a one-sided tolerance issue, and we want to avoid compounding small errors.

So, is it really necessary to check the sawn surfaces of the tails before proceeding to mark and saw the pins?

With good sawing skills, frequent repetition, and an easy-going wood, you may need little or no checking. Realistically however, it is not easy to make all the saw cuts right on, and checking takes very little time and effort. And while you or a demonstrator may be heroic in pine, what about oak, shedua, or hard maple? Also, it’s a lot easier to dovetail a 3/8″-thick, 3″-wide drawer side than a 3/4″-thick 12″ carcase side.

I suggest be realistic and reasonably careful in your work without being timid or plodding.

dovetail square

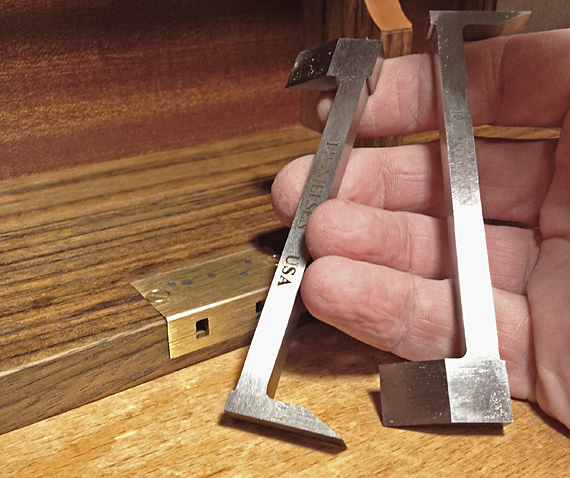
Here is the little square I use to check the sawn sides of the tails as well as the adjustments I make by paring them. I made this tool about 30 years ago.

The beam, made of pre-ban Brazilian rosewood (Dalbergia nigra), is about 4 1/4″ long x 3/4″ x 1/2″. The 1/16″-thick brass blade is 11/64″ wide, which can fit between almost any pair of tails that I make. At almost 1 3/4″, it is unnecessarily long – maybe I envisioned sometime making giant dovetails. The square is accurate to less than 0.001″ on both sides, a tolerance not too difficult to achieve in this size tool with patient filing and scraping.

The T shape allows the beam to register on the face of the wood on both sides of the measurement point. This makes it fast and convenient to use. It also averages out any trace of cupping that might have creeped into the board since it was four-squared.

There are two excellent manufactured tools for this task. One is the little (in size but not in price) Starrett 14D square, shown below, which has a blade 5/32″-wide over most of its length that is cut down to a mere 3/32″ wide over the remainder.

small squares

A lot less expensive is Sterling Toolworks’ Dovetailing Rule. This blade fits in a 6″ combination square stock (Starrett and others) and has a section just under 3/32″ wide to fit between virtually any pair of tails. Chris Kuehn, founder of Sterling, has produced a practical, commercially available solution.

Category: Tools and Shop  | Comments off
Author:
• Friday, December 18th, 2015

woodworking tools

It has been a while since I expanded this wish list, so here goes.

1. Is it too much to ask for Lee, Lie, or some other great maker to come up with a modern compass plane? To use this tool effectively, think of the compass plane as a light jack plane, not a smoother, for curves. As with other hand planes, I have little doubt that modern manufacturing, informed by history, will outdo vintage models.

2. Speaking of tools for curves, a curved rasp, flat across its width, would be nice. Start with the idea of the “curved ironing rasps” made by Auriou (pictured above) and Liogier but make one about 6-7″ long, 1 1/2″ wide, with a knob on the leading end and a near-vertical handle at the rear. And Santa, if you’re listening, I want the radius of the curve to be smaller toward the rear and larger toward the front. Medium and fine grain, thanks.

None of the following currently available tools quite fits the bill: flexible floats, the very coarse Liogier Beast, and the Surform shaver. The latter is decent when modified, but it’s rather short.

3. The Pony brand 22″ hard-tooth saw with three-bevel, Japanese-like teeth is a wonderfully useful stock breakdown tool and a great value at about $16. It crosscuts like a demon but does not rip very well. A 26″ rip tooth version would be a very useful bargain.

Pony hand saw

4. I still haven’t given up on advocating a higher bed angle for bevel-up bench planes. About 22.5° would be good. This is a large topic that has been addressed earlier on this site but here are some highlights. [I should add here that this is mostly applicable to bevel-up smoothing planes.]

Compared to a 22.5° bed, the 12° bed angle in Lee and Lie bevel-up models may have a slight advantage in reducing the downward deflection of the blade edge but I think this is made largely moot by the excellent support of the blade close to its edge that is provided by the bevel-up design.

The 12° bed creates problems with sharpening. For example, to get a 55° attack angle, the blade must be sharpened to a 42.5° secondary bevel. That makes it significantly more difficult to produce and retain a good edge.

Even if you don’t agree with my contention that such a blade creates a fatter wedge that is more difficult to drive through the wood, and that the only thing the woods “sees” is the attack angle, then why not use a 22.5° bed and make edge creation and retention easier?

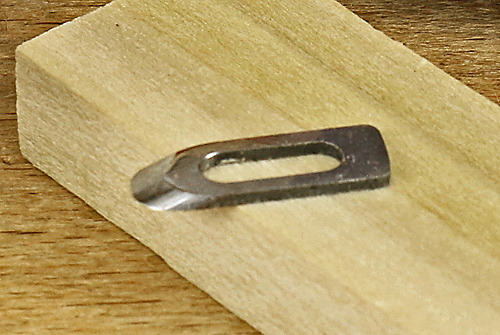
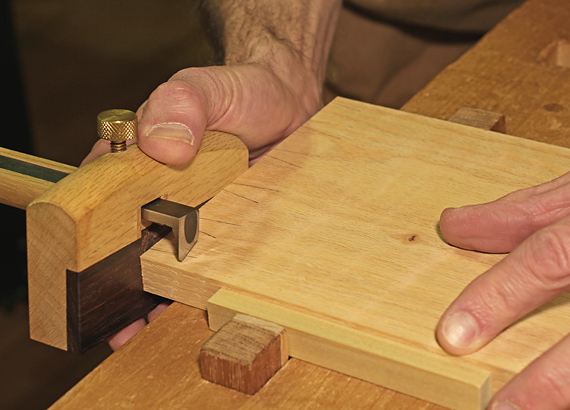
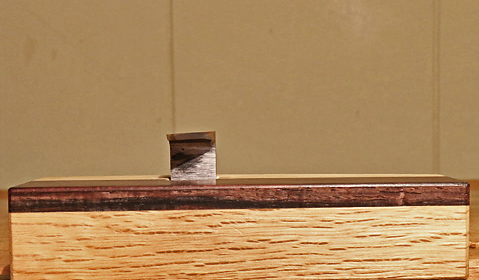
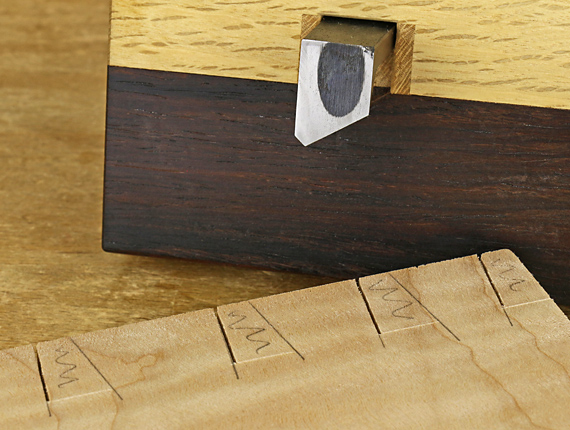
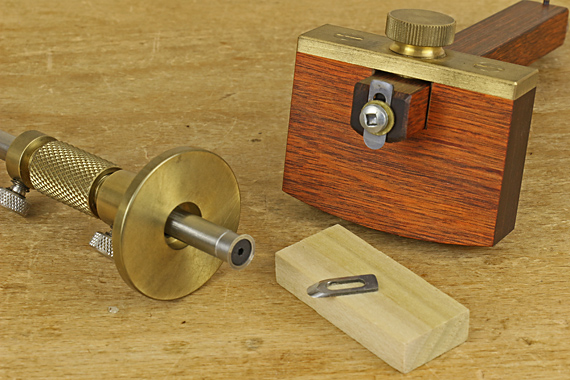
5. To mark pins from tails, in some situations, I prefer to use a chip carving knife like this, modified to eliminate the secondary bevel. I learned this idea from Chris Becksvoort.

However, it is not easy to flatten both sides of the blade to meet at the edge in a single bevel because the angle gets quite small, making the edge fragile. It would be nice to have a manufactured version. The sides of a blade 5/16″ wide and 1/8″ thick at the back would meet in a single bevel at 25°.

6. I wish the pads on my earmuffs did not squeeze the temples of my glasses against my skull. It’s uncomfortable. And I hate earplugs.

7. When jointing and planing to get flat stock, the thickness of some boards seems to disappear faster than cash in my wallet. I don’t need a board stretcher, I need a board inflator.

Hope is a good thing.

Category: Tools and Shop  | 8 Comments
Author:
• Monday, September 28th, 2015

Suehiro Gokumyo 20,000

My new, new (ugh) favorite fine finishing stone, the Suehiro Gokumyo, is a real thoroughbred. Nominally 20,000 grit/0.5 µ with a tight distribution of particle size, it can produce magnificently sharp, clean edges.

This is a very hard stone in all respects. A hard, tough binder makes it extremely wear resistant, so it retains a flat surface very well and requires little maintenance. It is virtually non-porous, so no soaking is required – just splash and go.

When first using the Gokumyo, do not expect the genial feel of a Chosera 10K or a soft waterstone. The hard feel of this stone under the steel is initially formidable. However, once you tune in to just how awesomely fast and smooth it is removing steel and adjust your sense of feedback, it becomes an efficient joy to use. Nonetheless, to get the most out of it, you do need good sharpening skills.

The Gukomyo comes with a 1K/3K nagura but I prefer my shop-made 1200-grit diamond nagura to quickly enhance feel and performance. I have not encountered the grabbing or stiction that many of the Shapton stones tend to produce, and one does not need to baby this stone like the Chosera 10K.

Having worked with this stone for several months now, it produces great edges in all the main steels in my shop – ­A-2, O-1, and Japanese blue and white. I transition from the 8000/3µ DMT Dia-Sharp diamond stone, used with a light touch, to the 20K Gokumyo. True, that is a sizable leap but it works, and it minimizes the number of stones and speeds the process.

The Gukomyo 20K is discussed fairly widely on the internet among straight razor aficionados but has not received much attention from woodworkers. The best and least expensive source for Suehiro Gukomyo finishing stones is Tools From Japan, which is actually based in Japan. Proprietor Stu Tierney is tremendously knowledgeable and generously helpful. [This review is unsolicited and uncompensated.] Yes, this is an expensive connoisseur’s stone but at 20mm thick and so wear resistant, it should last an extremely long time.

With this and the transition to diamond stones, the revolving door of sharpening stones in my shop seems to have thankfully reached an end.

By the way, anyone want to buy some used Shapton glass stones or other sharpening gear at a nice price? (Please send me an mail.)

Author:
• Saturday, September 26th, 2015

diamond stone sharpening

Sharpening tools should integrate into a logical system. Here is how and why I have revamped my system to use diamond stones as the workhorses.

The tools

The system uses three DMT Dia-Sharp 8″ x 3″ continuous surface diamond stones, a very fine ceramic finishing stone (about 1/2µ), and the Tormek 10″ grinding wheel. The diamond stones are: 45µ (325 mesh), (1200 mesh), and (8000 mesh).

At this size, these diamond stones fit in the same holding device as most waterstones and provide enough length to accommodate a honing guide, if desired. I measured the flatness of each using a Starrett straightedge to be better than 0.0005″ (half a thou) over the whole surface.

Diamond stones cut wonderfully fast, require minimal maintenance, and last a long time. Compared with coarse and medium waterstones, they create less mess, and minimize the chance of transferring grit from stone to stone via the blade or a honing guide.

The processes

A tool makes only infrequent trips to the Tormek to reconstruct the primary bevel. The 10″-diameter grinding wheel creates a mild hollow. I usually grind barely out to the edge or just short of it. Next, I clean up the primary bevel with the /1200 diamond stone by creating small flats on both ends of the hollow, and sometimes use it to start the secondary bevel (e.g. to start a slight camber). Then I use the /8000 diamond stone to form the secondary bevel, and finally, the 1/2µ ceramic stone with my diamond nagura to bring it to an exquisite edge.

The 45µ/325 diamond stone supplements the Tormek, such as for forming the primary bevel on certain awkward or small tools, or for adjusting a large camber.

For resharpening on the secondary bevel, which is what we are doing most of the time, I use the finest stone I can, based on how dull the edge is. The idea is to strike an efficient balance that avoids spending too much time on the finer stones while minimizing the depth of the initial scratches that later must be removed.

Thus, if just a bit of touch up is needed, the ceramic finishing stone alone may suffice. More often, I’ll start with the 8K diamond, or, if the edge is quite dull, the 1200 diamond, and work down from there.

When working on the secondary bevel, it is important to use a light touch on the diamond stones. I back off any remaining burr or use the “ruler trick” only on the ceramic finishing stone to preserve the polish on the back of the tool.

The key to this system is that diamond stones comprise the literally central position in the process where their speed and responsiveness quickly get the edge ready for the “money” stone – the finest stone.

For the most critical edges, such as a preparing a smoothing plane blade for the finest work, I finish off the edge by stropping it on leather charged with diamond paste down to 1/8µ, perhaps just to make me feel better.

Though these are my usual processes, the great speed of the diamond stones makes it easy to improvise steps to accommodate different situations such as edge nicks, different steels, edge reshaping, etc.

Why these three grits of diamond stones?

DMT diamond stones

I chose these stones (45µ, 9µ, and 3µ) empirically by experimenting with small stones, basing my judgments on sharpening efficiency and edge performance. The key point is that this set of stones works well for me as a system.

Factors in sharpening stone performance are numerous and complex; grit size is only one of them. A diamond stone performs quite differently than a waterstone of the same nominal grit, so using the same numbers for choosing a series of each type of stone would make little sense. Trial and observation work best.

This set of stones yields for me an efficient balance between minimizing the number of stones and minimizing time. I can maintain proper edge geometry, and get very good responsiveness and feel of the steel on the stones at each stage of sharpening. Overall, the increments in grits seem just about right.

Such choices are certainly subject to personal preferences. For example, many woodworkers may prefer the 8K diamond to be the final stone and finish off the edge with some stropping, or prefer to use larger or smaller increments in grit size.

Category: Tools and Shop  | Comments off
Author:
• Sunday, May 31st, 2015

Nexabond glue

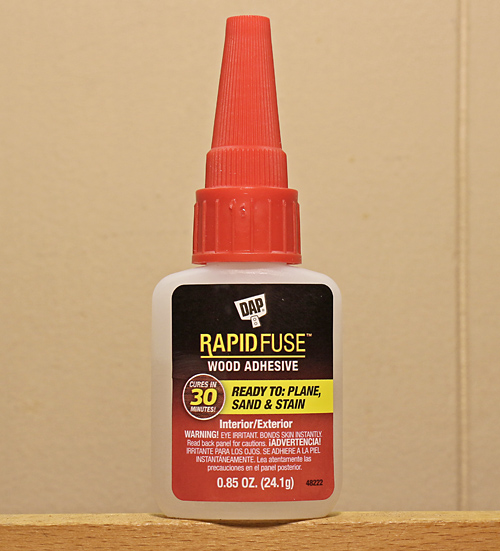
[Addendum 12/7/16: As of 3/1/16, “Nexabond” products are no longer available but the Nexabond 2500M (Medium set time) formulation is sold widely by DAP products as RapidFuse Wood Adhesive. The short and long set Nexabond formulations are no longer available.]

With this glue, we’ve got a high performance, convenient, fast-setting cyanoacrylate specifically formulated for woodworking. Fine, but there are lots of other good glues, so why do we need this one?

The main advantage of Nexabond’s fast set is that a glued assembly can be brought into the next stage of construction much sooner than with PVAs or most other common glues. The clamps come off, freeing both the clamps and shop space, and the assembly can be manipulated. Depending on the projects you build and your shop circumstances, this can significantly change the workflow.

Maybe. In my shop, which is probably like a lot of other low-volume small shops, speedy glue setting is usually not a big practical advantage. For example, the work flow proceeds just fine as I put aside a glued up tabletop and move to other work.

However, there are other times when it would be very helpful to have the glue set right away. In fact, there are more of these occasions than I first thought. As an example, it is nice to glue up a drawer bottom and have it ready to be raised and fit shortly thereafter with the bonus of not having to worry about moisture or swelling at the glue line. Generally, the advantage of fast setting seems to come up when adding components such as a partition, inside frame, or secondary stretcher to a primary structure where the obstruction of clamps would delay further work.

Moreover, there are situations where clamping small parts is awkward or impossible. With Nexabond, small parts can be held in place by hand until sufficient strength has developed. For example, installing corner blocks in a table went a lot easier with Nexabond.

The option of Nexabond has sometimes changed my approach when otherwise it would not have occurred to me. For example, when making a bent lamination form, successively stacking and pattern routing the layers was a breeze with the glue working at my pace. In general, Nexabond is very handy for making jigs.

The main point is that it’s great to have the option of the quick set. I see Nexabond augmenting, not replacing, PVAs and the other glues in my shop.

I’ve also been finding that Nexabond does a good job on end grain, perhaps better than any other glue I’ve tried. It seems to work well by applying a thin sizing coat to the end grain, waiting 1-2 minutes, scraping it smooth, then gluing the joint as usual. Below are some samples showing that the bond exceeded the strength of poplar but not red oak. That’s pretty good for an end grain-to-side grain bond.

Nexabond glue

All that said, there are major situations where the fast set is a disadvantage for me. When gluing dovetails or a leg-to-apron assembly, I want the extra time after closing the joint to check for square and adjust the clamp angles as needed. Of even more concern is the possibility of a joint seizing when it is partly assembled as I hurry to clamp it home to the shoulder lines.

In some assemblies where placement and trueness are virtually guaranteed without tweaking, this glue might work fine. We’re told it works well in production shop work.

There are also some joints where wood swelling is part of the strategy and water is therefore an advantage, so for these, I will continue to use PVA glue: biscuit joints, dowelling with dowels that have compressed grooves, and, in my opinion, Dominos.

In summary, as a small shop, low volume, custom woodworker, I definitely want Nexabond in my shop, I trust it, and I will be using it a lot, more than I thought at first, though I do not see it replacing PVAs as my primary glue for major assemblies.

[Note to readers: This series on Nexabond glue can be conveniently viewed in a single page by accessing it from the Series Topics page, to which there is a link just below the header image. There you will also find 19 more series on useful woodworking topics.]

Category: Tools and Shop  | Tags:  | 5 Comments
Author:
• Saturday, May 23rd, 2015

Nexabond glue

[Addendum 12/7/16: As of 3/1/16, “Nexabond” products are no longer available but the Nexabond 2500M (Medium set time) formulation is sold widely by DAP products as RapidFuse Wood Adhesive. The short and long set Nexabond formulations are no longer available.]

The informal shop tests shown in the previous post suggest that Nexabond glue’s bond strength develops slower in cherry than in the other species tested, red oak and poplar. I asked Peter Stevenson, chemist at Sirrus, the maker of Nexabond, about this. I wondered if the wood chemistry varies a lot between species. Here is his answer, quoted here with permission (emphases mine):

“In fact, the wood chemistry does vary drastically in some cases. One of those being cherry, which is much more acidic than poplar, maple, and oak. The acidic properties of the wood act as a secondary stabilizer of sorts and can decrease the polymerization process. Additionally, even within the same wood species you can see some variation in set time relative to early and late wood. While we have observed some variation in set time, we still see adequate bond strength within half an hour for return to service/processing demands. There will, of course, be some exceptions relative to specific scenarios which may arise.”

This leaves me a bit confused theoretically, because I thought red oak is more acidic than cherry. Maybe it depends on the specific acid compounds. I am not a chemist and fortunately don’t have to be one to do woodworking. What matters is what happens in the shop.

Thus, the practical conclusion for woodworkers, in my view, is that when working with any unfamiliar materials – woods, finishes, hardware, and glue – it pays to do a bit of trial-and-observation in the shop. In the case of Nexabond, it makes sense to take a few minutes and some wood scraps to see how quickly bond strength develops in a particular species before committing to a specific time frame for removing the clamps from a set of glue ups.

Of course, if you are able to clamp the work and keep the clamps occupied for at least about a half hour, then it won’t matter. But five minutes may be too soon in some cases, depending on the joint, how you will handle the assembly, and, as we now learn, the wood species.

Gain direct experience with even with the best tools and materials to use them effectively.

Next: some thoughts on practical applications of Nexabond. (The basics were covered in the first installment.)

Category: Tools and Shop  | Tags:  | 2 Comments