Archive for the Category ◊ Techniques ◊

Author:
• Wednesday, August 31st, 2016

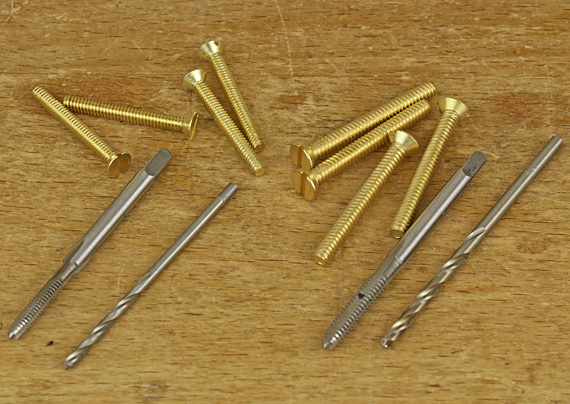
brass machine screws

When installing solid brass hardware in fine woodwork, matching solid brass screws are essential to complete the look. However, brass wood screws are weak compared to their steel counterparts and there often is limited depth with which to work, such as in a small box lid.

Lee Valley recommends the use of brass machine screws as having much better strength than brass wood screws in short holes. I have tried this with excellent results with 4-40 (above, left) and 6-32 (above, right) flat head brass machine screws. Here are the details.

The why

The machine screw has the advantage of a thicker, non-tapered body that is less likely to break than the wood screw as you torque it down. Furthermore, because the machine screw threads have already been cut by a tap, the screw goes in easily and only tightens as the head meets the countersunk hole in the hardware.

By contrast, a brass wood screw has to cut its own threads and the screw is stressed throughout the range of installation. Yes, you can use a steel screw to pre-cut the threads, but good luck trying to find a steel wood screw with threads that match the pitch of the same nominal size brass wood screw. They usually do not, which means you are simply breaking down some of the inter-thread wood that the brass screw’s holding power depends upon. A recent Brusso hinge set came with such a mismatched steel screw.

Tightening into a properly tapped hole, the brass machine screws feel very solid. I find I can now relax with this method for small hardware installation.

The how

The preparatory hole is drilled at the root or “minor” diameter of the machine screw (the diameter of the screw body without the threads), which yields 100% thread depth when the hole is tapped. Typical work in metal uses 75%, or less, thread depth by using a pilot hole somewhat greater than the root diameter of the screw.

For 4-40 machine screws, the minor diameter is .0813″. This is approximated with these drill bits: 2mm (.0787″), #46 (.0810″), and 5/64″ (.0781″). For 6-32, the minor diameter of .0997″ is approximated with these bits: 2.5mm (.0984″), #39 (.0995″), and maybe 3/32″ (.0938″).

Fortunately, those wonderful folks at Lee Valley sell inexpensive sets of drills in the metric sizes with imperial taps through 1/4-20. In cherry, maple, and shedua (ovangkol), all tight-grained hardwoods, the method worked very well in 4-40 and 6-32. Of course, it pays to experiment beforehand in the specific wood species.
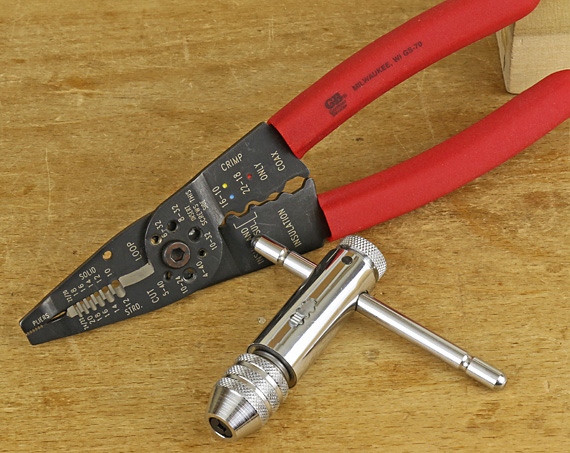
tap wrench

Use a standard-point tap and ratcheting hand tap wrench for most situations, but consider a bottoming tap when you want to eke out every last bit of functional depth. Tap carefully, without wobbling the tool, especially for the smallest sizes whose wood threads are still fairly delicate while in the formation process. Even fine threads in wood are surprisingly sturdy once they are fully filled with the screw, but I like to harden the wood threads with a tiny bit of cyanoacrylate glue. Epoxy is not worth the hassle in my opinion.

I bought a supply of brass machine screws 4-40and 6-32 in longer lengths than required and easily cut them to length with an electrical multitool (shown), and then filed the cut edge clean.

Since we are often dealing with shallow depths and small tolerances, make sure the screw will actually tighten against the countersunk hole in the hardware and not just tighten against the taper left by the tap at the deep end of the hole.

I often prefer to enlarge the countersink and hole in brass hardware if there is room to accommodate the next larger screw size, e.g. 4-40 to 6-32, for more strength.

Category: Techniques  | 3 Comments
Author:
• Monday, May 16th, 2016

glue joint test

When to remove the clamps

The instructions on the Titebond III bottle recommend “clamp for a minimum of 30 minutes (longer is better)” and “Do not stress joints for 24 hours,” which is how long PVA glues generally take to fully cure.

I leave the clamps on at least overnight. There really is no hurry to remove them unless they are needed for other work. Furthermore, I will not be working the board for at least 24 hours to allow time for the joint to condition and the board to reach a uniform moisture content as excess moisture exits the glue line area. This avoids producing a sunken joint line or depressions over the biscuits when surfacing the panel.

Also, it seems plausible that the joint could be stressed from changes in moisture and applied forces if the clamps are removed too early in the curing process.

For these reasons, I put the assembly aside and wait until the next day to remove the clamps, tending toward longer times for larger work, and up to 24 hours if there are any doubts about the behavior of the wood. Small, light panels such as a drawer bottom can be unclamped sooner.

Flattening the panel

Hopefully, this will be fairly easy and corrections will be well within the range of hand planing for small to medium panels if biscuits were used for alignment. The panel only needs to be flat enough for its function. Don’t worry about small imperfections that yield to light hand pressure and, for example, a table frame will easily flatten. On the other hand, don’t allow an errant panel to twist the frame of a light cabinet door that needs to fit and close precisely.

As needed, work diagonally with the jack plane to true the surface, then finish off with the smoother or scrape or sand to the final surface.

If you glued up a large panel in stages, you may be able to flatten the intermediate glue ups with a wide jointer-planer, minimizing the work required on the final panel. For a big table top that needs significant correction, consider using the services of a local commercial shop with a giant wide-belt sander.

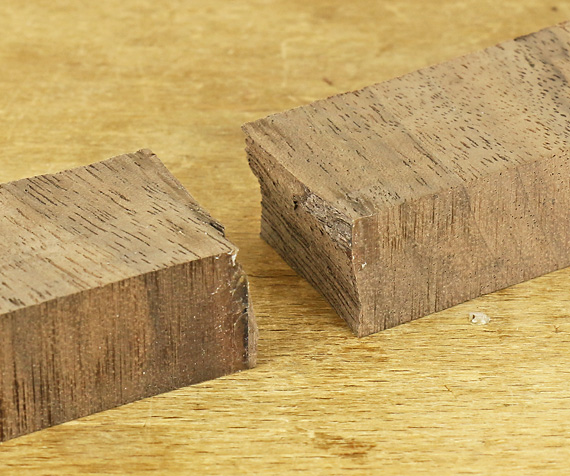
It is reassuring to do some testing on the off-cuts, as in the photo at top. I grasp both ends of the off-cut and bash the joint line against a hard table edge. Though the force is directed on or very close to the joint line, only the surrounding wood will break while the joint line remains intact.

Summary

To confidently and efficiently produce sound edge-to-edge joints and beautiful glued-up panels, here is what to do:

  1. Select reliable wood to produce visual and structural harmony, especially along the joint line.
  2. Use straightforward methods, finishing with hand planes, to make good joint surfaces that fully meet. Use the slightest bit of camber as a one-sided tolerance.
  3. Use biscuits for alignment in boards thick enough to accommodate them and the special method for small, thin boards.
  4. Use parallel-head clamps with a simple tunable setup.
  5. Rehearse the glue up then work fast.
  6. Feel good about what you made – it’s going to last!

Closing thoughts

I hope this series on edge-to-edge joints will assist you in this essential aspect of woodworking. In writing this blog, I want to empower people to make things and experience the quiet – yet great – joy of it. I’m not an infallible guru – no one is. Nevertheless, I can assure you that these methods are carefully thought out, researched, have been used by me for many years, and actually work in my shop.

Of course, there is more than one good way to do almost everything in woodworking, so you will surely find those who disagree with some of what I have presented. No problem. Please do consider alternatives, try things in your shop, and ultimately use your judgment to find what works for you in your shop to give you the results you want.

NOTE: The entire 6000-word series on Edge-to-edge Joints and the many other series on this blog can be conveniently accessed via the Series page.

Category: Techniques  | Tags:  | 2 Comments
Author:
• Sunday, April 24th, 2016

glue brush

This discussion primarily applies to PVA glue, which most woodworkers use for these joints. I prefer Titebond III for its relatively long open time, ease of use, and dependability. Alternative glues with longer open times include special slow-set PVAs or liquid hide glue.

The gluing process

Speed is paramount. It is absolutely imperative that the thin layer of glue not start to skin over or stiffen. This can result in a weakened joint and/or a glue line that is too thick. I suspect this is one of the main causes of failed edge joints and cosmetically poor joints.

A good glue up requires a rehearsal – it is worth the time. Dry clamp the boards, working out clamp placement and distribution, and examine the joint. When readying for the glue up, prepare the clamps open to the correct length. Rehearse how you will hold and move the boards for glue application. For example, the middle of a three-board panel needs glue on both edges. How will you support it for gluing the second edge?

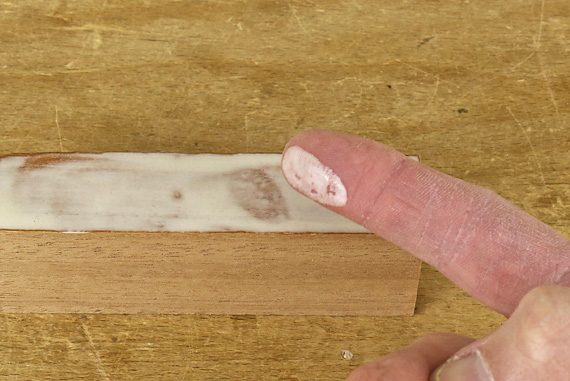
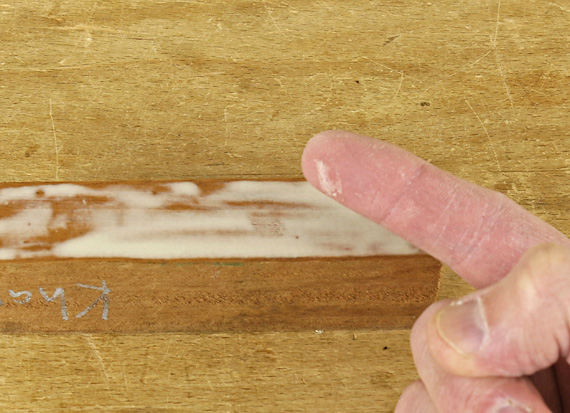
Again, if the glue skins over at all, you lose, so when it’s game on, move fast! In the first photo below, the glue is good to go but the glue that is partially skinned over and stiffened in the next photo will produce a failed joint.

glued edge

glue skinning over

Applying glue to both sides of the joint ensures good wetting and equal penetration on both sides of the joint. Set up two edges side-by-side and work on both at once. First, put a modest amount of glue in the biscuit slots where its bulk will delay skinning over. To apply glue to the joint surfaces, I run a bead directly from the bottle and then spread it out to the edges with a brush or roller. Using my finger to spread the glue seems inevitably to transfer glue to somewhere I don’t want it.

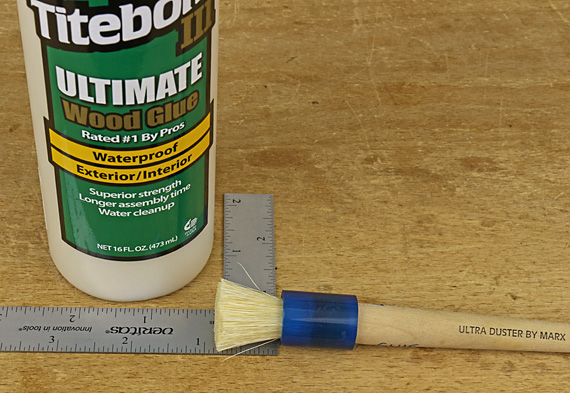
I like the inexpensive hog-bristle brush available from Tools for Working Wood but I crop the 1 1/2″ bristles to about 7/8″ (see photo at top), which allows me to push the glue faster using it nearly upright. Flux brushes are a poor substitute as they cannot spread the glue as fast and shed bristles on the work.

Squeeze out

I aim for light squeeze out along the full length of the joint, trying to avoid dripping. In theory, one could apply the perfect amount of glue that is just short of producing any squeeze out but then when you assemble the joint and see no squeeze out, you would not be sure if there is just the right amount of glue inside the joint or too little. Thus, squeeze out is simply assurance that you have applied enough glue and as such, there is no point in making it excessive.

As for removing glue squeeze out, I prefer to wait until it is rubbery then lift most of it away with a sliver of wood cut to a chisel edge. Then I spot remove most of any remaining glue with a wet rag that is more than damp but less than drippy.

I recall reading somewhere that removing the squeeze out before it fully dries can cause the outside of the glue line to dry faster than the interior and thus produce a tiny gap on the outside. There may be some truth to this as I have infrequently observed a hint of gapping early on after clearing the squeeze out but it has never persisted in a well-made joint. Therefore, and also because removing substantial fully dried squeeze is a hassle and can chip the wood, I keep it practical and don’t worry about this issue.

Next: Finishing up, a summary, and a thought.

Category: Techniques  | Tags:  | Comments off
Author:
• Friday, April 22nd, 2016

clamp pressure

Clamping capacity

Can small shop clamping methods generate enough pressure to make a good edge-to-edge joint? The short answer is yes. Let’s look at the details.

The US Forest Products Laboratory in their very useful Wood Handbook, chapter 10, page 16 (2010 edition), recommends pressures of 100 pounds per square inch for low-density wood and up to 247 psi for the highest density woods. The book also states: “Small areas of flat, well-planed surfaces can be bonded satisfactorily at lower pressures.”

Jet claims (I suspect rather conservatively) 1000 pounds of force can be generated by their parallel-head clamps while Bessey claims 1500 lbs. for their similar K Body Revo clamps. As an example, 1500 pounds of force produces 200 psi over a 10″ length of 3/4″-wide glue line (7.5 square inches area).

So yes, adequate pressures can be generated in the small woodshop. There’s no need to get out the calculator, just lean toward more clamps and more torque with denser species/thicker boards and less beef with less dense species/thinner boards. And, of course, make good joints.

Clamp spacing

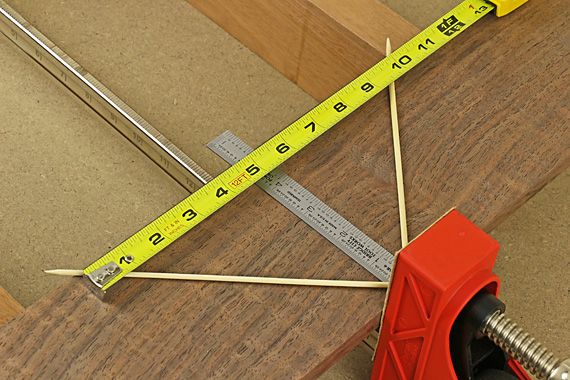
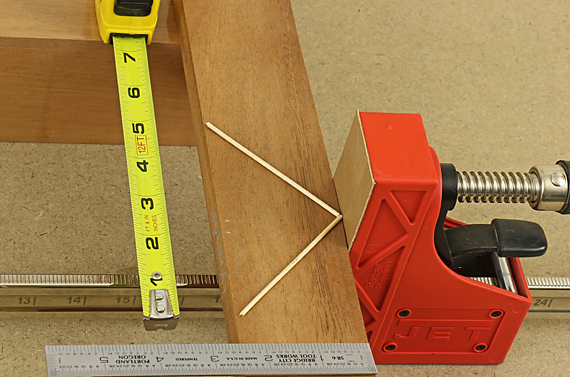
How about spacing the clamps? This depends partly on the above issue but also on the mechanics of the force spread. Even a wanabe engineer like me can surmise that the board is acting as its own caul and thus the transmission of force to the glue line depends on the width and stiffness of the board. I long ago adopted, with consistent practical success, Ian Kirby’s rule that the clamp force can be assumed to spread in a 45° fan.

Thus, referring to the diagrammatic photos herein, the maximum distance between clamps (remember, there will be clamps above and below the panel) should be twice the width of the narrower of the two outer boards in the panel. Shown at top, the 5″-wide board requires fewer clamps (maximum 10″ apart), than the 2 1/2″-wide board below (maximum 5″ apart), if all else is equal.

clamp pressure

Assembly

Regarding assembly, I first moderately tighten the center clamp, and then work outward, avoiding heavy pressure. Then I add the upper gang of clamps, moderately tighten them, check with a straightedge for problems, and make any needed adjustments. Then I torque down everything, and check/adjust again. All of this is done very quickly!

Accordingly, I glue up any panel with more than three boards in separate sections, and usually prefer to limit the sections to only two boards, especially if the intermediate panel can fit in my jointer-planer. This is wood – nothing is perfect all the time. I’m usually working with very expensive stock and like to preserve the opportunity to reset any errors rather than let them accumulate.

Next: Glue issues.

Category: Techniques  | Tags:  | Comments off
Author:
• Friday, April 22nd, 2016

glue up clamps

Clamp setups

The most important step in a trouble-free clamping regimen for edge joints is to get a set of parallel-head clamps, such as those made by Jet and by Bessey. These invaluable tools eliminate most problems.

It is best to do the glue up on a flat base such as a workbench with a sheet of 3/4″ MDF on top or a dedicated assembly table. You then want to transfer that flatness to the panel to be glued.

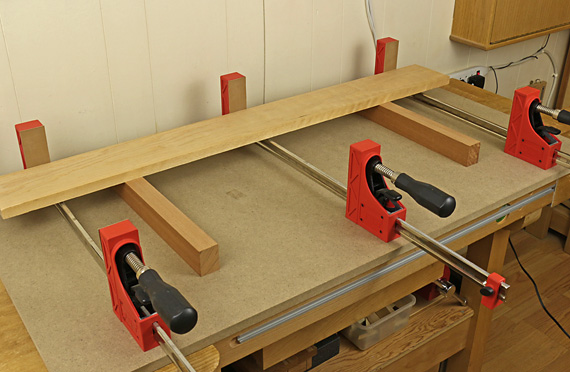
The best and most versatile method, especially useful for gluing up long boards, is to rip two thick boards to the same width and set them on the work surface parallel to the clamp bars where they will act as bearing strips. The top photo shows the bearing strips with the lower gang of clamps. One panel board is mocked up in place.

Make the height of the bearing strips sufficient for the boards to slightly clear the clamp bars, and cover their top surfaces with packing tape because glue will squeeze out on to them. You can make corrections for imperfections in the work surface by simply shimming the bearing strips.

[Tip: To make adjustments for creating a flat, untwisted bed for the panel, think of the bearing strips as winding sticks. View them directly as such or place actual winding sticks on top of them. Shim as needed.]

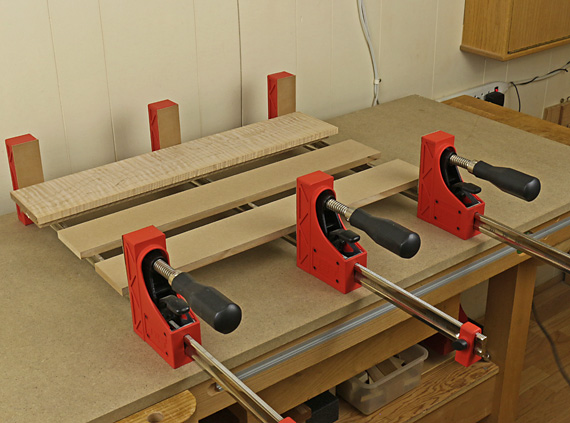
If the work surface is flat and the clamps uniformly sized, a quick method would be to put the boards directly on the clamp bars. However, glue will squeeze on to the bars, which is messy even if they are covered with plastic, an additional nuisance. Alternatively, pieces of 1/2″ MDF can be placed across the clamp bars and away from the glue lines, as shown below. This works well for small scale work and will keep glue off the bars unless it drips.

glue up option

These setups keep the boards close to the underlying clamp bars and thus minimize forces that would tend to bow the bars. A possible problem with the second method, where there is no air space between the underlying clamp bars and the work pieces, is the transference of bow in the tensioned clamp bars to the glued up panel, though in practice and testing, I have not found significant bowing using heavy clamp pressure.

I almost always alternate clamps above and below the panel because this seems more reliable and safer, especially when later moving the assembly around the shop. Further, it affords an opportunity to tweak the pressure balance if things are amiss. After experimenting with light panels, observing for distortion, I think one could get away there without alternating, but I have found no practical disadvantage to alternating in any case.

The bars of the fewer upper gang of clamps will be further from the panel boards, so in theory, this produces asymmetric bowing forces. In practice, this is little or no problem but if there is any upward bowing of the panel, you can slant the clamp heads or use the short sides of the heads to bring the bar closer to the work piece.

Again, I have never found the need to use over-under cauls or those specialized clamps that produce a similar effect.

One more thing: Parallel-head clamps also obviate the need for the pyramidal pressure blocks described by David Charlesworth in the article “Accident Prevention” in Volume 2 of his excellent Furniture Making Techniques series. The blocks (or similarly, rounding over the outer edges of the panel) make good sense to neutralize the effects of the bowing that seems to occur with the sash clamps he is using.

Next: clamp pressure and how many clamps do you need?

Category: Techniques  | Tags:  | One Comment
Author:
• Sunday, April 17th, 2016

biscuit alignment

When gluing up edge joints, you want to maintain proper alignment of the boards to produce a flat panel. Especially for small shop woodworkers, it takes a lot of work to flatten glued up panels, which accounts for the proliferation of specialized clamps and devices designed to keep the boards aligned during glue up.

Maintaining alignment

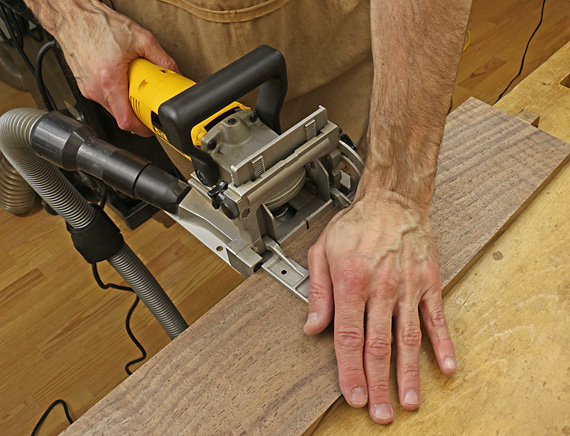
The simplest reliably effective answer is a tool you probably already own: the biscuit joiner. Start with flat boards and good edge joints. Place #20, #10, or #0 biscuits typically 8-12″ apart and just a couple of inches or so from the ends. Remember to account for the trim allowance so you do not leave an exposed biscuit in a tabletop.

The most consistent results come by pressing the joiner’s fence against the reference face of the board, which is secured slightly overhanging the edge of the workbench. Even for “standard” 3/4″ stock, this is easier and more reliable than trying to register the board itself against the bench and using the sole of the joiner as a reference.

Make sure the fence is flat and exactly square to the joiner’s face. Test to make sure the fence is also parallel to the blade/slot and if necessary, shim the fence with tape to achieve this. You can even use a 5/32″ slotting bit in a router to make the slots if you don’t have a dedicated joiner.

The biscuits are not necessary for strength. A well-made edge joint is strong enough without them, though they can’t hurt and offer some insurance against imperfections especially near the ends of the joint. The goal is minimize the work of flattening the glued up panel.

Some authors recommend hammering the boards into alignment during glue up. With the partial exception noted below I do not like that method. Time is very limited once the edges are brought together. Using a hit or miss process while playing with clamp pressure, rushing, and hoping are not my style of woodworking, particularly when a very fast and reliable alternative is available.

At glue up, squeeze glue in the slots before spreading it on the joint edges. If you reverse the order, the coat of glue on the edge has time to start skinning over while you are fiddling with the slots. Another option is to forgo gluing the slots, but why?

Later, when you are ready to plane or sand the panel, remember to avoid sunken areas above the biscuits by giving the extra moisture and consequent wood swelling time to dissipate. Use a pinless moisture meter or just check for remaining swelling with a small rule. Anyway, before working the surface of the panel, you have to wait for the immediate area of the glue line itself to loose its swelling but this small added delay for the biscuit areas is about the only real disadvantage of using biscuits.

I do not use any of the following: special over-under clamps, cauls, pinch dogs, dowels, Dominos, splines, or incorrigibly distorted wood that does not belong in a panel.

Thin panels

What about thin panels such as drawer bottoms that will not accommodate a biscuit? Here is a straightforward method using simple shop-made blocks to control the boards near their ends that will cover most of those situations. Depending on the length of the panel, a bit of tapping in the interior of the joint is usually necessary to align the boards but this is usually easy because it is a small panel with relatively light clamp pressure.


For shops that need to make lots of panels efficiently, such as dining tables and large frame and panel doors, the Plano Glue Press is one specialized tool that looks worthwhile.

The other major aspect of reliable alignment is clamp set up, which we’ll look at next.

Category: Techniques  | Tags:  | Comments off
Author:
• Tuesday, March 29th, 2016

handplanes

Hand plane?

I almost always use a hand plane for the final preparation of the wood surface prior to edge gluing.

To hand plane to a final edge as efficiently as possible, I prepare the edge on a well-tuned jointer, my Hammer A3-31, or in a few cases, my cabinet saw. By doing the power tool work accurately, it can take as few as two shavings with the hand plane to finish the edge. Yet they are important shavings because they produce the truest edge and leave the best quality surface for glue adhesion, unmatched by even the best machine.

A production shop using a dedicated ripping setup with a power feeder can produce excellent edges directly from the saw but they are no better and often not as good as those produced by a skillful small shop woodworker finishing with a hand plane. For less critical work, the edge from a tuned small-shop tablesaw may suffice but for high-end work I always use a hand plane, which affords the most control of the process.

Which plane?

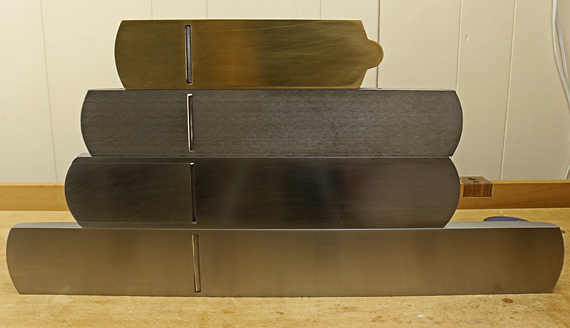
The photo above of the plane soles shows, from the top, a #4 smoother, a #5 bevel-down jack, a Veritas bevel-up jack with its longer infeed sole, and a 22″ #7 jointer with a 2 3/8″ wide blade. Unless you are doing only small work, it is worth having the jointer because its length will bridge valleys and level hills and so make it much easier to produce an accurate edge. You may prefer the massive 24″ #8 jointer with its 2 5/8″ blade but the #7 seems to suit my mostly medium-scale work.

It is important to realize that a very sharp blade is essential for accuracy. As the blade dulls, accuracy suffers because the edge deflects more, the shavings have to be thicker, and you have to push the plane harder with less control.

Methods

For boards up to about 2 feet long, especially if they are 1/2″ or less thick, I find that long grain shooting is the most efficient method. Close the two boards like a book and plane both edges at once so any deviation from 90° is self-correcting when the edges are later joined. Thicker boards can be planed individually, each in its book-match orientation to achieve the same benefit. Occasionally, the grain directions won’t work out but usually you are working on an edge with minimal figure runout and thus without a strong directional grain angle.

long grain shooting

You don’t even need a shooting board because the plane sole rides on the work piece, not on the edge of the shooting board. A flat bench top would suffice. Clamp the boards so they don’t shift. Use a shooting plane or an appropriate bench plane.

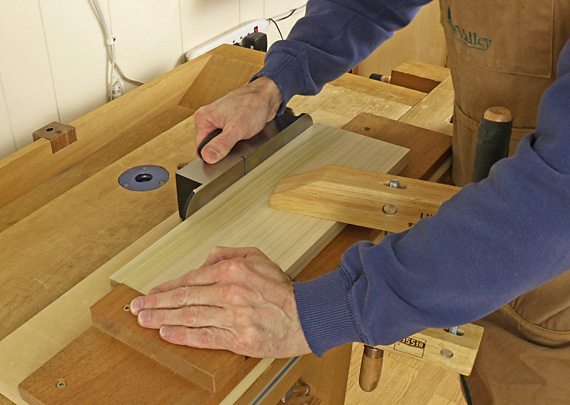
Similarly, you can plane two boards at once held book-closed in the front vise of the workbench, as shown below. If you have done a good job machining the edges and align them together accurately in the vise, the combined width will give consistent support to the plane while the self-correcting geometry will ensure a good joint.

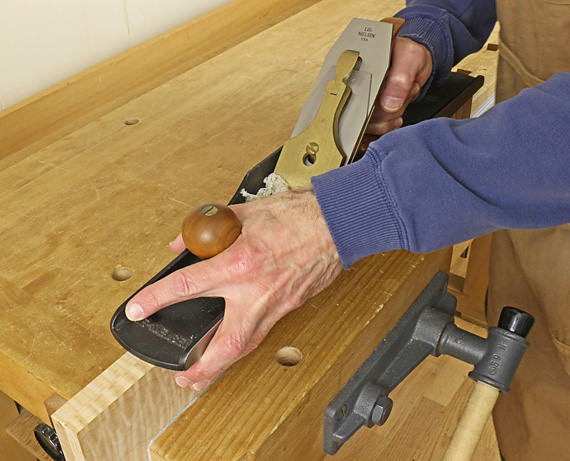
I spread my front hand widely across the plane to be able to sense any lateral tipping of the plane. I am not really using my fingers as a 90° fence but simply aim for consistency along the length of the cut. Errant tipping of the plane will introduce twist in the planed surface and an inaccurate joint.

edge planing

If planing two boards at once is unmanageable due to their thicknesses or lengths, plane each edge individually. Use a deadman or a jig in the tail vise to support the lead end of a long board while the opposite end is in the front vise.

Then, one option is to plane freehand, using your front hand as a fence. Your goal is to keep the sole of the plane at a consistent angle, hopefully 90°. Check your progress with a square. If your last shaving was the full width of the edge but the square shows the edge is a bit off, do not make the correction by taking a guess and tilting the plane differently. Rather, maintain the same supposed 90° and shift the plane laterally to use the slight camber of the blade edge to take a thicker shaving from the appropriate side. Since there is likely to be some systematic error in your attempt at 90°, it may help to plane the mating board in a self-correcting orientation, if possible.

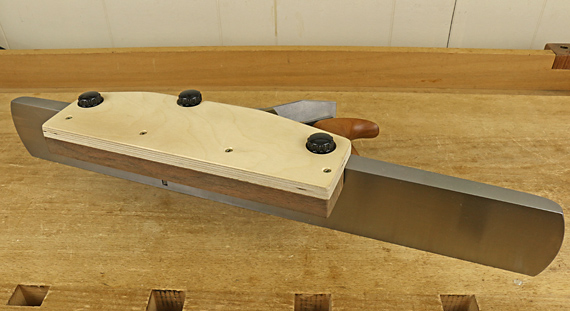
I prefer to use my shop-made plane fence to get the job done faster and more predictably. Below, the fence is attached with three hand bolts entering tapped holes in the sidewall of my Lie-Nielsen jointer plane. Lee Valley makes plane fences. This method has worked for me for 30 years.

jointer plane fence

Note that even with the fence method I still use a slight camber in the blade edge. This prevents any possibility of a concave (or supposedly straight) blade edge producing joint surfaces that kiss in the interior of the joint with hairline gaps at the outsides.

Use the method that gets the job done for you with the work at hand. With all these methods, try to finish with a full-length shaving.

Upcoming: edge joint alignment, clamp setup, and more.

Category: Techniques  | Tags:  | 3 Comments
Author:
• Saturday, March 12th, 2016

edge-to-edge joints

Board orientation

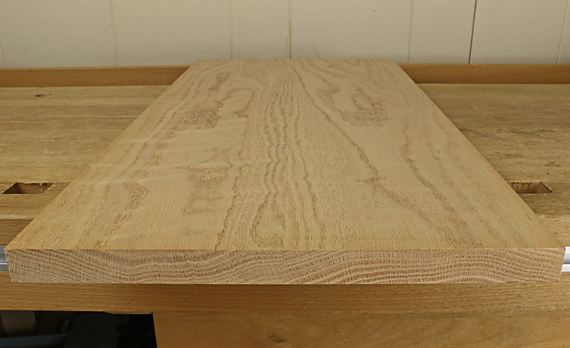
When gluing up flatsawn boards to make a panel, is it important to alternate the growth ring orientation of the boards? The short answer is no.

In general, I suggest go for the best appearance. The reasoning usually given for alternating heart and bark faces is that the full depth of the cupping in any season is confined within each board, and thus is particularly helpful in unrestrained panels. The case usually given for orienting all the boards alike is that cupping will want to produce one large curve, which is more easily kept flat in, for example, a leg-and-apron table.

There is truth to both assertions, though unless appearance strongly dictates one or the other, I tend to favor alternating the boards. Just thinking geometrically (see the endgrain photos below), I wonder if the restraint of a presumptive large arc of like-facing boards is inordinately stressing the joints in tension on the heart face of the panel in the dry season, and vice versa in the humid season.

You can avoid the issue by using quartersawn or near-vertical riftsawn boards. With flatsawn boards, you can minimize problems by assembling the panel from equilibrated boards in a workshop in the midrange of humidity, using narrow boards, choosing species with a low T/R ratio and volumetric movement, and avoiding aberrant boards such as those with crook or substantial twist.

If you alternate the heart and bark faces of flatsawn boards, pay attention to the grain orientation if you plan on planing the glued up panel by hand or machine. Look at the glue up in the top photo. The board on the left will be planed away from the viewer – “pith side, plane with the points” – and so will the board on the right – “bark side backwards.” (Thanks to R. Bruce Hoadley for the mnemonics.) In the photo below, the endgrain growth rings are also alternated but the proper planing directions of the faces are opposing. Thus, if you alternate rings, you’ll probably also want to alternate the cathedral points.

growth rings

You also have to pay attention to grain direction if heart and bark are not alternated but the choice is more apparent. The boards in the photo below are correctly oriented in this regard (plane toward the viewer).

growth rings

The camber question and how to check the joint

This is one of those perpetual arguments among woodworkers. Here’s my view.

I aim for just a trace of camber (hollow), simply as a one-sided tolerance. I do not want any kissing in the central length of the joint, which might create separation tension across the joint line at the outer ends where it is most likely to open. I would be satisfied with two perfectly flat edges but that is nearly impossible to reliably observe.

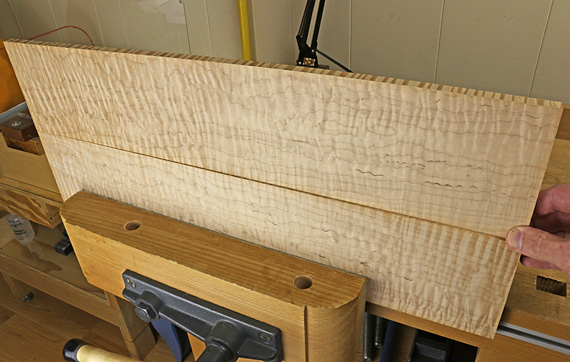
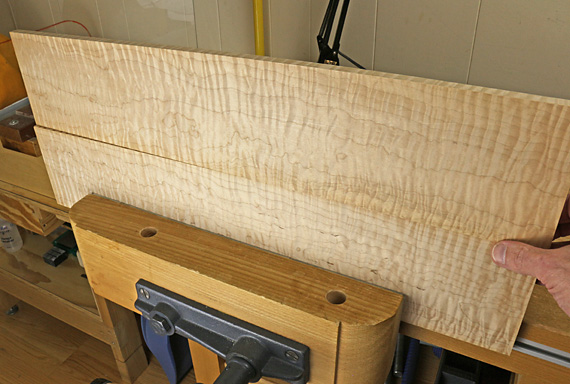
With any method of planing the edges (options discussed in the next post), I want to finish with a continuous shaving to ensure there are no localized bumps or troughs in the edge. Then the best test of the joint is to set the edges against each other as in the photos below.

Move the upper board by its end. It should barely pivot at the opposite end as in the first photo below. The gap in the middle of the closed joint should be nearly invisible but you know it is there by the pivot.

In the second photo below, the pivoting shows that the boards are kissing within the length of the joint. No good.

edge joint test

poor edge joint

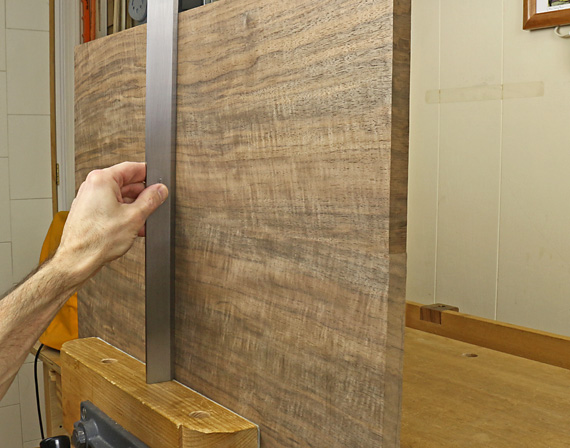
Also, check for twist within the joint by gently trying to rock the top board across opposite-end corners of the joint. Significant twist of the joint faces against each other will produce a subtle but surprisingly detectable rocking.

Check for flatness in a few places as below, again being aware of any rocking.  Ultimately, this is far more sensitive than directly checking if the joint surface itself is square to the face of the board.

If all is well, you know you have a joint that wants to be together and is not being forced into submission by clamp pressure.

edge joint test

Some woodworkers like to produce a more pronounced camber to be able to clamp the joint with a single clamp across the midpoint of the length of the joint. I acknowledge that this can work but unless one has a shortage of clamps, I consider this to be an unnecessary and awkward method with several disadvantages for most work.

Also, making a substantial camber in the joint on the assumption that insufficiently equilibrated wood will dry faster at the ends is basically starting off on the wrong foot.

Upcoming: options for hand planing, and more.

Category: Techniques  | Tags:  | 3 Comments