Archive for the Category ◊ Jigs and Fixtures ◊

Author:
• Tuesday, November 29th, 2016

woodworking jigs

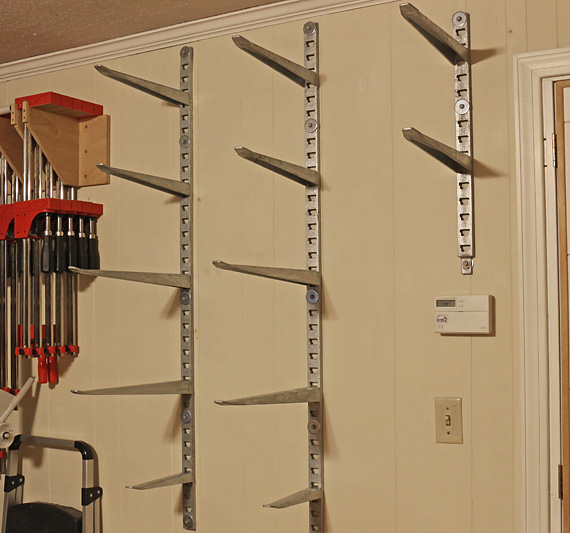
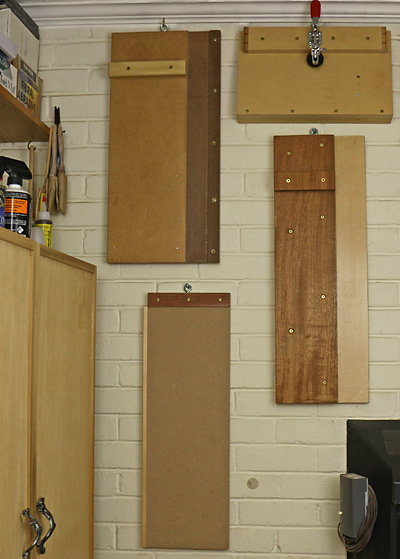
The previous post reminds me to catalog the Wall of Boards in my shop, as this may be a helpful reference for readers.

The most essential is the shooting board on the lower right. I cannot imagine working without at least a basic shooting board. Of course, it is used for long grain as well as end grain shooting. Go to this post for a few tips on shooting.

shooting board

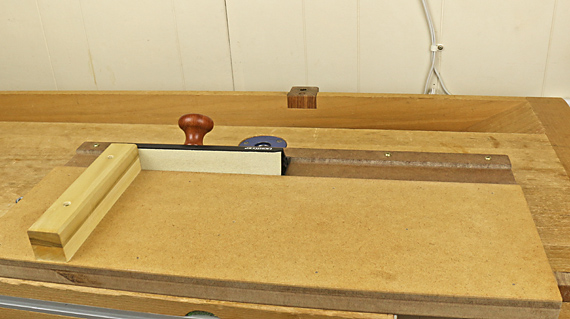
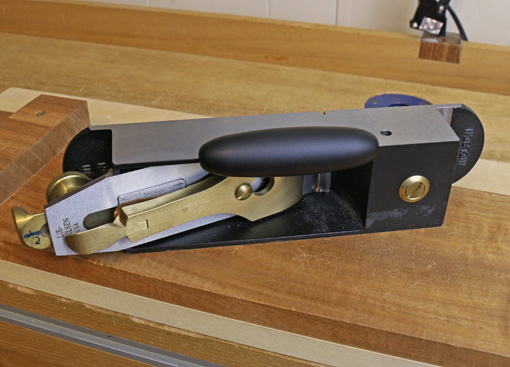
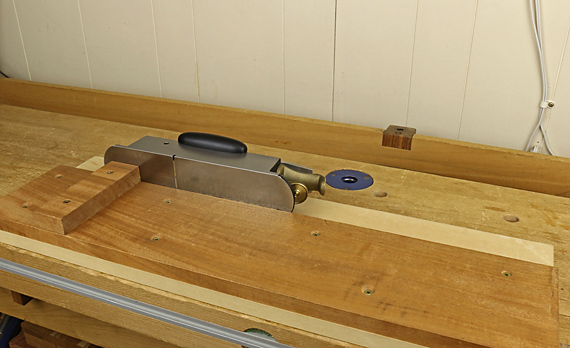
On the upper left is the least essential of the boards, but still quiet handy, the sanding shooting board, used with the Veritas Shooting Sander. It can save the day for small parts, thin pieces, and cantankerous wood.

shooting sander

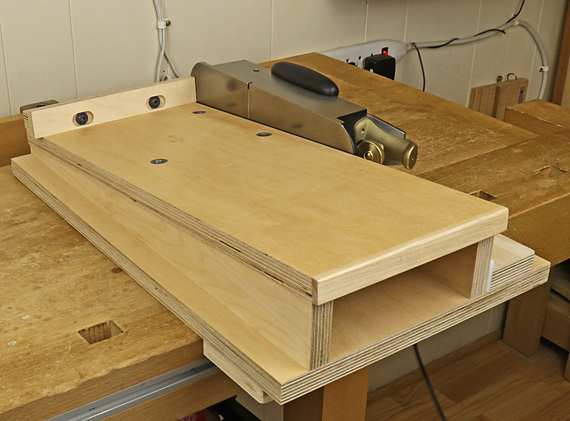
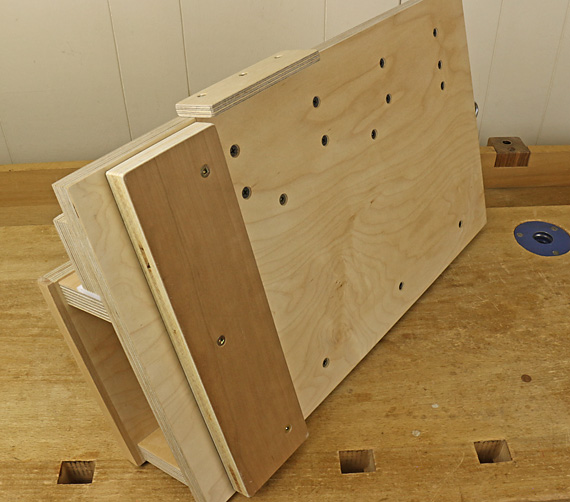
Speaking of shooting boards, Tico Vogt’s Super Chute remains a staple in my shop. (It is stored on another wall.) I attached two cleats, shown in the second photo below, that allow it to be clamped in the tail vise of my workbench. This keeps the Super Chute super steady and allows me to put my weight behind the plane when needed.

Super Chute

Super Chute attachment

By the way, the incline does matter. The skew reduces resistance in the cut, despite the assertions of some, and this is especially helpful when working endgrain. The ramp also results in wider distribution of wear on the blade edge, saving some trips to the sharpening bench.

The jig for trimming tenon shoulders is on the upper right, and the planing stop board is on the lower left.

For those in the early stages of learning woodworking (and we’re all in some stage of learning), using jigs such as these will be an empowering step up in your work.

Category: Jigs and Fixtures  | Comments off
Author:
• Monday, November 14th, 2016

lumber rack

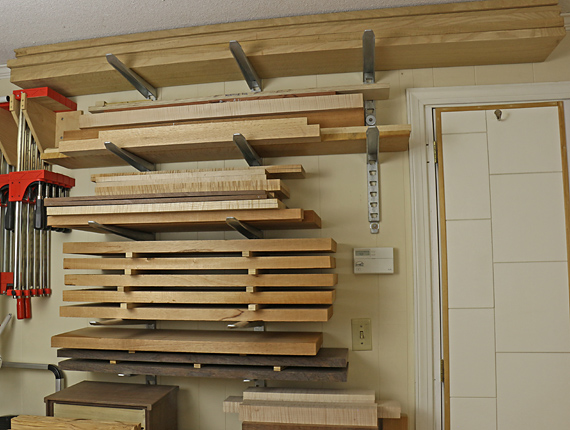
This upgrade of the main lumber storage rack in my shop has worked out well. Manufactured by Slacan Industries, based in Canada, it is designed to hold underground cable but is sold to woodworkers by Woodcraft and Lee Valley as a lumber rack.

The formed-steel brackets, U-shaped in cross section, are available in 10″, 14″, and 18″ lengths. They freely insert at 1 1/2″ intervals into the rolled-steel channel wall straps, which come in 55″ and 24″ lengths.

The versatility of this rack is the main reason I chose it. The movable brackets of different lengths make it easy to adjust the rack as storage needs change. It is now easy to create room to store wood by category or to make a pile with spacers between boards.

This thing is mega beefy – all parts are made from 3/16″-thick steel. Fuhgeddaboudit: a single 18″ bracket is rated by Slacan to support a 300-pound load applied one inch from the outer end!

What you cannot forget about is properly installing the rack. I consulted a structural engineer to make sure the wall studs could safely hold the anticipated load of lumber in the way I would set up the rack.

lumber rack

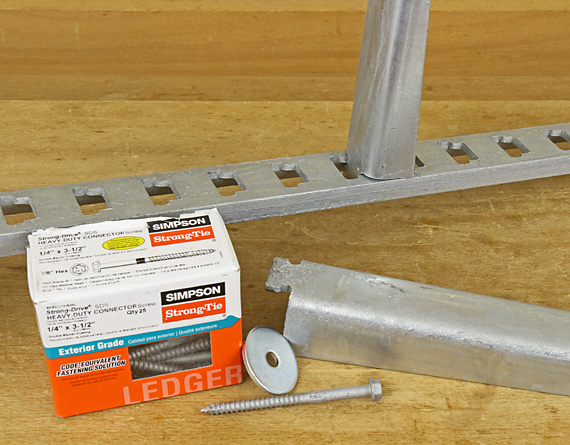
I have limited room in my small shop so there are two 55″ straps spaced 16″ apart on studs, plus a 24″ strap for the upper two or three levels that are more heavily loaded. I attached the straps to the studs with Simpson StrongTie 1/2″ x 3 1/2″ structural screws (#SDS25312), using 1/8″-thick x 1 1/2″-diameter washers to bridge the large bracket-insertion cutouts; there are no dedicated mounting holes in the 55″ straps (and those on the 24″ straps are large).

lumber rack parts

The galvanized finish on the straps and brackets is rough. I used a bastard-cut mill file to quickly ease the top surfaces of the brackets and their connection tabs.

I bought the rack from Woodcraft on sale as a set, which had a few more parts than I needed but was still cheaper than buying individual parts. With more storage capacity, I now have to resist buying beautiful wood that I don’t need (yet).

Author:
• Sunday, September 18th, 2016

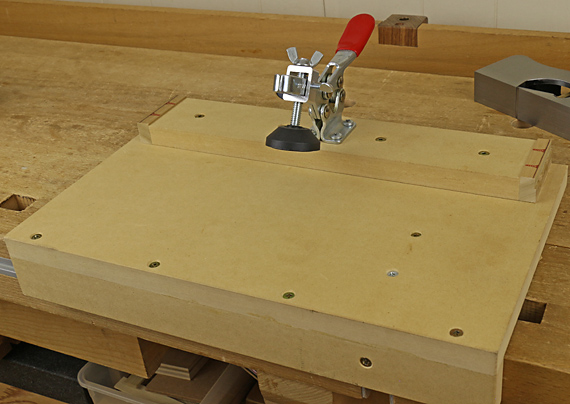
jig for trimming tenon shoulders

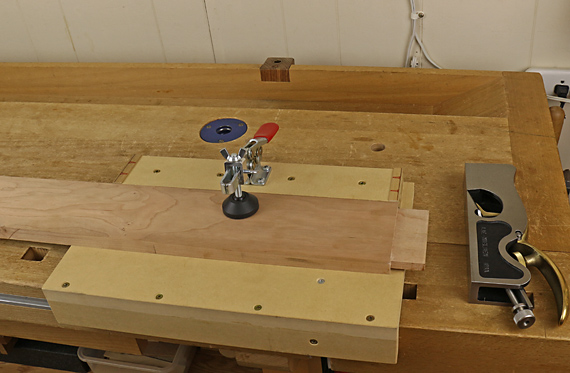
This simple jig gives greater control for trimming tenon shoulders and eliminates breakout of end grain at the back edge of the rail as the plane exits. I have been using it in my shop for many years.

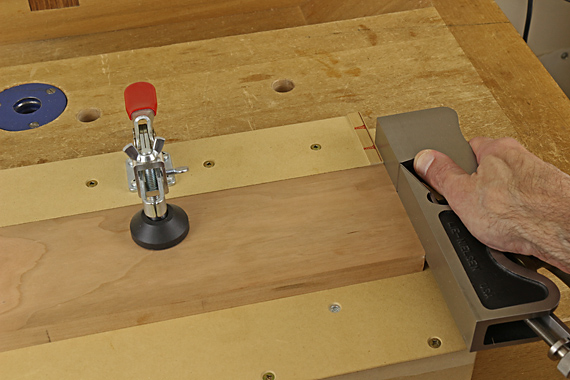
A tenon shoulder is correctively trimmed with a shoulder plane used on its side and registered against the cheek and the shoulder of the tenon itself. The correction usually involves just a few critical strokes of the plane.

trimming tenon shoulders

The jig easily installs in the tail vise, clamps the rail quickly and firmly, provides the essential support at the back edge to eliminate spelching, and allows planing without obstruction. Two earlier steps in forming the tenon, sawing the shoulder and trimming the tenon cheek, can also be done on this jig by simply clamping the rail so the shoulder line is positioned a bit beyond the backstop.

The jig is easily made from 3/4″ MDF. The base is 15″ wide x 9″ deep. The main portion of the backstop is 13″ x 2 1/2″, laterally centered on the base and attached with glue and screws.

A 500-pound capacity, 6 1/2″-long toggle clamp with a large retrofit foot pad is screwed to the midpoint of the backstop. The depth and outward projection of the pad are adjusted according to the thickness and width, respectively, of the work piece rail. Other types of quick-set clamps could also be used.

tenon jig

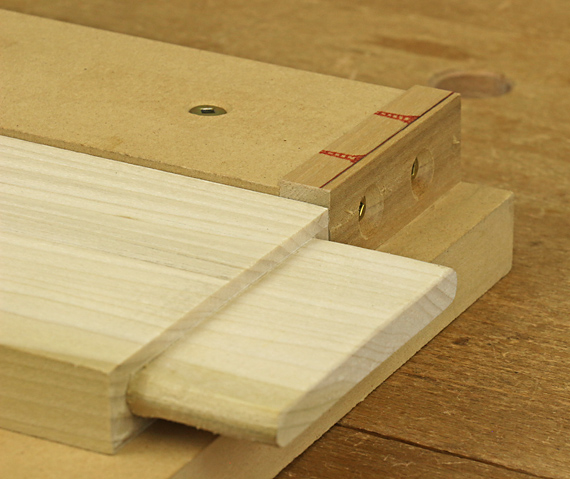
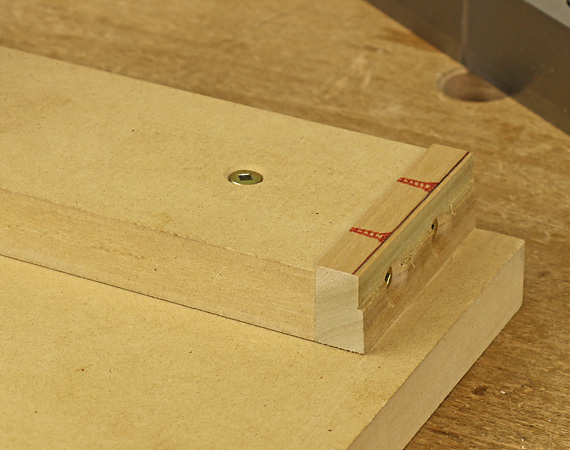
Key features are the hardwood caps on the backstop. These are 2 1/2″ in the long grain direction and 1/2″ wide, and simply screwed to the ends of the MDF. Countersink, or better, counterbore, the screws deeply enough to keep them out of the path of the plane blade. Note that I have marked a line at the depth of the screw heads and drawn pictures of the screws in red as reminders of their presence. I would hate to run a plane blade into them.

By the way, I am right-handed and never use the left side of the jig but it is useful for lefthanders at classes and demonstrations.

tenon shoulder

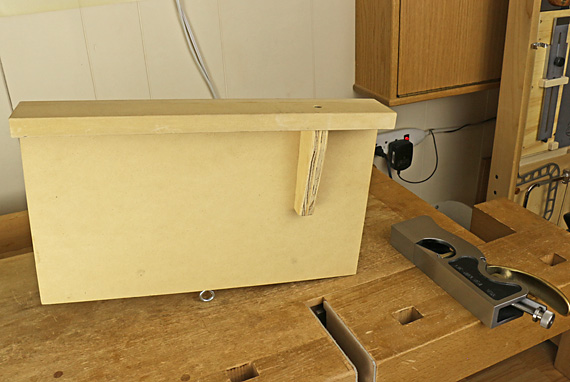
For securing the jig in the workbench, a 1 1/2″-wide strip of MDF is glued and screwed to the front of the base where it will butt against the front of the bench. Further, a 4 1/4″ x 1 3/8″ x 3/4″ plywood cleat is glued and screwed to the base and front stop. The cleat fits into the tail vise, which is then tightened to secure the jig.

tenon jig cleat

To trim a tenon shoulder, align it with, or very near, the edge of the hardwood backstop cap. Plane the shoulder and continue the stroke through the cap as needed. Of course, the cap gets slowly depleted over time, as shown here, but it is easily replaced.

jig detail

I think you will find this jig increases your comfort and control in the precision job of trimming tenon shoulders.

Author:
• Monday, January 25th, 2016

reference constructions

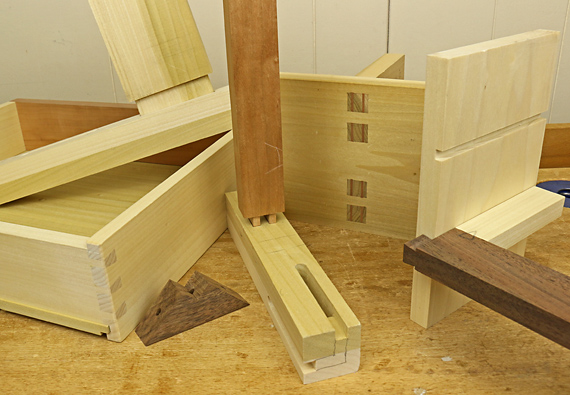
When designing and making a particular joint or subassembly, an actual sample of it is a great aid to spatial thinking. I keep a bunch of these brain helpers in the shop, including various mortise and tenon configurations, sliding dovetails, a section of a web frame, some curved legs, and, of course, a drawer or two. Most are unglued to permit study.

In the design phase of a project, when considering proportions, thicknesses, and surface relationships, the models help in a way that drawings cannot. Later, they are useful when strategizing construction methods. They are particularly helpful if it’s been a while since I last incorporated such an assembly into a piece.

A reference model does not have to be very neat or even complete. Most likely it will be one section of an assembly or the critical parts that are just enough to direct your thinking. I often write notes and dimensions on the reference models, especially if there’s something that I’m not likely to notice later. Basically, give yourself all the help you can; woodworking is hard enough already.

Accumulate the models from practice joints, experiments, or extras from a past project. It’s amazing how some in my shop of have aged and then jog my memory when needed. “Oh, that’s how that frame went together,” or whatever, in some project from the past. A piece that you completed long ago may be unavailable to you now but even if it is, you can’t disassemble it.

Since virtually all of my woodwork is one-of-a-kind, the reference models serve as brain assistants, not formulas. I benefit from my former efforts but I’m still thinking things through as they pertain to the project at hand. I really enjoy that combination!

If accumulating reference constructions is not a woodworking habit of yours, consider giving it a try. I think you’ll find it pays off.

Category: Jigs and Fixtures  | Comments off
Author:
• Friday, July 31st, 2015

dowel former

The otherwise excellent square hole punches from Lee Valley have a practical problem that I detailed on this blog more than two years ago, along with a suggested solution.

In brief, the punches work beautifully to square the upper section of a round hole in applications such as a pegged mortise and tenon joint. The punches are sized from 3/16″ to 1/2″ in 1/16″ increments. Each requires boring a round hole 3/64″ less than the width of the punch and thus the use of unusually sized dowel pegs.
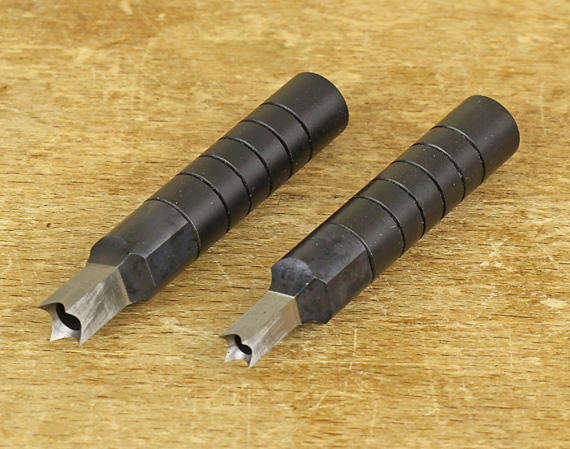
Lee Valley square hole punches

For example, a 13/64″ hole is used with the 1/4″ punch. After forming the square portion, the round hole could reasonably be enlarged to 7/32″ but anything further would risk damaging the edges of the square. So, here’s the problem: how to obtain round pegs in diameters such as 13/64″, 7/32″, and so forth. Even Lee Valley, despite my suggestion, does not supply the equipment to make such dowels.

There are methods demonstrated on the internet for making dowels using a portable power drill and clever shop-made cutters, but I prefer a simple dowel-former plate to make these short pegs. This is easily made from a piece of unhardened weldable steel, 1/4″ x 1 1/2″ x 5″, from the local hardware store. Rough-shaped stock is pounded through the holes to form the dowels.

Construction

Use a drill press to bore two holes for each diameter, one for rough cutting and the other for finish cutting. The roughing holes are on the right side of the plate in the photo at top. Relieve the diameter of all holes by reaming from the exit end using a General #130 6° tapered reamer, going to full depth for the roughing holes and about 1/2 depth for the finishing holes.

Deeply score the sidewalls of the roughing holes with a 2/0 blade in a fret saw and a 4″ double extra slim saw file. Use a small sharpening stone to cleanly remove the burr and create a sharp edge on the entry side of the holes. Use a countersink bit to lightly chamfer only the exit side of all holes.

Use

Start by making stock from straight-grained wood, ideally riven, to a width slightly more than 1/64″ larger than the hole diameter. Trim the corners to make an approximately octagonal cross section. I prefer to use a small handplane for this step.

Directions for using this type of plate usually recommend whittling an approximate taper on the blank to ease its entry into the hole. However, I’ve found the forming cutting goes much smoother and more balanced with a nicely centered blunt entry point formed on the blank with a pencil sharpener or dowel pointer.

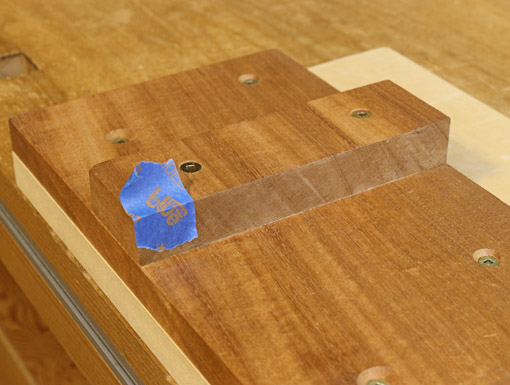
Place the former hole over a dog hole in the workbench top. Use the roughing hole first, followed by the finishing hole. Pound the wood blank with a mallet, taking care to keep the blank perpendicular. Proceed until the blank is nearly flush with the plate, then use a narrower peg to tap it the rest of the way though. A piece of blue tape under the dog hole will catch the dowel, saving the frustration of looking for it on the floor.
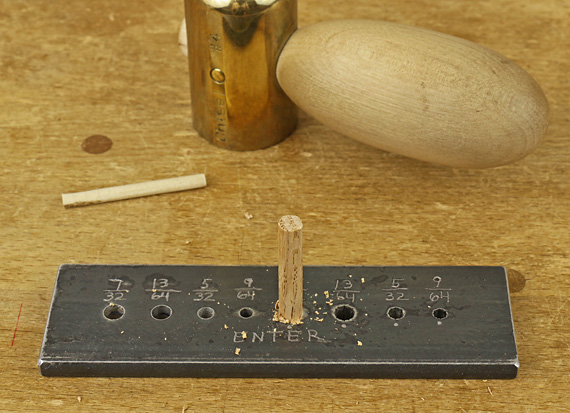
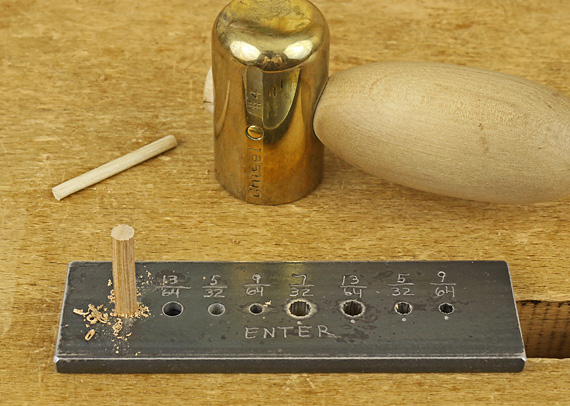
shop-made dowel former

shop-made dowel former

I have found that the two-stage process produces smoother cutting and better dowels. The photo below shows, from left to right, a piece of shaped stock, rough dowels formed by the first step, and straight, smooth finished dowels in cherry, bubinga, and red oak.
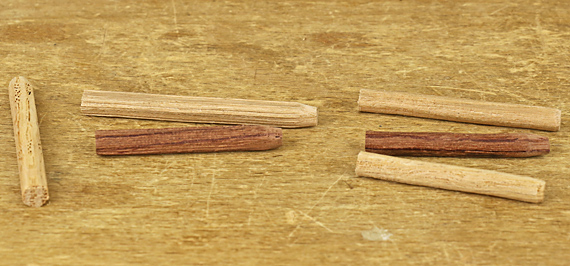
shop-made dowel pegs

Ideally, this tool would be made of hardened tool steel like a genuine Veritas or Lie-Nielsen but that is beyond what I can accomplish in my shop. However, the shop-made version is inexpensive, easy to make, has any hole size you want, solves the problem with the square chisels, and works surprisingly well.
Category: Jigs and Fixtures  | Comments off
Author:
• Tuesday, April 21st, 2015

drill stops

Maybe.

Of course, the best drill stop is on a drill press but the topic here is drill stops for hand drilling, which for most of us means with a portable electric drill, corded or cordless. So, let’s look at the candidates.

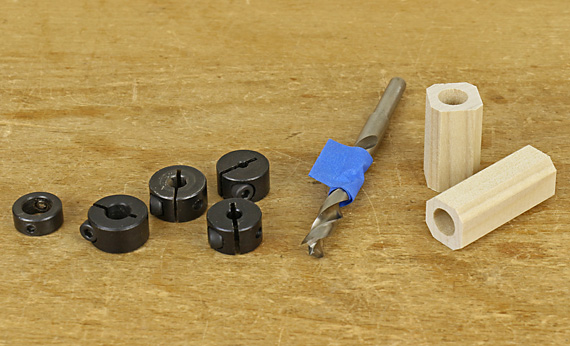
The most common store bought drill stop is a round metal collar with a single setscrew that tightens against the drill bit. These are cheap and not bad, but I’d stop short of calling them good. Most of them tend to tilt as the screw is tightened and all of them can damage the flutes of the bit. If you jiggle or turn the collar to direct the point of the setscrew toward the bottom of a flute and then tighten the screw carefully and firmly, they can stay put and perform decently. Fuller makes a version of these that is longer than the others.

Another type of stop uses a setscrew to close the metal collar’s diameter to bind it by friction against the drill bit. I’ve found that the metal is too stiff to reliably close down snugly against the bit, or on the other hand, that the inside diameter is too close to that of the drill bit so the collar is too hard to get on or off the bit. They’re borderline acceptable; I wouldn’t call them good.

Some of the stops used in conjunction with a countersink are pretty good and some of the Forstner bit stops seem good but those are other matters.

An utter failure is the red plastic stop that twists on and supposedly tightens against the drill bit. I have found them totally unreliable – they easily slip. Sorry, I wouldn’t use them in a hundred years on any project of importance.

Now let’s look at what I think most of us use: masking tape. Wrap some blue tape tightly around the drill bit and squish it in against the flutes. Then fold over the last bit of length so it forms a little flag that sweeps away the drilling dust on the work piece to signal that you are at full depth, and later to make the tape easier to remove.

In any careful work, I put a mark on the drill bit at the bottom of the tape with a Sharpie. Then, as I’m drilling successive holes, I check repeatedly to see if there is a gap between the mark and the tape, which would indicate that the tape has slipped. Alternatively, I keep checking with a ruler.

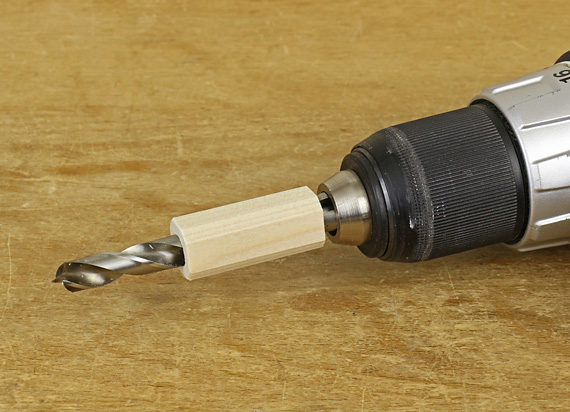
What about for very careful work, especially drilling many holes, such as in carcase dowelling? For this, remove all doubt and make a dedicated wooden collar drill stop as James Krenov recommended.

drill stop

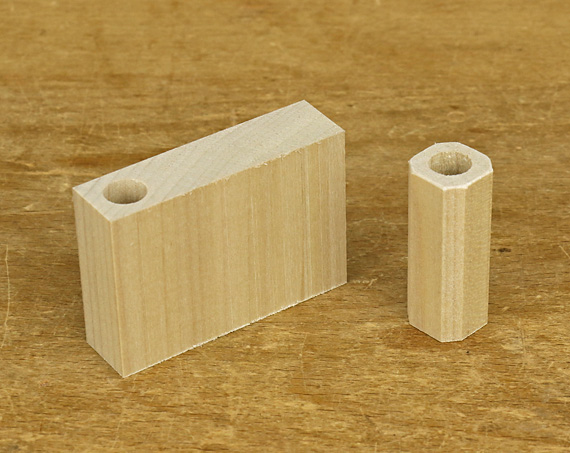
Work out the required length according to the desired depth of the hole and the length of the drill bit. Use a drill press to bore into the end grain of an over-wide squared block then saw off the stop itself. Chamfer the long corners for safety so they won’t hack at your fingers. If you cut the cross section of the stop to size before drilling, it will register less accurately against the drill press table and the drilling is likely to be dangerous.

making a drill stop

The cutting depth can be fine tuned by adjusting the amount of the drill shank inside the chuck – assuming it is a good chuck. This type of drill stop has never let me down. It’s worth the extra effort. By the way, dentists understand this.

So, yes, there is a good drill stop, but you have to make it.

Author:
• Sunday, May 11th, 2014

shooting glove

Shooting is a gateway technique that produces reliable accuracy and control unattainable with machines. Here are three simple tips to improve your results with shooting.

1- Put a grippy glove on your left (non-dominant) hand

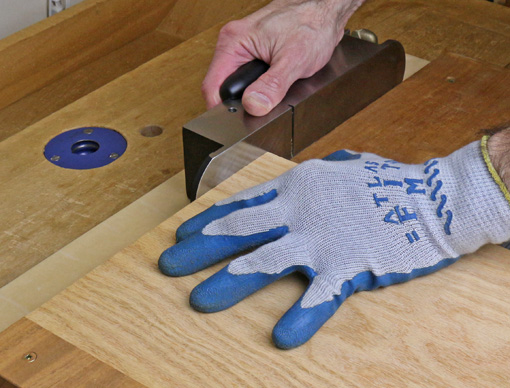
An inexpensive, widely available glove with a rubbery grippy palm adds remarkable strength to your hand. The work piece must be controlled with the left hand in two respects. First, it must not slide or pivot during the cutting stroke of the plane. The torque can be considerable with a wide work piece of dense wood. The glove gives you control with much less effort than a bare hand.

Second, in preparation for the cut when shooting end grain, the work must be advanced a tiny amount along the fence toward the plane. Without this, the blade edge will simply clear the work piece because it has already cut away the previously projecting thickness.

Practically, the work piece is advanced just to meet the toe of the plane sole, as in the photo below. This is done almost without thinking but it is a precise move made more controllable by the gloved hand.

registering the board

2- Simple microadjustability

Everything is not square in woodworking, even when we intend it to be so. For example, when fitting a drawer front to its opening, the sides of the front piece should be made to match the opening, even if it is a bit out of perfectly square.

To minutely adjust the shooting angle away from 90°, just place a piece of blue tape at the appropriate end of the shooting board fence. Realize too, that the angle can be adjusted with phenomenal precision by slightly altering the position of the tape.

microadjustability

Of course, this is done empirically, but for some mathematical fun, note that a .003″ thick tape placed at the end of a 7″ fence will change the angle .025° from 90°, and moving it to the 6″ position will adjust that new angle, in turn, by .004°. Using a .001″ plane shaving would create an initial adjustment of .008° from 90°. Shims are magic!

3- Hold the plane like you mean it

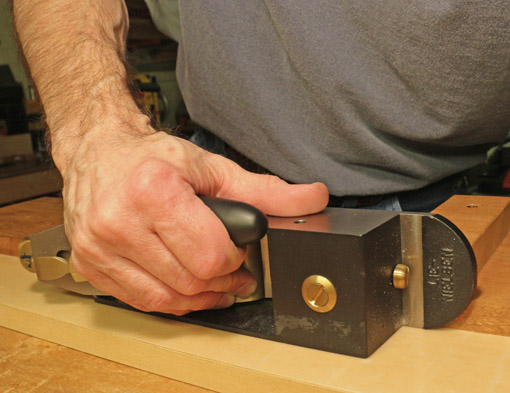
Whether you have a dedicated shooting plane like the #9 I use, or use a nice heavy bevel-up bench plane, or, yes, a bevel-down bench plane, grip that righteous beast over the blade. Get the big muscles at the base of your thumb firmly down on the sidewall of the plane, wrap your fingers around into the throat of the plane, and plant the ends of the fingers on the lower part of the lever cap. That way, you can control the ride of the plane on the horizontal track while keeping the sole tight sideways against the vertical runner.

grip the plane for shooting

Furthermore, you get a good tactile sense of the blade’s cutting action. In concert, all of this promotes accuracy by preventing the plane from tipping in any direction as it takes a firm, uninterrupted stroke.

I like the “hot dog” attachment from Lie-Nielsen on the #9. This is something I imagine could also be readily made by the user.

hot dog attachment

Category: Jigs and Fixtures, Techniques  | Tags:  | 5 Comments
Author:
• Wednesday, April 02nd, 2014

IMG_1194_edited-2

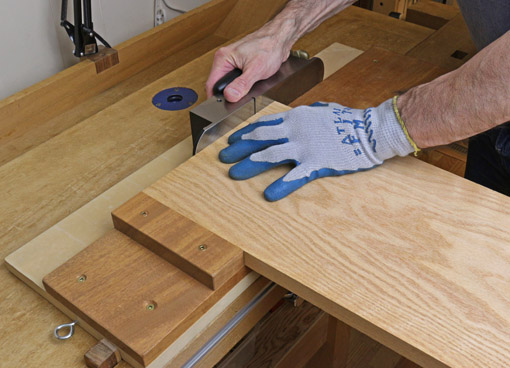
This is so easy. Shooting is a fast and accurate method for making a straight and square long grain edge on small boards, generally less than about two feet in length. This is far easier, especially for thin stock, than planing the edge while the board is held vertically in a vise.

Though shooting is mostly associated with truing end grain, I really don’t know why long grain shooting is not commonly discussed in instructional materials. True, it’s not absent but I think it should be included among routine methods.

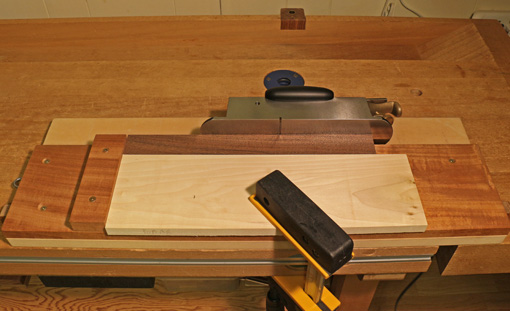
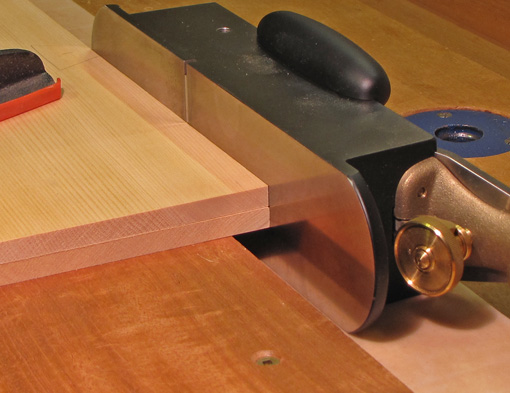
A long shooting board is helpful for this work. The long grain edge of the work piece should overhang the edge of the platform by a half-inch or so (see below), while the end is butted against the fence. For narrow pieces, especially a series of them such as drawer parts, I clamp an auxiliary bracing piece of plywood or MDF onto the shooting board platform, as in the top photo, to help my left hand steady the work piece.

The plane does not contact the vertical running edge of the shooting board platform that is used for end grain shooting. You simply control the plane to produce a straight edge much as you would when planing with the sole down – initially emphasize pressure on the toe of the plane, transition to balanced pressure, and finish with pressure on the rear portion of the plane.

IMG_0189_edited-3

I like my Lie-Nielsen #9 for most of this work, but really any bench plane, bevel-up or bevel-down, with a length appropriate for the work, will do. The “hot dog” handle on the #9 is very helpful to control the plane in all directions. Placing my fingers on the lever cap gives a good feel of the blade’s cutting action. When using a regular bench plane, I like to grip the arch in the sidewall of the plane and place my fingers over the lever cap. The contour of the Veritas bevel-up jack plane makes it especially effective to place the heel of the hand on the rear of the sidewall arch.

Medium to larger work is more easily and accurately managed by clamping it to the work surface. This prevents the work piece from yawing as you push the plane, which would make it difficult to produce a straight edge.

It is also possible to accurately set the auxiliary bracing piece, referred to above, to produce a parallel-sided work piece. This can also be accomplished by planing to a gauged line. No table saw is needed here.

A nice way to combine machine and hand work to make small to medium pieces with accurate and smooth edges, such as drawer parts, is to refine and smooth the machine-jointed edge by shooting. Then rip to width on the table saw with the planed edge against the fence. The ripped edge can be smoothed with one or two passes of a hand plane, usually later in the building process.

You can even eliminate the shooting board and still do this work. Just take a piece of 3/4″ MDF, clamp the work piece on top with its edge overhanging the MDF, and run the plane on the workbench top. If you don’t trust the trueness of your workbench, temporarily cover it with another piece of 3/4″ MDF.

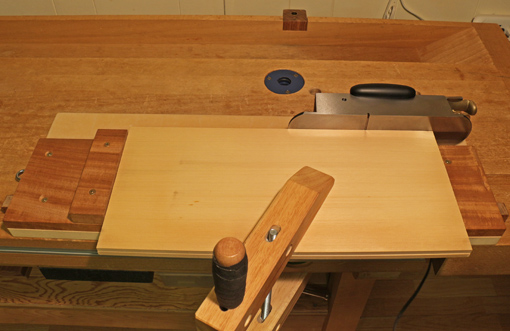
This is also an easy, effective method to edge joint a pair of thin or small boards, such as drawer bottom stock (see below). Decide on the mating edges, “close the book” on the joint, clamp the pieces to the platform, and shoot both edges at once. It’s hard to miss.

IMG_1196_edited-2

Shooting is also a sensible way to work with very small pieces (see below).

IMG_1199_edited-2

These are effective methods that require minimal infrastructure and can be used regularly on a wide range of projects.

Category: Jigs and Fixtures, Techniques  | Tags:  | One Comment