Author Archive

Author:
• Wednesday, April 02nd, 2014

IMG_1194_edited-2

This is so easy. Shooting is a fast and accurate method for making a straight and square long grain edge on small boards, generally less than about two feet in length. This is far easier, especially for thin stock, than planing the edge while the board is held vertically in a vise.

Though shooting is mostly associated with truing end grain, I really don’t know why long grain shooting is not commonly discussed in instructional materials. True, it’s not absent but I think it should be included among routine methods.

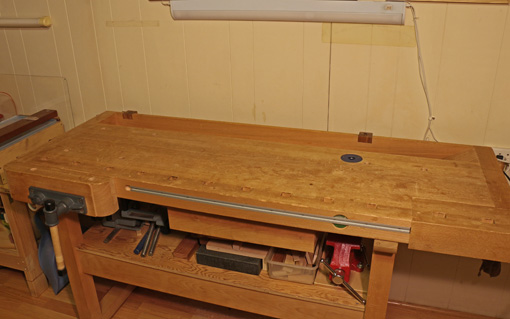
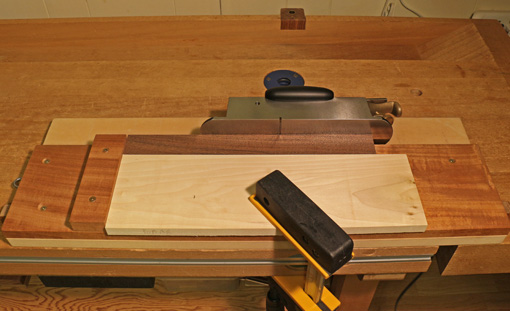
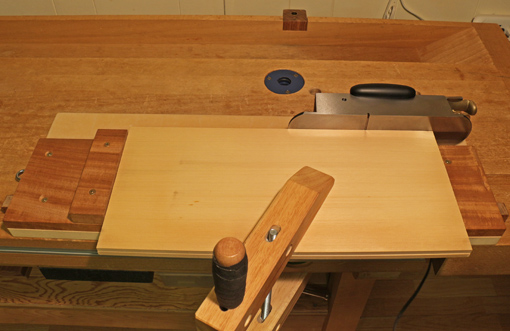
A long shooting board is helpful for this work. The long grain edge of the work piece should overhang the edge of the platform by a half-inch or so (see below), while the end is butted against the fence. For narrow pieces, especially a series of them such as drawer parts, I clamp an auxiliary bracing piece of plywood or MDF onto the shooting board platform, as in the top photo, to help my left hand steady the work piece.

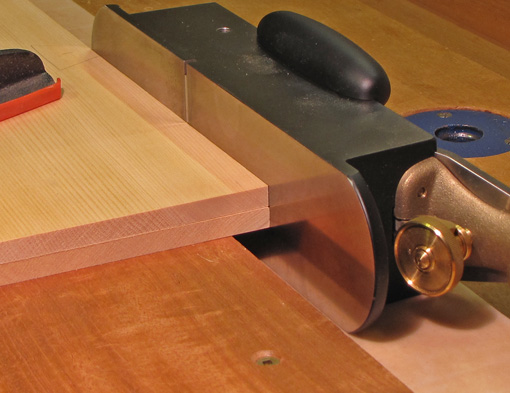
The plane does not contact the vertical running edge of the shooting board platform that is used for end grain shooting. You simply control the plane to produce a straight edge much as you would when planing with the sole down – initially emphasize pressure on the toe of the plane, transition to balanced pressure, and finish with pressure on the rear portion of the plane.

IMG_0189_edited-3

I like my Lie-Nielsen #9 for most of this work, but really any bench plane, bevel-up or bevel-down, with a length appropriate for the work, will do. The “hot dog” handle on the #9 is very helpful to control the plane in all directions. Placing my fingers on the lever cap gives a good feel of the blade’s cutting action. When using a regular bench plane, I like to grip the arch in the sidewall of the plane and place my fingers over the lever cap. The contour of the Veritas bevel-up jack plane makes it especially effective to place the heel of the hand on the rear of the sidewall arch.

Medium to larger work is more easily and accurately managed by clamping it to the work surface. This prevents the work piece from yawing as you push the plane, which would make it difficult to produce a straight edge.

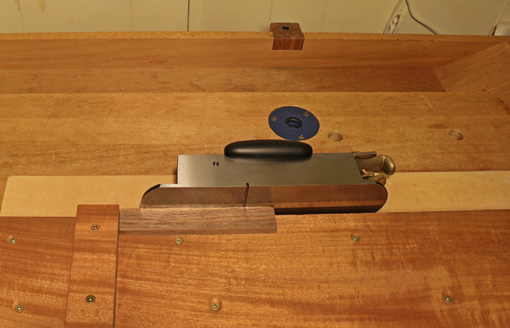
It is also possible to accurately set the auxiliary bracing piece, referred to above, to produce a parallel-sided work piece. This can also be accomplished by planing to a gauged line. No table saw is needed here.

A nice way to combine machine and hand work to make small to medium pieces with accurate and smooth edges, such as drawer parts, is to refine and smooth the machine-jointed edge by shooting. Then rip to width on the table saw with the planed edge against the fence. The ripped edge can be smoothed with one or two passes of a hand plane, usually later in the building process.

You can even eliminate the shooting board and still do this work. Just take a piece of 3/4″ MDF, clamp the work piece on top with its edge overhanging the MDF, and run the plane on the workbench top. If you don’t trust the trueness of your workbench, temporarily cover it with another piece of 3/4″ MDF.

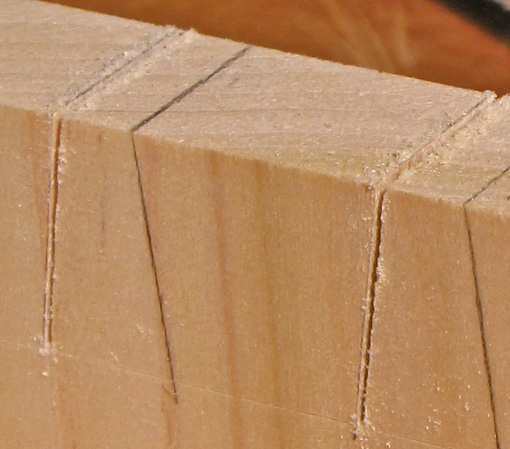
This is also an easy, effective method to edge joint a pair of thin or small boards, such as drawer bottom stock (see below). Decide on the mating edges, “close the book” on the joint, clamp the pieces to the platform, and shoot both edges at once. It’s hard to miss.

IMG_1196_edited-2

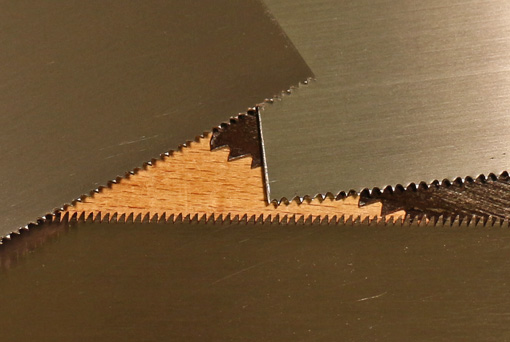
Shooting is also a sensible way to work with very small pieces (see below).

IMG_1199_edited-2

These are effective methods that require minimal infrastructure and can be used regularly on a wide range of projects.

Category: Jigs and Fixtures, Techniques  | Tags:  | One Comment
Author:
• Thursday, March 27th, 2014

IMG_1079_edited-3

Finer pitch saws generally produce more precise cuts than coarser pitch saws. Well, of course they do. The finer teeth make a cleaner kerf with which to track a line. They also advance the kerf more slowly and thus presumably more controllably since each stroke is a relatively smaller commitment that can be adjusted as needed.

The finer pitch, all else being equal, also produces a smoother sawn surface. Also, the thickness of the wood must be taken into account. At least several teeth should ride in the kerf to maintain control and prevent the saw from grabbing and tearing.

So, OK, we don’t use a 5 1/2 ppi rip saw to cut dovetails in 1/2″ stock, obviously.

But what may not be so obvious are the practical limits to fine pitch saws. In other words, finer and finer is not more and more accurate.

If each commitment – each stroke of the saw – is too small to judge whether accuracy is being maintained, then you have to wait for a few of them to really make a judgment. In other words, the feedback is delayed and you can be going off course without knowing it for a while. Similarly, the corrective action is harder to judge.

The object is to use a tool that is palpably controllable, not too coarse, of course, but also not too fine. Among novice woodworkers there is a tendency to think that using the finest saw available will be the most accurate way as long as one is patient enough, but for a saw, and probably for just about any tool, it might be too fine to function accurately. Note also that the stroke speed of a coarser pitch saw can be slowed to some extent.

As an analogy, a good car steering wheel should be responsive, not mushy. The result of an input action – such as a saw stroke – should give a sufficiently sensible and prompt result so that the feedback loop is closed clearly and quickly. This is much of what hand tool woodworking is about. In other words, if you go too slowly, you can’t tell what you’re really doing!

In summary, consider balancing factors when choosing the pitch of a saw. And don’t be charmed by superfine saws (e.g. superfine dozuki saws) or see them as a substitute for skill; they may be too fine.

Category: Techniques  | Comments off
Author:
• Friday, March 21st, 2014

IMG_0417_edited-3

A nice byproduct of messing around with photography using a fancier camera has been that I think I’m also improving my seeing skills for woodworking. By this I mean learning to better observe and process visual elements of composition and design.

The simple key is that this takes effort – it’s not automatic – and it takes practice. Sure, it’s easy to have an immediate reaction when confronted with a creative work. “Wow, beautiful,” or “Please, you’ve got to be kidding.” This sort of intuitive response does have its place and value, and, at the other extreme, over analysis is probably capable of dissolving any creative work into boredom.

Between the extremes there is a very valuable habit of pausing, observing, absorbing, and seeing what the maker has in mind, including if the maker is you.

It is similar to the difference between quick snapshots versus truly observing and appreciating the light and visual elements before you, then using your technical skills to compose a satisfying photograph.

Among many woodworkers, including me, there is a tendency to too soon get absorbed in the intricacies of construction and joinery. Pause and see first, I tell myself, and in this, photography is good training. Photography is humbling because so often the photograph shows you that what you thought you saw when you took the shot is not quite so.

It is amazing what the trained brain can see. During a guided walk in the woods with an expert naturalist, I marveled at his ability to spot interesting things that I walked right past. Yet, in the more subjective landscape of designing and making good work in wood, I think one must be similarly astute.

The main thing is that, just like cutting joinery, it takes effort and practice.

IMG_1008_edited-3

Category: Ideas  | 3 Comments
Author:
• Wednesday, March 12th, 2014

IMG_1191_edited-2

A project idea has taken hold, a concept has developed, and maybe you even have scale drawings. This could come to fruition but your jointer isn’t wide enough or your bandsaw isn’t tall enough. Or the boards you found for the project aren’t quite consistent in color and figure. Or your shop isn’t big enough, or you don’t have a real shop at all. And you really don’t have the time anyway.

It’s always something.

Always, because making real things is done in the real world with all its unsavory limitations. The wood is never quite right. There is always one more tool that would probably make the work a breeze. A wide belt sander? Sure, that will solve everything. Everything, that is, until the next limitation comes along.

Make it anyway. It won’t be perfect or just the way you want it, but it will be. Until then, it is nothing.

Let’s take an example from music history. What do you do if you are an organist renowned throughout Europe, later to be recognized as one of the greatest composers in history, you basically get canned from your job and move to a place where you have no access to an organ? It must have been like a woodworker with no planes! Well, I guess if you are Johann Sebastian Bach, you deal with the limitations and use the resources available to you to make stuff like this:

Bach violin sonata

Nearly 300 years later, the lack of a right hand does not stop Adrian Anantawan from playing these works. [The sample heard in most of the clip is from Partita #3 in E for solo violin, 3rd movement.]

So, what then, when the work is done? If the piece is the product of a sincere effort, it becomes its own point of reference, freed from the maker’s expectations, limitations, and nervous influence. Never perfect, but excellent, good, or just fair, it is nonetheless now on its own.

It is too late for substantive changes. This is just as well, because now everything hopefully seems right unto itself, at whatever level the work was done, including the imperfections and doubts, almost as if it was meant to be that way.

Deal with limitations, do the best you can, and accept the result for what it is. Make something.

It’s always something – until the thing is.

Category: Ideas  | 5 Comments
Author:
• Tuesday, February 25th, 2014

IMG_0635_edited-3

Is a thinner kerf saw more accurate? Does that make a skinny saw better? After all, we associate thin with accurate, such as thin pencil lines or thin gradations on a rule.

Accurate sawing means a clean, neat kerf that consistently splits the layout line, with the kerf in the waste wood. This comes from teeth of appropriate design and pitch for the task that have a small, consistent amount of set. Further, the saw plate must be produced straight and stay straight throughout cutting. The sides of the teeth should also be cleanly free of burr.

The sawyer must employ good mechanics, aided by good tooth geometry, saw balance, hang angle, and other mechanical factors. With all that on your side, you can physically sense true cutting, split the layout line, and visually monitor the progress with accuracy.

But is thinner kerf width, per se, more accurate? I don’t find this to be so. As an example, my .012″ plate Japanese rip dozuki holds no advantage in accuracy by virtue of its thinner plate over my .018″ plate Western dovetail saw. In fact, because of other factors, I find the latter is more accurate. Yes, this is an apples-to-oranges comparison but my eyes and hands can tell that factors other than plate thickness are the deciding ones in determining relative cutting accuracy between these saws.

Similarly, my carbide tip bandsaw blade makes a considerably wider kerf than my steel blades but it cuts more accurately. We also don’t think of thin kerf table saw blades, whatever their other advantages, as being more accurate than standard kerf blades.

Now, I’m not saying get a dovetail saw with a .042″ plate, nor that thin plate saws are necessarily bad choices. I do think confusion arises in assessing and choosing saws because thinner plates are sometimes associated with other factors that promote accuracy such as nicely set fine teeth, or comparing a good quality thin Japanese saw with a poorly made thicker Western saw.

Within limits, however, one ought not assume that, all else being about equal, a thinner plate is more accurate. In some cases, contrary to the assertions of some vendors, it may be less accurate.

There are many factors that produce an effective, accurate saw. You may, for various reasons, prefer a thinner plate saw. But I suggest don’t get charmed by skinny saws. Rather, consider the whole picture, I’d say, and see how the saw really saws.

Category: Tools and Shop  | Comments off
Author:
• Friday, February 21st, 2014

IMG_1169_edited-2

In saw descriptions and discussions, there is often the implicit assumption that a thinner saw cuts proportionately faster than a thicker saw. At the risk of setting this up as a straw man case, the assumption goes that, as an example, with all else being theoretically equal, a .012″ plate will cut twice as fast as a .024″ plate. Further, it follows that a thin-kerf saw has, within limits, this distinct advantage, assuming that its other sawing parameters can be controlled to maintain good function.

This would be analogous to a 24″ wide swath of snow being twice as hard to push as a 12″ swath, all else being equal. However, I don’t think saws work like that!

Let’s think about what a saw tooth does. A rip tooth cuts and plows the wood at the bottom of the kerf. In this, kerf width is probably roughly proportional to the effort, and thus inversely proportional to speed. At the sides of the kerf, the tooth shears the wood, and there the task is approximately the same regardless of kerf width.

The crosscut tooth severs the wood fibers at the sides of the kerf where, again, the task is approximately irrespective of kerf width. At the bottom of the kerf, where it is a lesser task of shuffling away the broken wood, the work is probably about proportionate to the kerf width.

Thus, in both cases, especially crosscutting, this simple idealized analysis suggests that, all else being equal, twice the kerf width does not mean half the sawing speed. It is not like pushing snow.

In reality, all else is never equal, of course, and the dynamics are surely more complicated than described here. Nonetheless, this way of looking at it at least gives some basis to explain my real world observations using many saws that, within limits, thinner kerf saws do not seem to give a proportionate advantage in cutting speed over thicker kerf saws.

Again, my argument is against this as an assumption that may be made by some when comparing saws. This is applicable in comparing among Western saws, and generally comparing Western with Japanese saws.

Further, as plate thickness is reduced too much, especially in Western saws, disadvantages ensue. Among these, depending on other design parameters, is a tendency to distort in the heat and action of sawing. Also, energy intended for cutting seems to get wasted in vibrating the skinny saw plate, somewhat akin to action of a thin or poorly supported plane blade.

In summary, skinnier is not as attractive as it might seem. It is important to look at the whole picture when choosing saws.

Next: Ah, but is the thinner kerf saw inherently more accurate, all else being equal? Does that make skinny better?

Category: Tools and Shop  | 2 Comments
Author:
• Tuesday, February 18th, 2014

NWA image_edited-1

The NWA’s 23rd Annual fine woodworking Showcase, attended by 5000-6000 woodworking enthusiasts each year, will be held Saturday and Sunday, March 29-30, 2014 at the Saratoga Springs City Center in Saratoga Springs, NY.

The event features:

  • Lots of free classes and demonstrations to help you broaden your woodworking skills.
  • A large trade show with tools and materials from national manufacturers and local suppliers for exhibit and sale.
  • An exhibit of over 500 pieces of woodwork by amateurs and professionals ranging from small accessory items to large furniture.

This year, as one of the featured demonstrators, I will present two topics on each day, Saturday and Sunday: “Hand Planes – Choices, Set Up, Use,” and “Drawer Fitting – Steps To Success.” The demo schedule is here. Of course, I will also be around for chatting, questions, and enjoying the Showcase.

Heartwood readers, I hope you have a chance to attend and I will see you there. Saratoga Springs is about 30 miles north of Albany, NY. If you are there but don’t happen to attend my presentations, please do say hello anyway.

Category: Resources  | 3 Comments
Author:
• Monday, February 17th, 2014

IMG_1185_edited-2

Sometimes in woodworking, especially in unusual constructions, there comes a deflating realization that things would be a lot easier now if a different turn was made several steps earlier in the process. It’s not an abject mistake but it is time for the fix-it crew.

Here are several notable tools among the many whose modest bearing belies their performance in the clutch.

The pair of left and right-handed crank-neck 3/8″ skew chisels get into vertically and horizontally restricted areas to remove small amounts of wood that are preventing parts from fitting well. Widely available and inexpensive, I find them more useful than straight skew chisels.

For precise paring in more accessible locations, long paring chisels allow much finer control than a regular bench chisel. Using the dominant hand at the back end, the tool’s length allows fine control of the attack angle of the edge to produce clean cuts.

The Japanese azebiki saw has short, curved rip and crosscut edges. It’s great for starting cuts on a flat surface, and for getting into restricted areas. I adjust the set to a bare minimum on my saw.

The very flexible .020″ hand scraper is easier to use than thicker scrapers to clean up localized surface defects that can arise in the late stages of building from planing tearout or handling dings.

I’m almost embarrassed to say how often I use the little 1″ x 2″ .016″ mini scraper for fix-ups. I keep some edges with a hook and some without, and use it pulling, pushing, angled, skewed, or even flat against a surface to solve all sorts of problems.

The low-profile ratcheting driver is another tool that I might be lost without. It accepts 1/4″ hex-shank bits and can be used for driving and, patiently, for light drilling when necessary. With this tool and with a right-angle attachment for a power drill, it is very handy to have shorty drill bits available.

Of course the most important tool in a jam is the one on your shoulders. Pause, step back, collect, think, and be optimistic – there’s probably a solution!

Category: Tools and Shop  | 2 Comments