Author Archive

Author:
• Saturday, June 06th, 2015

Optivisor

For many woodworking tasks, it is very helpful to see things bigger. Examples include saw sharpening, viewing knifed layout lines, evaluating sharpened blade edges, tuning hand tools, and assessing tiny wood defects.

Headband lenses keep both hands free to work and they maintain binocular vision, which is a major advantage in perceiving depth detail.

It’s simple

Magnifiers of this sort – those used just in front of the eye – work by allowing you to focus closer. When something is closer it looks bigger. That’s really all there is to it!

Forget this stuff

Let’s also put aside a few confusions and misconceptions. Please do not think of these headband lenses in terms of “X power magnification” such as “2X.” This is neither useful nor fully descriptive. Furthermore, the magnifications of a hand-held magnifying glass, a camera’s zoom lens, a telescope, and a microscope are all different matters that really do not apply here.

Also, in the headband magnifier, there technically is an increase in retinal image size apart from the effect of the closer focal length but for practical purposes, forget it.

How to choose

You want to see things bigger (i.e. closer) but you also need room for your hands and tools to work, so there is a practical limit to “cranking up the mag.” Objects placed in the range of 6″ – 10″ from your eyes will be suitable for most woodworking tasks that require magnification. Of course, this depends on your work and preferences, but the working distance is your main decision. Remember, closer makes you see bigger but you also have to be able to work.

Also, lens aberrations and other undesirable optical effects increase with lens strength. So again, more power is not necessarily better.

For example

Let’s look at Donegan Optivisors, excellent quality headband magnifiers available for about $35. The table on the Donegan website shows, for example, a DA-4 focuses at 10″ and magnifies 2X. As discussed earlier, ignore the 2X and pay attention to the 10″.

However, this lens will actually put most people at a working distance closer than 10″ because some additional power is added by your eyes (especially if you are young) and/or by your eyeglasses if you are older than about 45 years. Note: wear the headband magnifiers over your whatever glasses you normally use for woodworking.

Lots of things come into play here but, again, let’s keep it simple: that 10″ lens will actually enable most people to work at about 6-7″. Similarly, for most people, the #3 (14″) lens will work at about 8″, the #5 (8″) lens at 5-6″, and the #7 (6″) lens at 4-5″. The Optivisor itself takes up some space too.

Even simpler: your working distance with most of the headband magnifiers will usually be 2″-4″ closer than the inches listed in the table.

I use a #4/10″ lens and it probably will be your best bet too.
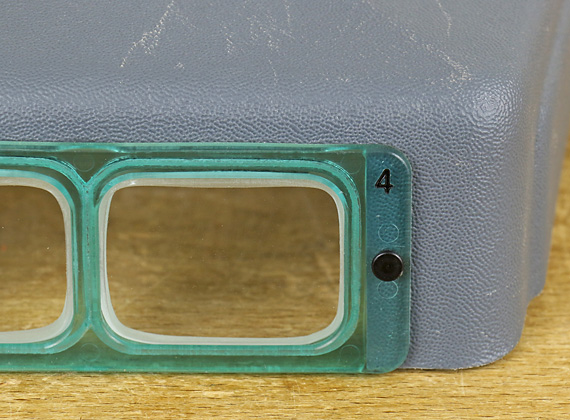
Optivisor

Technical stuff – you can skip it (but I can’t)

The number 4, which is also the number on the lens, means 4 diopters. To approximately convert diopters to focal length in inches, divide 40 by the diopter number. So, 40/4 = 10″, 40/5 = 8″, etc. In making the estimates of the actual functional working distance, I’ve assumed an additional input of about 2 diopters, from accommodation, spectacle add, or both. If this makes any sense to you, then you’ll also know that this is obviously variable.

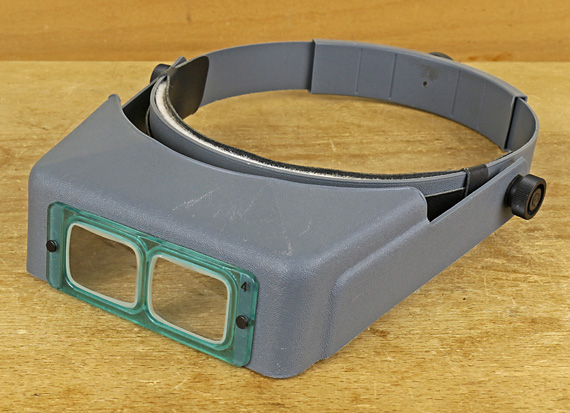
The Donegan lenses also incorporate another element. As your eyes focus closer, with or without optical aids, they must also converge more. This can be tiring or impossible depending on the circumstances. The Donegan lenses have the appropriate prism built in to compensate for this. Again, if this makes any sense to you, so will the profile of the lenses shown in the photo below.
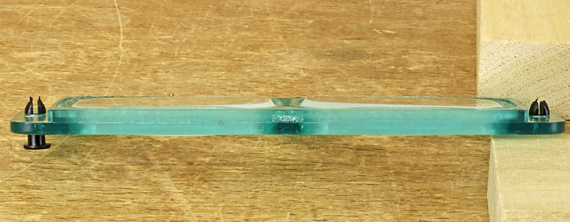
Optivisor

Caution

The lenses in the Donegan DA series are crown glass; those in the LX series are acrylic. I would not rely on either of these for eye protection. They are no match for the impact resistance of polycarbonate, the material in protective eyewear.

Special for people with high myopia (nearsightedness)

You know who you are. When you remove your glasses or contact lenses with prescriptions of at least -4.00, you see very poorly far away and things only come into focus when they are very close to you.

You have a big advantage over the rest of us! To the extent that you are myopic, you can remove your corrective lenses and focus very close on your own. You probably don’t need the headband magnifiers and in fact, they may make the working distance impractically close.

Don’t forget this

There are countless exceptions and special circumstances to anything dealing with human vision.

Take care of your tools – have your eyes checked regularly.

Category: Resources  | 5 Comments
Author:
• Sunday, May 31st, 2015

Nexabond glue

[Addendum 12/7/16: As of 3/1/16, “Nexabond” products are no longer available but the Nexabond 2500M (Medium set time) formulation is sold widely by DAP products as RapidFuse Wood Adhesive. The short and long set Nexabond formulations are no longer available.]

With this glue, we’ve got a high performance, convenient, fast-setting cyanoacrylate specifically formulated for woodworking. Fine, but there are lots of other good glues, so why do we need this one?

The main advantage of Nexabond’s fast set is that a glued assembly can be brought into the next stage of construction much sooner than with PVAs or most other common glues. The clamps come off, freeing both the clamps and shop space, and the assembly can be manipulated. Depending on the projects you build and your shop circumstances, this can significantly change the workflow.

Maybe. In my shop, which is probably like a lot of other low-volume small shops, speedy glue setting is usually not a big practical advantage. For example, the work flow proceeds just fine as I put aside a glued up tabletop and move to other work.

However, there are other times when it would be very helpful to have the glue set right away. In fact, there are more of these occasions than I first thought. As an example, it is nice to glue up a drawer bottom and have it ready to be raised and fit shortly thereafter with the bonus of not having to worry about moisture or swelling at the glue line. Generally, the advantage of fast setting seems to come up when adding components such as a partition, inside frame, or secondary stretcher to a primary structure where the obstruction of clamps would delay further work.

Moreover, there are situations where clamping small parts is awkward or impossible. With Nexabond, small parts can be held in place by hand until sufficient strength has developed. For example, installing corner blocks in a table went a lot easier with Nexabond.

The option of Nexabond has sometimes changed my approach when otherwise it would not have occurred to me. For example, when making a bent lamination form, successively stacking and pattern routing the layers was a breeze with the glue working at my pace. In general, Nexabond is very handy for making jigs.

The main point is that it’s great to have the option of the quick set. I see Nexabond augmenting, not replacing, PVAs and the other glues in my shop.

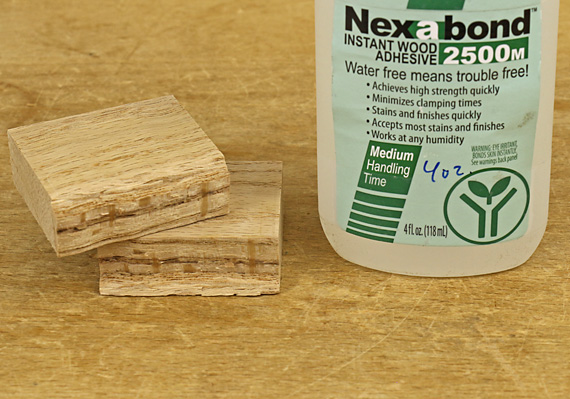
I’ve also been finding that Nexabond does a good job on end grain, perhaps better than any other glue I’ve tried. It seems to work well by applying a thin sizing coat to the end grain, waiting 1-2 minutes, scraping it smooth, then gluing the joint as usual. Below are some samples showing that the bond exceeded the strength of poplar but not red oak. That’s pretty good for an end grain-to-side grain bond.

Nexabond glue

All that said, there are major situations where the fast set is a disadvantage for me. When gluing dovetails or a leg-to-apron assembly, I want the extra time after closing the joint to check for square and adjust the clamp angles as needed. Of even more concern is the possibility of a joint seizing when it is partly assembled as I hurry to clamp it home to the shoulder lines.

In some assemblies where placement and trueness are virtually guaranteed without tweaking, this glue might work fine. We’re told it works well in production shop work.

There are also some joints where wood swelling is part of the strategy and water is therefore an advantage, so for these, I will continue to use PVA glue: biscuit joints, dowelling with dowels that have compressed grooves, and, in my opinion, Dominos.

In summary, as a small shop, low volume, custom woodworker, I definitely want Nexabond in my shop, I trust it, and I will be using it a lot, more than I thought at first, though I do not see it replacing PVAs as my primary glue for major assemblies.

[Note to readers: This series on Nexabond glue can be conveniently viewed in a single page by accessing it from the Series Topics page, to which there is a link just below the header image. There you will also find 19 more series on useful woodworking topics.]

Category: Tools and Shop  | Tags:  | 5 Comments
Author:
• Saturday, May 23rd, 2015

Nexabond glue

[Addendum 12/7/16: As of 3/1/16, “Nexabond” products are no longer available but the Nexabond 2500M (Medium set time) formulation is sold widely by DAP products as RapidFuse Wood Adhesive. The short and long set Nexabond formulations are no longer available.]

The informal shop tests shown in the previous post suggest that Nexabond glue’s bond strength develops slower in cherry than in the other species tested, red oak and poplar. I asked Peter Stevenson, chemist at Sirrus, the maker of Nexabond, about this. I wondered if the wood chemistry varies a lot between species. Here is his answer, quoted here with permission (emphases mine):

“In fact, the wood chemistry does vary drastically in some cases. One of those being cherry, which is much more acidic than poplar, maple, and oak. The acidic properties of the wood act as a secondary stabilizer of sorts and can decrease the polymerization process. Additionally, even within the same wood species you can see some variation in set time relative to early and late wood. While we have observed some variation in set time, we still see adequate bond strength within half an hour for return to service/processing demands. There will, of course, be some exceptions relative to specific scenarios which may arise.”

This leaves me a bit confused theoretically, because I thought red oak is more acidic than cherry. Maybe it depends on the specific acid compounds. I am not a chemist and fortunately don’t have to be one to do woodworking. What matters is what happens in the shop.

Thus, the practical conclusion for woodworkers, in my view, is that when working with any unfamiliar materials – woods, finishes, hardware, and glue – it pays to do a bit of trial-and-observation in the shop. In the case of Nexabond, it makes sense to take a few minutes and some wood scraps to see how quickly bond strength develops in a particular species before committing to a specific time frame for removing the clamps from a set of glue ups.

Of course, if you are able to clamp the work and keep the clamps occupied for at least about a half hour, then it won’t matter. But five minutes may be too soon in some cases, depending on the joint, how you will handle the assembly, and, as we now learn, the wood species.

Gain direct experience with even with the best tools and materials to use them effectively.

Next: some thoughts on practical applications of Nexabond. (The basics were covered in the first installment.)

Category: Tools and Shop  | Tags:  | 2 Comments
Author:
• Monday, May 04th, 2015

Nexabond glue

[Addendum 12/7/16: As of 3/1/16, “Nexabond” products are no longer available but the Nexabond 2500M (Medium set time) formulation is sold widely by DAP products as RapidFuse Wood Adhesive. The short and long set Nexabond formulations are no longer available.]

Does Nexabond cyanoacrylate glue make strong wood glue joints? In short, yes, but let’s take a closer look at that along with other properties of this glue.

Strength

Sirrus, the manufacturer of Nexabond, has graphs on their website that show has shown that white oak bonds made with their glues are as strong or stronger than those made with “water based wood glue.” They use an ATSM test protocol that involves lap shears and is different from the protocol for Titebond III presented on Franklin’s website.

Testing glue in this manner makes practical sense because the glue bonds in most woodworking joints are primarily stressed in shear. Sirrus kindly supplied me with additional data derived from this test protocol that compares Nexabond to Type I and Type II PVA emulsions, the categories of Titebond III and Titebond II, respectively. Again, they are all nearly identical in strength, though Nexabond 2500S measured very slightly, probably insignificantly, less than the others. The strength of all of the bonds exceeded that of the wood.

Endurance

After soak-bake cycling, Nexabond bonds held up almost as well as Type I PVA bonds and considerably better than Type II PVA bonds. In a moisture-UV torture test, Nexabond outperformed both of the PVAs. Still, Sirrus cautions that their glue is water resistant, not waterproof, and the website states “for interior applications only.”

Woodworkers would naturally like assurance that our glue bonds will survive for decades and generations but, of course, we cannot directly know that yet. Thus, for any new glue, like finishes, there is a degree of uncertainty that only time can fully eliminate. In the meantime, we have to rely on tests and chemists, which seems reasonable.

Impact resistance

I’ve noticed that little blocks that were glued in place with a general purpose CA, in reconfiguring my tool cabinet, for example, can be easily knocked free, usually almost cleanly. For me, that is enough of a clue to avoid those glues for structural joints in furniture.

Nexabond is different. Data from Sirrus shows that it equals the PVAs in the impact resistance of shear joints. Also, even after 30 days of 82°C (180°F) heat, Nexabond bonds held up better than PVA bonds, though I don’t know the practical significance of that.

Cold creep

Glue line flexibility (cold creep), to a degree, is good or bad depending on the application. The flexibility of PVA glue helps mortise and tenon joints survive their inherent cross grain conflicts, while the rigidity of urea-formaldehyde glue keeps bent laminations stable.

Sirrus tells me that, as of my inquiry three months ago, they have not specifically evaluated cold creep performance. They point out that CAs in general are rigid but additives in the Nexabond formula create some flexibility, so qualitatively, performance in this regard should land between PVA and UF glues.

Glue line and clamping

I wondered if the glue line with Nexabond can ever be too thin or if I should be concerned about overdoing it with clamp pressure, such as in an edge-to-edge glue joint where an invisible glue line is desirable. None of their work, they say, suggests issues with too much or too little clamp pressure. Use enough pressure to close the joint and make the parts meet tightly without gaps.

Informal shop tests

Now, here are a few unscientific trials from the Heartwood Joint Destruction Laboratory (no affiliation with NASA). Please don’t interpret these as anything more than me just wanting to “see for myself” in my own shop. I wanted to get a sense of the development of the bond strength in different woods.

All of the joints were carefully fit, glued with Nexabond 2500M, and clamped for 5-7 minutes. I broke apart each joint by placing the assembly in a vise with the glue line just above the jaws and then grasping the top piece with large pliers just above the glue line – basically stressing the joint in tension to failure. I used this method simply because it’s easy to do and tough on the joints.

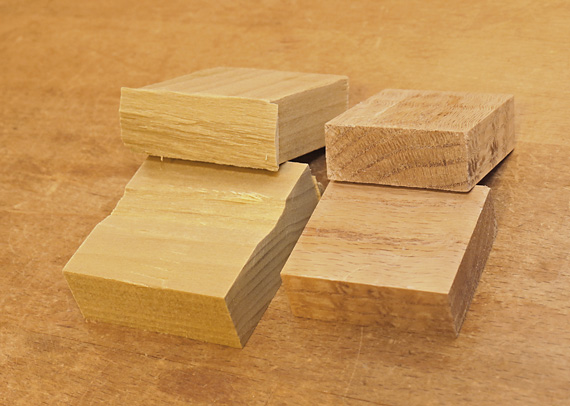
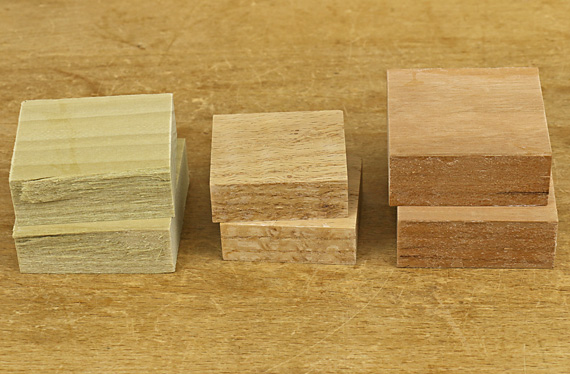
I broke the first set right after removing the clamps. Shown below, even after setting only several minutes, the poplar joint held perfectly, as evidenced by total wood failure, but the red oak and cherry joints obviously needed more time.

Nexabond glue

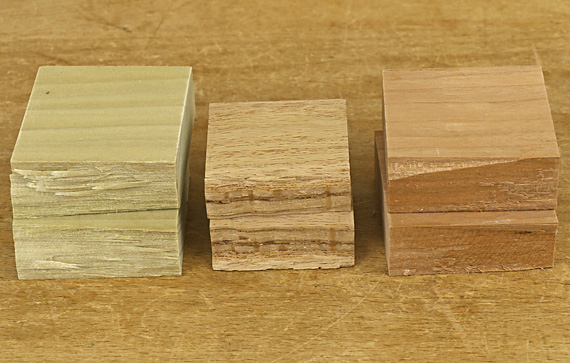
I broke another set one hour after removing the clamps, which is still not enough time to fully cure. Shown below, the poplar and oak joints held perfectly but the cherry joint was not ready.

Nexabond glue

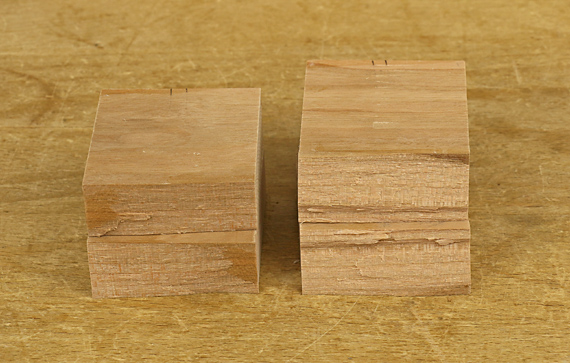
I let two more cherry joints cure overnight before destruction. One shows about 90% wood failure and the other shows 100% wood failure, in other words, that joint held perfectly.

Nexabond glue

Again, this is obviously not a rigorous test but Nexabond seems to cure slower on cherry. I repeated the 5-7 minute and one hour breaks with cherry, again making sure the joints met perfectly, and the results were essentially the same as above. Perhaps Sirrus can advise on this.

In any case, I like to do these simple shop trials with unfamiliar glue just as I would with an unfamiliar finish-wood combination.

All in all, I’m very impressed with Nexabond glue. I’m convinced it is quite different – better – than any of the several other CAs I’ve tried over the years. 

As a reminder, this review is unsolicted and uncompensated.

Coming up: let’s consider options for practical applications of this glue in the small woodshop.

I’ve also invited Sirrus to comment on these posts.

Category: Tools and Shop  | Tags:  | 4 Comments
Author:
• Friday, May 01st, 2015

Nexabond 2500M

[Addendum 12/7/16: As of 3/1/16, “Nexabond” products are no longer available but the Nexabond 2500M (Medium set time) formulation is sold widely by DAP products as RapidFuse Wood Adhesive. The short and long set Nexabond formulations are no longer available.]

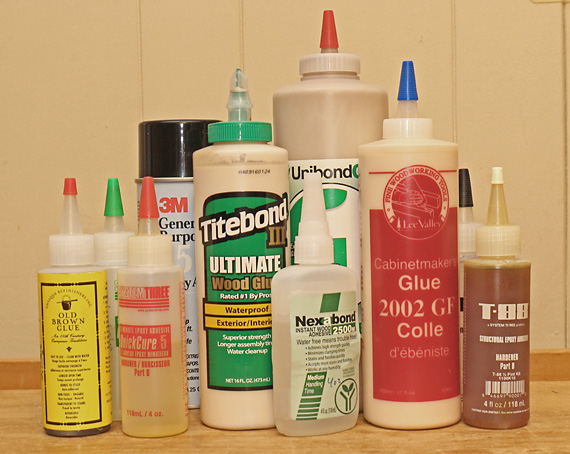
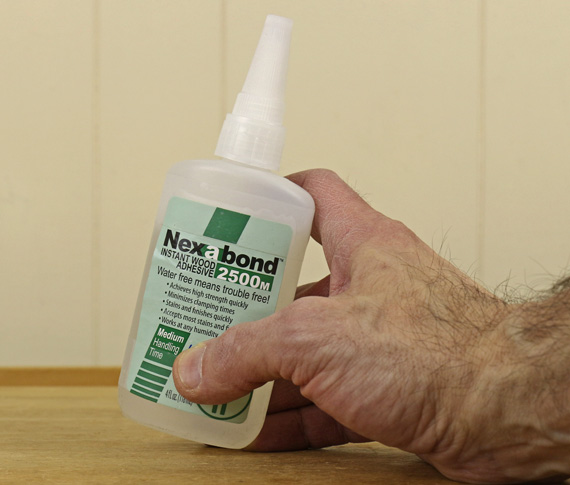
Nexabond is a unique cyanoacrylate glue specifically formulated  for bonding wood. Like other CAs, its main advantage is speed. It reaches most of its final strength very quickly, and that can change your shop workflow.

I have never trusted other CAs as mainstream woodworking glues, mostly because of their poor shock resistance. More than relying on data, I could see this myself by easily whacking apart small, simple test joints. I just couldn’t trust those CAs, and trust is everything for a woodworker when it comes to glue. But I’m becoming convinced that Nexabond is different.

First, let’s cover the basics of working with Nexabond. By the way, this review is unsolicited and uncompensated.

The full cure time to maximum strength for all of the Nexabond glues is 4 hours but Nexabond 2500M builds 2/3 of the maximum in only 5 minutes. 2500S is faster, 2500L is slower. They bond wood to wood and many other materials such as glass, plastic, and metal to wood. The manufacturer says it also works on MDF and oily exotics such as cocobolo and teak.

The basic procedure is easy. Apply a small amount of Nexabond – much less than you would for PVA glue – to only one surface and spread. The viscosity of 2500M is a little less than Titebond III, yet it is easy to work with and actually runs less than TBIII because there is simply less glue on the wood.

The joint surfaces must meet snugly because this glue is not a gap filler. I’ve found that there is a comfortable amount of open time so there is no rush to get the parts together.

Clamp the joint using customary force to bring the joint surfaces tight together. The instructions on the website say to clamp for a “couple of minutes” but I clamp for five minutes with 2500M, assured that plenty of strength will build in that time. No accelerator is used. Small pieces like corner blocks can just be held into place by hand for less time.

Aim for minimal squeeze out and use a dry cloth to clean up the excess. Nexabond glue does not contain water so there should be no joint swelling issues.

This is a fast glue, which can be helpful, but the flip side is that parts must come together in the correct position right away because there is very little time for repositioning them once they have met.

The glue has a sharp odor and beware, it bonds skin instantly. Unlike most CA glues, the bottle tip doesn’t clog. Shelf life is listed at 12 months at 72°F.

Coming up: A closer look at shear strength, endurance, impact resistance, and cold creep/glue line flexibility. Then a discussion of practical uses for this glue and a note about end grain bonding.

Category: Tools and Shop  | Tags:  | 6 Comments
Author:
• Tuesday, April 21st, 2015

blogging

OK, OK, I get it. 150,00 words – about the length of 2 1/2 non-fiction books, along with 800 photos, of woodworking techniques, tools, resources, jigs, and thoughts on the craft over the past 6 1/2 years, and what is by far the most popular post on this blog?

A joke. Yes, the recent April fool’s post featuring the profound research of the nonexistent Dr. Insane(o). OK, so that’s what you want. My webhost actually had to warn me about bandwidth overuse.

Seriously, this doesn’t bother me a bit. On the contrary, I am, as always, very grateful for the large readership of Heartwood. That post points up the value of laughter and the dangers in taking our woodworking and ourselves overly seriously. That some readers swallowed it whole only unmasks the wishful thinking to which all of us woodworkers are subject. It naturally arises from pursuing a craft that is more difficult than we might like to admit.

While I’m on the subject though, hey, a few more comments now and then would be nice. I’m of course interested in your thoughts on the posts but remember so are other readers.

Anyway, thanks again for reading and here’s a true classic to put a smile on your face. Yes, “They’ll be standin’ in lines for those old honky-tonk monkeyshines.”

Rob

Category: Ideas  | 4 Comments
Author:
• Tuesday, April 21st, 2015

drill stops

Maybe.

Of course, the best drill stop is on a drill press but the topic here is drill stops for hand drilling, which for most of us means with a portable electric drill, corded or cordless. So, let’s look at the candidates.

The most common store bought drill stop is a round metal collar with a single setscrew that tightens against the drill bit. These are cheap and not bad, but I’d stop short of calling them good. Most of them tend to tilt as the screw is tightened and all of them can damage the flutes of the bit. If you jiggle or turn the collar to direct the point of the setscrew toward the bottom of a flute and then tighten the screw carefully and firmly, they can stay put and perform decently. Fuller makes a version of these that is longer than the others.

Another type of stop uses a setscrew to close the metal collar’s diameter to bind it by friction against the drill bit. I’ve found that the metal is too stiff to reliably close down snugly against the bit, or on the other hand, that the inside diameter is too close to that of the drill bit so the collar is too hard to get on or off the bit. They’re borderline acceptable; I wouldn’t call them good.

Some of the stops used in conjunction with a countersink are pretty good and some of the Forstner bit stops seem good but those are other matters.

An utter failure is the red plastic stop that twists on and supposedly tightens against the drill bit. I have found them totally unreliable – they easily slip. Sorry, I wouldn’t use them in a hundred years on any project of importance.

Now let’s look at what I think most of us use: masking tape. Wrap some blue tape tightly around the drill bit and squish it in against the flutes. Then fold over the last bit of length so it forms a little flag that sweeps away the drilling dust on the work piece to signal that you are at full depth, and later to make the tape easier to remove.

In any careful work, I put a mark on the drill bit at the bottom of the tape with a Sharpie. Then, as I’m drilling successive holes, I check repeatedly to see if there is a gap between the mark and the tape, which would indicate that the tape has slipped. Alternatively, I keep checking with a ruler.

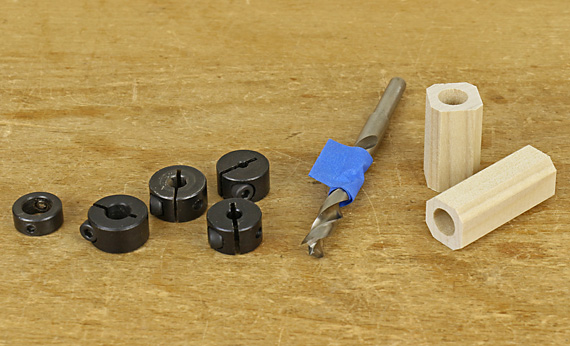
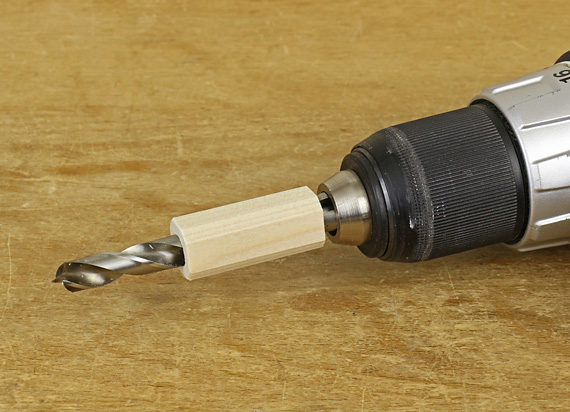
What about for very careful work, especially drilling many holes, such as in carcase dowelling? For this, remove all doubt and make a dedicated wooden collar drill stop as James Krenov recommended.

drill stop

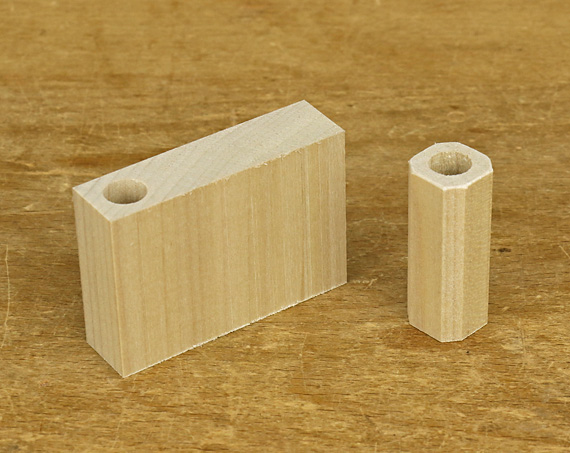
Work out the required length according to the desired depth of the hole and the length of the drill bit. Use a drill press to bore into the end grain of an over-wide squared block then saw off the stop itself. Chamfer the long corners for safety so they won’t hack at your fingers. If you cut the cross section of the stop to size before drilling, it will register less accurately against the drill press table and the drilling is likely to be dangerous.

making a drill stop

The cutting depth can be fine tuned by adjusting the amount of the drill shank inside the chuck – assuming it is a good chuck. This type of drill stop has never let me down. It’s worth the extra effort. By the way, dentists understand this.

So, yes, there is a good drill stop, but you have to make it.

Author:
• Wednesday, April 01st, 2015

A new steel developed at the Japanese Institute of Engineering and Metallurgy holds tremendous practical promise for all who use sharp blades, including busy woodworkers. Though not yet ready as a marketable product, it appears to have the potential to be a complete game changer. Here’s the details.

The key feature of this steel is its ability to, in effect, self sharpen. By combining sophisticated powdered metal technology with several unconventional alloying elements, the researchers have been able to produce a unique grain structure in the steel. Whereas a sharp edge in any conventional steel wears by “dropout” of iron, alloy, and carbide grains, which leaves behind a degraded surface and edge, the newly developed steel product wears in an entirely different manner.

The grain structure in the outer few microns of this steel gets compressed just before it wears. When metal wears away, it does so in minute thin “flakes,” leaving behind a surface – and a cutting edge – that is as polished and keen as it was before the wearing process started.

In fact, once properly sharpened, the edge actually becomes slightly sharper as it wears in this unique manner. It is as if the wood that is being cut by the blade’s edge acts as a very slow sharpening “stone”. There is a limit to how long this process can persist simply because the volume of steel near the edge is gradually depleted.

However, in personal communication with Dr. I. N. Sano, the lead scientist on the project, he predicts the sharpened edge of a smoothing plane would be expected to last through about one year of regular use in a typical hand-tool-based woodshop! Dr. Sano remarks that, “Woodworkers are going to be amazed at not only how long a cutting edge in this steel can last but how it actually improves with use. The traditional routine of continually resharpening plane blades and chisels is going to become a relic of the past.”

The details can be found in the latest issue of the Institute’s bimonthly journal but a full English translation is not available at this time. A brief introduction is reproduced below, with permission.

ここで問題の真実は、ケースにあなたが興味を持っている、である

あなたがこのナンセンスのいずれかを信じるなら、よく、あなたは、日付をチェックしていない。それとも、素早く、簡単にすることができます木工誇大広告、そして確実なことするたびに信じるものだまされやすい木工の一つです。申し訳ありませんが、それだけで何か他のもののように、練習と勝利と一緒にいくつかの障害がかかります。

The development group estimates that the new steel product will be available to tool makers by the end of this year. After a bit more tweaking, it is expected to have very favorable working characteristics for blade formation. I will keep readers posted with new information on this wonderful innovation that really has the potential to change the way we all work in our woodshops.

Sano-san has informed me of a single drawback to the new steel. It will only be produced on a single calendar day each year, namely today, which is named in honor of all those who believe that high quality woodworking is easy, quick, and every step is a sure thing every time.

Category: Resources  | 14 Comments