Author Archive

Author:
• Sunday, December 30th, 2018
clamping

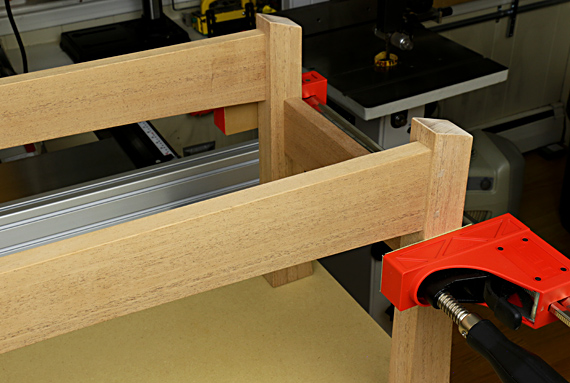
You’ve cut your joints, fitted them individually, and happily found them to be tight and true. Now you dry assemble the frame or carcass, which should include applying the clamps to rehearse the conditions under which the glue will dry. 

Unfortunately, you may well find that despite the rightness of the individual pieces and joints, and having applied the clamp forces in true directions, the assembly is out of square, twisted, or harbors some other seemingly unmerited vileness with which you must now contend. 

What’s going on? Well, I suppose tiny tolerances, wood movement, unnoticed error stacking (and probably the alignment of the planets) have somehow militated against the righteousness of your assembly. As careful as I try to be, I find at least a little bit of this is not the exception but the norm. 

So, the next step is to tweak the clamp placements to true the assembly. For example, you can use pinch rods and recall the rule of the long diagonal.

But how much should you force the assembly into true? Consider that you are probably using several clamps, each capable of perhaps a thousand pounds of force, which can easily bend and twist wood. You may be truing one aspect of the assembly while distorting another, making it impossible, for example, to later get a good sliding fit with a drawer. 

Clamp force can also compress wood, especially on side grain where it meets end grain, which is part of most joints. I think a little bit of this nearly always happens in clamped glue ups and acts as an acceptable correction mechanism. Carried too far, however, I suspect it may show up next year as gaps at the joints because the glue line has some elasticity, especially with PVA glue, and the wood compression may not be fully elastic.  

The point is to not add too much stress to the final assembly by using clamp force as a correction mechanism. As much as possible, the components of the assembly should “want” to go together true, flat, and square. Very small corrections by clamp placement to true the assembly during glue up will likely not cause problems, but overwhelming a fundamentally untrue assembly with clamp force is not a good approach. Neither is making joints so loose that they can be easily forced into any configuration. 

If the assembly requires anything more than gentle correction with clamps, go back and tweak the joints and/or components if possible. As examples, judiciously trimming tenon shoulders will solve many frame constructions. Dovetail assemblies can sometimes be tweaked by planing the inside face of the tail board, or easing overly tight spots in the joint itself. 

Finally, keep in mind that you can also compensate for some imperfections in the glued-up assembly. For example, a slightly twisted frame-and-panel for the back of a cabinet can usually be easily held flat by the cabinet itself without significantly stressing the carcass. On the other hand, a slightly twisted cabinet door or box lid is difficult to fully correct directly, so it is usually easier to plane the front edge of the carcass (preferably before glue up!) to accommodate the twist in the door.  

Every situation is different, but the general principle is: don’t force it much! Try to use good stock preparation and joinery, make judicious corrections as needed, and think through how remaining imperfections might be accommodated. And maybe you’ll find the planets to be aligned in your favor after all.

Category: Techniques  | 2 Comments
Author:
• Friday, December 21st, 2018
pinch rods

Accurate construction of most furniture assemblies – frames, carcasses, post-and-rail construction, and drawers – usually involves 90° angles. “Square” is a big part of woodworking. Parallelograms, we do not want. 

Will a square do the job? Yes, for verifying individual parts, but for most assemblies, the tool to use is pinch rods. Here are the reasons: 

  • They are more accurate.
  • You can work faster, and don’t need to remember numbers.
  • You will get a more intuitive sense of the magnitude and direction of the error.
  • Most important, you will see immediately how to correct it, especially during glue up. 

The idea is simple. You are comparing the length of the diagonals across the frame. If they are equal, you have a rectangle; if not, you have something else, such as a parallelogram. (Yes, the diagonals would still be equal in a symmetrical trapezoid, but you will not make that if you start with the opposite sides of the frame being equal, unless of course you want it ever so slightly that way in making a carcase to hold drawers.) 

I have been using this set of pinch rods for more than 20 years, which I made with collars manufactured by Veritas. I recommend these because they simplify construction, and the result is a lightweight, low profile tool that is quick and secure to clamp, and adjusts smoothly. 

Veritas supplies basic construction instructions but here are a few tips. You’ll want to build a set of rods, so keep in mind that the shortest length a pair of rods can measure is at least 1″ longer than the individual stick length, while the longest measurement will be about twice the stick length minus 3″. 

range of pinch rods

A 40° chisel-like business end works well, but contrary to Veritas’ instructions, I suggest orient the pair of sticks so the bevels face away from each other, toward the outside, as seen in the photo below. In use, the beveled side should always face the shorter side of the rectangular assembly. Thus, you will rotate the stick 180° along its length to measure the other diagonal. This allows the tool to manage even the narrowest rectangles. 

pinch rod ends

The storage position is shown in the photo below. The non-working blunt end protects the sharp-beveled working end. I prefer to apply the gentle accuracy of these wooden rods instead of metal ones on cleaned up work.

pinch rod ends

Nearly always, you will be measuring from the inside of the frame or carcass because the other parts of the assembly will interact with the inside surfaces and angles, not the outsides. 

For very large assemblies, a tape measure, perhaps with the special tip made by Veritas, or an ad hoc pair of rods, is more practical than having a giant special pair of rods. 

To make a parallelogram into a rectangle, there is a simple rule to remember: shorten the long diagonal. For dry assembly, this may mean tweaking the joints, such as trimming tenon shoulders in a frame or post-and-rail construction, or simply adjusting the positions of the clamps. During the crunch time of glue up, remember: angle the clamps to be slightly more along the long diagonal, as if you are trying to scrunch it shorter. I am always amazed at how little clamp adjustment is necessary to square up the assembly, especially using heavy clamp pressure. Don’t overdo it. 

Sure, you did a meticulous layout and cut great joints – dovetailed that drawer, mortise-and-tenoned that frame – but somehow when it all goes together the evil forces still manage to sneak in. Assess and correct it with pinch rods. 

You might even want to make a nifty rack to store them.

rack for pinch rods
Category: Tools and Shop  | 6 Comments
Author:
• Thursday, November 22nd, 2018

Rob Hanson fire

At his Evenfall Studios in Paradise, California, Rob Hanson had been producing top quality shooting boards, jigs, and shop fixtures for the past ten years. Rob is a craftsman, a businessman and a builder, and yet almost unimaginable destruction has entered his life. On November 8, his home and shop, 35 years in the making, were devastated by wildfire. The photo above is what is left of his home and shop.

Rob has written accounts: leading up to the destruction, the aftermath, and how it is.

Rob and his wife Kristy could really use your help. Dear Heartwood readers, please consider, on this Thanksgiving Day, helping them through this tough time by contributing via GoFundMe or Paypal. Every little bit will help in body and spirit.

Let us all be grateful that we can build, and that we can also help others to build, and as life sometimes requires, rebuild.

Thank you.

Category: Resources  | 2 Comments
Author:
• Sunday, November 18th, 2018

marking out

Elsewhere in this blog, I’ve contended that woodworking isn’t quick, easy, or perfect every time, and false promises of such delights by some tool advertising and sources of instruction can discourage those learning the craft, who eventually encounter the truth but wonder if the difficulties are their fault. Moreover, perfection is an illusory pursuit that can lead to discouragement and loss of nerve, and is better replaced by a knowledgeable pursuit of excellence.

Yet, I think most anyone with strong dedication, good tools, proper instruction, and decent manual dexterity can develop the individual skills needed for excellent woodworking.

So, what makes woodworking difficult? Why is it pretty hard to learn how to make a project turn out the way you hope? What is the missing link that takes you from learning how to cut a mortise and tenon joint to being able to confidently make a table? In other words, what is the most essential thing to learn in woodworking?

I think it is this: putting it all together. This means being cognizant of the context of each step of the process, so that as steel meets wood, you understand what you’re really doing and why. You must appreciate how the skill being executed at the moment fits into the whole construction. That appreciation informs your approach to the task at hand.

For example, when you flatten the stock for casework, you are aware of why it needs to be flat, the range of flatness tolerance required, and the consequences of sloppiness outside of tolerance. You know when to bear down for high precision but also when punctiliousness is, at best, a waste of energy. So, you have a different mentality when preparing stock for drawer sides compared to drawer bottoms.

Here are more examples. You sense how to make that mortise and tenon joint accurate not just for itself but also for how it will contribute to the accuracy of the whole table coming together. You have this sense even when you are marking out (photo above). In the design process, you appreciate how individual elements have to coordinate into an aesthetic whole that you are also capable of building.

And you understand how “perfect every time” is silly.

Of course, you cannot have all the steps of a project top of mind at once. However, with experience (and for most of us, that means sometimes dealing with failure) you learn to absorb the big picture. It shapes a correct mental approach that you carry with you. With this awareness, your work becomes natural and flowing. The cognizant mentality is not at all burdensome but rather is energizing because you know how to value each step in the journey.

Good musicians know this. Playing notes, even if technically excellent, is one thing; making music quite another. The impact, presence, and style of the whole piece inform the treatment of each passage. I suppose being good at anything is like this, but with woodworking it is right there in front of us.

And finally, another thought for another day: how does making something in wood fit into everything else? (And for me, it must.)

Category: Ideas  | 7 Comments
Author:
• Tuesday, October 30th, 2018

smoothing plane

I will be teaching a class, Handplanes: Understanding, Using, and Tuning, this coming Sunday, November 4, 2018, 10:00AM – 3:00 PM, at the Woodcraft in Woburn, MA.

This class will equip you with understanding and skills to directly apply to using handplanes in your shop. Sure, I’ll cover the basics but we’re going to drill down way beyond that so you will really know what you’re doing with handplanes. Among the areas we’ll cover:

  • Understanding bevel-down and bevel-up designs
  • Tuning your plane: blade edge camber for different uses, mouth opening, preparing and setting the chipbreaker, etc.
  • How to use the interactions among attack angle, chipbreaker settings (or no chipbreaker), mouth opening, and skewing the plane to get the performance you want
  • What’s really happening with blade edge wear
  • Blade steel differences
  • Planing technique – hands and body
  • The quality features that matter in new and used planes
  • How to intelligently sort among the many options in jack, jointer, smoothing, and scrub planes

Bring your plane if available, as this class will be hands-on as well as demonstration. If you have a plane in need of rehab, bring that too – I’ll choose one from the group and fix it up.

This class has been very well received in the past. In fact, a past attendee recently commented, “I took this course several years ago and it changed my woodworking.”

Please call the store directly at 781-935-6414 to register, and see their website for the location and details. You’re welcome to email me directly with questions. It would be great to see you there!

blade camber

Category: Resources  | Comments off
Author:
• Monday, October 29th, 2018

dark red meranti

Dark red meranti, pictured above, is a generally uninspiring reddish brown, rather uniform looking wood that does not therefore find its way much into fine woodworking. If you have not come across it as solid wood, you likely have seen it as the skin of middling quality plywood, where it is referred to as lauan or Philippine mahogany. It is about the same density as khaya and genuine mahogany, but a bit softer. It has several cousins in the Shorea genus, including the softer and even more forgettable light red meranti. Any claim of these woods as “mahogany” is untenable.

There is, however, one more wood that does have a strong claim as a mahogany substitute: utile, also known as sipo. Entandrophragma utile is in the same genus but not as hard as sapele, and easier to work. It is a generally consistent but not boring wood that can look quite nice, especially flatsawn, where you otherwise might have used genuine mahogany. Its darker ray lines sometimes also add interest. I’ve also seen some wild ribbon striped quartersawn utile.

The volumetric shrinkage of utile is 11.8%. That’s pretty good but no match for genuine mahogany’s freakish 7.5%. Still, with a nice T/R of 1.4%, you can expect utile to behave quite well.

Unfortunately, dear readers, I do not have any utile in my shop at this time, so I cannot offer you a photo. However, this is a good time to refer you to the magnificent resources created by Eric Meier. His huge website is a treasure trove of well-organized information, including beautiful and useful photos. As good as the website is, I highly recommend also buying his book, Wood!, which I think is the best book on wood available, and one of the best books in the entire woodworking field. [As always, my recommendation is unsolicited and uncompensated.]

If you are contemplating using any of the woods discussed in this series of posts – “genuine” mahogany (Swietenia macrophylla), African mahogany/khaya (Khaya spp.), sapele (Entandrophragma cylindricum), or utile/sipo (Entandrophragma utile), I offer these suggestions:

  • Consider each on its own merits rather than trying to imitate some other wood, namely “genuine” mahogany.
  • Pay close attention to the particulars of each board, including color, density, figure, and, of course, the orientation of cut from the log. There is much variation within each species.
  • Watch out for defects, especially compression failures. For this reason, and the point above, consider buying these woods planed or at least hit-or-miss planed if you can.
  • Scraping is a good way to tame the interlocked grain on quartered surfaces.

Enjoy building!

Category: Wood  | Tags:  | One Comment
Author:
• Sunday, September 30th, 2018

sapele

Sapele, Entandrophragma cylindricum, stands out as significantly darker, redder, heavier, and harder than the others in this bunch. Though it would often work in the same context as genuine mahogany, I suggest not thinking of it as a substitute for the venerable old boy, but rather as a wonderful wood in its own right.

The species offers some spectacularly figured wood. Most common is the neat ribbon stripe in quartersawn boards. The striping is finer and bolder than that of khaya, and can be obtained quite reliably. The pieces pictured above are unfinished, fairly middling stuff, but the ribbon figure will pop pretty well with oil-varnish mix, and the color will deepen considerably.

Also, consider ribbon-stripe face veneer plywood, which can be found reasonably priced in a variety of thicknesses, as a nice backing for a cabinet or for drawer bottoms. You know a wood has reached all-star status when you see it as fake veneer in an elevator in a fancy downtown building.

Sapele can also produce spectacular curly figure and pommele figure. The latter is similar to blister maple, sometimes in a finer pattern. The wood is popular with instrument makers.

On the other hand, flatsawn sapele, without special figure, is a decent wood but not something that really excites me on its own. Still, it may fit the bill as a predictable, diffuse-porous, reddish wood that can finish fairly dark and will darken further with time.

No pushover like genuine mahogany, sapele is about as hard as white oak and sugar maple, and nearly as dense. It machines pretty well as long as you take precautions to avoid planer tearout on the quartered rowed surfaces and burning from ripping on the table saw. For smoothing to a finished surface, I suggest skip the handplane and go with scraping and sanding.

Sapele is about as stable as black walnut, with a volumetric shrinkage of 12.8%. The T/R is a nice 1.5, but that offers little advantage when using quarted boards for the ribbon stripe.

Shopping at different dealers, I’ve had good luck with the sapele being fairly consistent, and it has seemed safe to buy in the rough. (However, check the comment in the first post in this series – compression failures may lurk.) I’ve also found it more expensive than khaya or utile but still significantly less than genuine mahogany. It is a popular wood.

How do you pronounce it? I’d been saying sa – ‘pay – lay (like the legendary soccer player), but most often I hear sa – ‘pee – lee, and sometimes, sa – ‘pell – lee.

There’s one more post coming up in this series.

Category: Wood  | Tags:  | 7 Comments
Author:
• Sunday, September 23rd, 2018

Khaya

Next up is khaya. The wood available to us may be any of four species in the Khaya genus: K. ivorensis, K. grandifoliola, K. anthotheca, and, less so, K. senegalensis. Ask the guy at your lumber yard what species he’s selling and he’ll probably look at you the same way we look at an 88° try square, even if the importer had kept the species distinct. In fact, you’ll probably create confusion by asking for the “khaya” bin because it is more commonly referred to as African mahogany.

And so, this is the only wood comparable to genuine/true mahogany (Swietenia) that generally bears the “mahogany” name. Botanically, it is in the same family (the next major grouping above genus), Meliaceæ, as Swietenia. It comes to us from West African countries.

Just like true mahogany, when African mahogany/khaya is good, it is indeed a very good wood. The problem is that I have had just as much frustration with inconsistency in density and color in khaya as with true mahogany. There is variation among species, but also with the geographic source of the tree, and the local conditions in which it grew. Therefore, as a practical matter, I suggest that you not be too concerned with the provenance of the wood, but evaluate each board on its own merits. Khaya is about half the cost of true mahogany, and there is some great stuff available.

Some khaya is less dense, and quite light in color – an uninspiring pale pink hue. The flatsawn wood looks particularly anemic. When quartersawn, these boards often have a hairy surface that can be difficult to finish. They come off the planer with hairy rows that are hard to tame with planing, scraping, or even sanding.

I try to avoid these boards and instead look for darker, denser boards. Many quartersawn khaya boards exhibit a fairly coarse, beautiful ribbon stripe. The boards in the photo at top are a good example of dark khaya with great ribbon stripe. Look how nice it finishes:

African mahogany

More quartered African mahogany:

Khaya

The color below is a bit more red but also very nice:

African mahogany

Good flatsawn khaya is also very worthwhile. In some case, it is difficult to distinguish from high quality true mahogany. In general though, I’ve found that true mahogany’s legendary chatoyance is harder to find in khaya.

Unfortunately, khaya seems to be quite susceptible to the dreaded compression failures that I discussed in reference to mahogany in the previous post. With the possibility of these defects, as well as the great variation in the other properties of khaya, I suggest buying your boards S2S planed or hit-or-miss planed, if possible. Look them over carefully.

Coming up: sapele and others.

Category: Wood  | Tags:  | 2 Comments