Devoted readers (thank you!) know that I like to keep my router table simple but very capable.
The router table is truly a key tool in the small shop but there is a wide range of complexity and cost involved. I admit to being intermittently tempted by router lifts, tracks and slots in the table and fence, bit changes and height adjustments from above the table, and micro adjustability of almost everything.
Yet, my simple set up continues to do everything required. It consists of an MDF top and fence on a 2×4 base, dust collection, and the Bosch 1617EVS held in a dedicated base attached underneath the table. Moreover, the flatness accuracy of the top equals the best tables reviewed in Fine Woodworking magazine #237, and it substantially exceeds most of them. Some of those rigs cost more than ten Bens.
But what about routing a rabbet or profile on the end of a narrow stick, or, more challenging, a dado in the middle of, say, a 4″-wide rail? I again admit to being tempted by an impressive cast iron tabletop with a miter gauge slot.

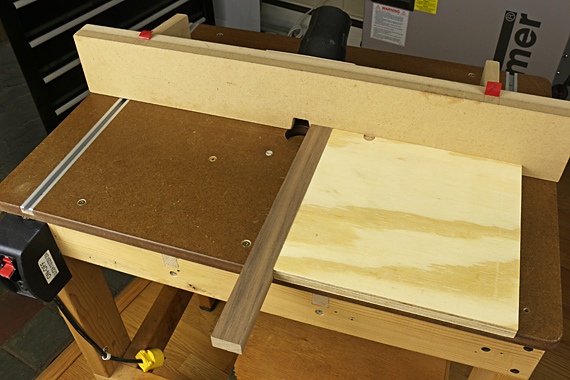
For routing on the end of the stick, the workpiece alone gives too little registration against the fence. Therefore, I have usually used a squared piece of plywood or MDF, about 10″ x 12″, to register the workpiece against the fence and prevent tearout at the trailing edge. (See photo just above.)
However, sometimes it is handy to use a miter gauge, especially for a short dado. This also allows me to register the left end of the workpiece against the miter gauge stop for a repeatable task.
Well, there just is not enough depth in a 3/4″ MDF top for a metal-lined track for a miter gauge. (Unlike for a T-track, which is more shallow.) Thicker MDF is an another option but that would mean a new table top that would require a recess to mount the router base. A bare slot in the 3/4″ MDF is also problematic in that it would wear quickly. I could line the slot with UHMW tape but it would be hard to get the width just right to avoid having to adjust my miter gauge bar every time I brought it over from the table saw.
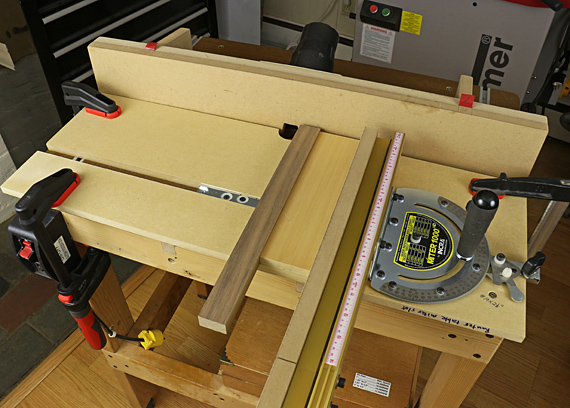
So, as usual, I turn to the late Pat Warner’s writings for a solution. On page 99 of his The Router Book, there is a simple way of making a temporary “slot” in your MDF router table top. My version uses nominal 1/2″ MDF with adhesive UHMW tape on inside edges. (See the photo at the top.) The outer board is screwed down in the near right corner to give more clearance for the miter gauge head, and elsewhere the boards are clamped.
This allows me to use my table saw miter gauge – the wonderful Incra 1000HD and its adjustable end stop. Note that I do not need to adjust the width of the bar. Instead, I retain the setting that works for the table saw, and then for the router table, simply set the two MDF boards snugly against the bar for a wobble-free fit. A backer board prevents tearout at the trailing end of the workpiece. The router table fence is not functional for the cut itself but is close by for dust collection if possible.
It looks like I just saved several hundred dollars yet again.
Mmmm, that walnut looks nice.


Very nice set-up! Have you considered writing a book? Or did you already? With all of the excellent information you have shared on your blog since you started it, you have plenty of very interesting and useful information to put in a book.
Pascal,
Short answer to the first question is yes, to the second no. Long answer is too long but I appreciate the encouraging words.
Rob
I would never have thought to do anything like that. I’ve been eyeing all of the fancy router table gizmos myself, but I think the more I look around, the more I’m dissuaded from making such a large purchase. Especially for something that I’m not going to use all the time.
Yea, that’s it, Mike.
Rob
Great write up, as usual Rob! What other books would you recommend for getting the most of the router?
Brad
Thanks, Brad.
Pat Warner’s book is still available and relevant. You can also always count on Bill Hylton’s books. In the 90s, I used Gary Rogowski’s book Router Joinery to gather ideas.
And remember this for safety: http://www.rpwoodwork.com/blog/2011/09/22/two-safety-principles-of-machine-woodworking/
Rob