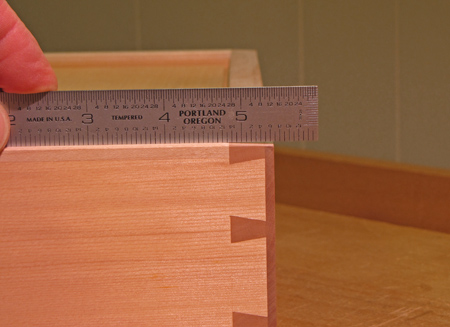
Hopefully, the drawer will close with the front even all around with the edge of the opening. If not, now is the time to correct this by planing. Soften corners to your preference. Cut a substantial chamfer on the top of the entering edges of the sides.
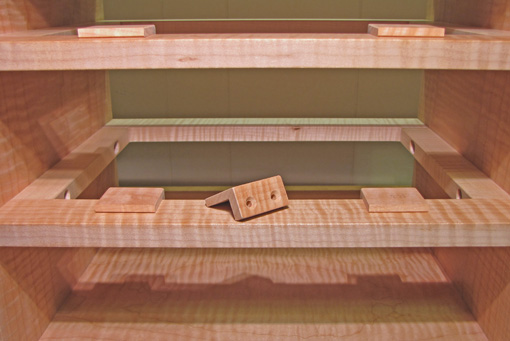
Closing stops can be installed at the front of the frame to contact the back surface of the drawer front below the drawer bottom. The strongest designs are those mortised into the frame. This generally requires the foresight to make the mortises before assembling the frame. (No comment.) They can also be glued, screwed, or even mortised to the frame near the end of construction, though less conveniently. To ease installation, it is helpful to design the stop with an abutting placement, such as against the back edge of the divider. The photo above shows a simple drawer stop design that hooks over the divider and is screwed to the back of it. The small undercut chamfer, visible at the front of the stop, facilitates fine trimming with a shoulder plane after assembly.
For all but the smallest drawers, two stops are best to create an unambiguous closure across the full width of the drawer. Since the drawer is then in a good, neutral position, it will be easy to open without jamming. I prefer the front face to be a hair inside the edge of the housing.
Alternatively, closing stops can be placed at the back of the case on the runners.
Outgoing stops are optional. A simple, effective design is a small piece of wood, screwed to the back of the drawer divider, which contacts the back of the drawer on its way out, yet can be rotated 90 degrees to let the back pass by to remove the drawer. (You know, to show your woodworking friends.)
I like to bevel the bottom edge of the front of a flush fit drawer to prevent it from rubbing the bottom of the drawer frame. (The drawer is upside down in the photo below.) This way the drawer will run only on its sides. On very small drawers, it may look good to match this gap to the one at the top of the front.

The front is finished to match the outside of the piece. For the sides and back and bottom, think “less is more.” Personal preferences aside, there are a few points to keep in mind: avoid perpetually smelly oil finishes on the inside of the drawers or case, finish the bottoms before assembly, and avoid any film finish on the outside of the side pieces. A light coat of wax on the sides’ outer surfaces and bottom edges will help produce pleasant drawer action.
Next: getting a handle on it and closing thoughts for the series


Nice work.
Hi Rob-
Thanks for a great series. I’m trying some of your techniques and will let you know if I can get your type of results.
Your efforts are greatly appreciated as is your sharing.
–Steve.
Jeff and Steve,
Thanks for the comments. Good luck with the drawers, Steve.
Rob
Well i just wanted to know what finish was used on the case that your making, it looks like tiger or quilted maple, but the finished used brings out the grain very well i wanted to get the process used to finish the wood bring out the grain the way u did cuz i have some figured maple and would like to finish it the same way to bring out the figure the way u did? this is my second time here on your site but i will be back very soon u have very interesting and informative articles its alot of reading but for some reason i like the info u post on your site so i will have to try to stay updated its hard being part of somany sites though but i think one more isn’t gonna kill me:)
Ike,
The case is made of curly big leaf maple. In the drawer series of posts it is shown unfinished except for the interior of the case in post #8 where it has an extremely light coat of thin wiping varnish – barely enough to seal the pores of the wood. For the exterior of the case I used two coats of wiping varnish but that is not photographed in these posts. For this wood, I like Bartley’s satin clear gel varnish for the exterior surfaces, usually preceded by a coat of Minwax wipe on poly which penetrates a bit more to pop the figure.
Rob
Excellent and well defined series on drawer making. There are so many small details that spell the difference between “high end” and “pedestrian” and your approach to drawer making magnificently highlights the details that make the difference. Thank you for sharing. I enjoy your blog very much.
Thanks, Beth. And it’s not easy to keep sight of all those details as the work progresses, so I hope these articles help.
Rob
Hi Rob,
Found this blog doing a search for how to do drawer stops. I have really enjoyed all the entries. I am finishing up a chest of drawers and will do my drawer stops as you indicated. You made a statement right before describing how to make the drawer stops. It was, “cut a substantial chamfer on the top of the entering edges of the sides.” Can you elaborate on this? Why do you do this? Thank you very much.
Thanks for reading David, and I hope it’s helped you with your project.
The top corners of the sides, at the rear, are higher than the top edge of the back piece, and so are somewhat vulnerable to damage from being bumped when you insert the drawer in its opening. Likewise, the top edge of the case opening can be bumped/damaged by those corners. So, to ease the entry of the drawer into its opening, knock off those harsh corners by making substantial chamfers. I think it also looks nicer when those corners are toned down so they visually blend to the back piece. (Though don’t make the chamfer physically go all the way down to the top of the back piece.)
Rob
Thanks for the reply Rob. That makes sense now. I made my drawer backs the same height as the sides so that is why I was confused. After having to trim the back heights a little bit in some places so they would not rub against the front and rear dividers, I can see why keeping the back a little bit lower than the sides is beneficial.
Dave
Great, Dave. Good luck with the rest of the project.
Rob