A full discussion of dovetailing is beyond the scope of this series, but here are several tips pertaining to drawer making.
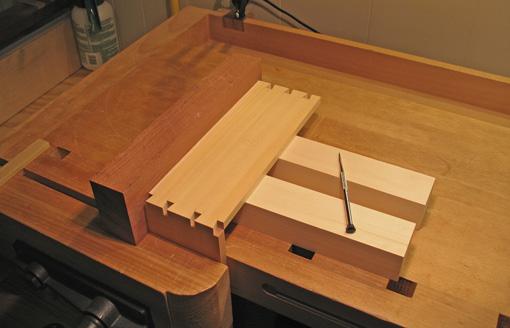
Much of the success of dovetailing depends on accurately transferring the outline of the tails to the pin board (or vice-versa, if that is your preference). The bottom edges served as references when fitting the front and shooting the sides square, and continue that role as a heavy, flat board, squared to the front piece, aligns the sides to the front while marking for the pins.
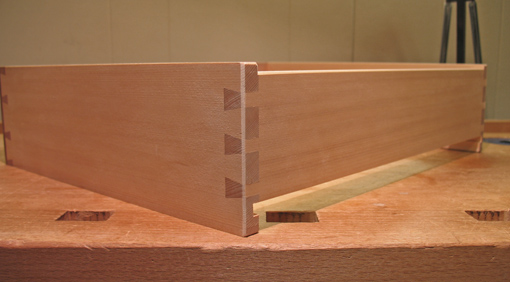
Angles for short dovetails should be steeper than usual to improve their appearance and possibly their strength. The tails for these drawers are approximately 5:1 slopes. My usual ratio for medium to larger joints in hardwoods is 7:1.
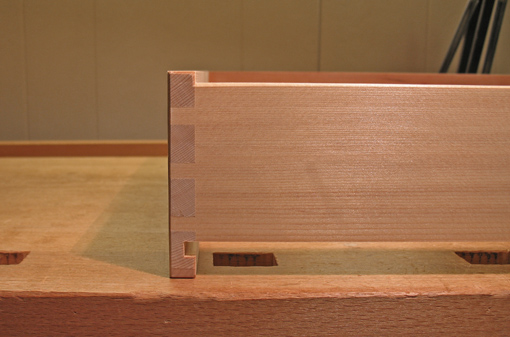
Layout the joints so the groove for the bottom will be fully within the lowest tail at the front. At the back end, there is a large tail at the bottom which also fully contains the groove, while a tail at the top allows for a neat chamfer.

The grooves to fit the drawer bottom are cut after dry fitting the front and sides and ensuring that the reference edges (the bottom edges) are aligned. For these drawers, I made the grooves 1/4″ wide, barely 3/16″ deep, and 3/8″ away from the edges. Keep the grooves sufficiently shallow and away from the edges to avoid weakening the sides, though not so shallow as to allow the bottom to slip out if it distorts a bit.
Note that the bottom edge of the back piece does not end with a customary squared pin. The little shoulder below the lowest pin allows the bottom of that pin to have an angled surface which has contact through the full depth of the side piece. A squared pin lacks the added strength of the angle, and contacts the side piece only in the thickness remaining lateral to the groove depth.

I prepare the back piece slightly wide at its bottom, cut the joints, loosely dry-assemble the joints, then mark the back piece so I can plane it, after disassembly, to align with the top of the grooves. This method separates the process of dovetailing from aligning the bottom edge of the back with the groove, affording more control in workmanship, as well as making stronger joints.
Next: adding the false front and fitting the drawer. Stay with me, we’re getting to the cool part.


Rob, what a great series and the results look outstanding. Thanks for publishing it on your blog.
Rick,
Thanks for the comment, and thanks for reading.
Rob
I’ve got your blog up on my Yahoo page so I don’t miss anything. I’ve really enjoyed your drawer series. Getting ready to do some more drawers for a walnut table, and your posts will help me do a better job. Thanks!
Stan,
Thanks for your encouraging comments. Good luck with the table, enjoy.
Rob
Rob,
This is a great series. For a novice like me, it’s highly enlightening. Well done, with great photos that highlight your workmanship. Question: I noticed in your last photo, that the top of the drawer back is lower than the sides. What is the reason, or is it just for looks?
Curtis
Thanks, Curtis.
That feature is typical of most drawers. It is often said that it allows for air passage when the drawer is moved in and out. However, that is not necessary unless one makes drawers fit to be air-tight to the top of the opening, which I think is wrong since they will bind in humid weather.
The feature does, however, prevent the back from binding or scraping against structures above it when the drawer is withdrawn and possibly tips down in front.
Go ahead and make a drawer, it’s fun. Thanks for reading.
Rob
thank you for making this web site. I’ve only read your five sections for draws and just to night, read your first blog from Sept 08 which you said it perfectly; We can all learn from looking over some ones shoulder from time to time and you my friend have a shoulder worth looking over. I have learned and enjoyed this tremendously. I look forward to reading everything you will share. Very inspirational I especially like the phrase hand work is almost always close to the soul. Forgive me if I got that wrong I’m rushing because my wife is hounding me to watch a movie with her. By the way, I found this through PW. Thanks again, I will join you soon. d
Dana,
Thanks for the kind words and for reading.
Rob
How are you going to afix the drawer bottom? Just glue in the groove on three sides? Will there be something in the back to hold it forward?
Torch 02,
The post on drawer bottoms is coming soon.
Rob
Excellent Job of Instruction
Excellent Work
Thanks, Bob Dennison
Thanks Bob.
Rob