Gluing up is the culmination of lots of work. It’s also exciting in that the piece is beginning to take shape and look like itself. However, it carries with it a potentially intimidating finality, and the process is strictly time limited.
And so gluing up can generate considerable anxiety. The usual recommendation is to check things with a “dry glue up,” but I suggest to expand upon that and think of a “rehearsal.”
This is the time to leave nothing to chance – summon your inner control freak. I cannot think of everything in advance for a unique project at hand, and I doubt you will be able to either. That’s why a Glue Up Rehearsal is essential to ensure success.
Hide glue aficionados will point out its extended open and closed times, and potential for reversibility, but still, there are limitations.
As you rehearse the process, you will fashion answers to questions and dilemmas such as the following. How exactly will you apply and spread the glue? How will you support the parts for this? Can you finish the glue application before there is any chance of it skinning over before the parts are joined? You dripped a big blob of glue – what, exactly, will you wipe it up with?
A big question: would things go better if the assembly were glued up in stages rather than all at once?

What is a convenient opening to preset the clamps? In what order will you apply the clamps? How will you keep the parts aligned? How will you support the pieces in the intermediate stages of the glue up? Will the all of the clamp handles be accessible for tightening? Will you have visual access to see if the joints are closing satisfactorily? Do you need a hand light?
Another big question: how will you assess alignment and squareness, and how will you make corrections as needed?
How will you deal with squeeze out, and when? How and where will you move the assembly after clamping?
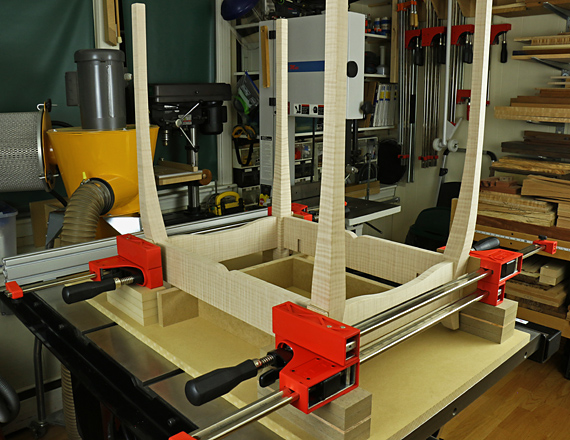
It is almost always worth it to build special support structures if they will facilitate the process. The unconventional leg-and-apron assembly in the top photo required a two-stage assembly and special support structures to ensure that all my previous hard work would pay off in a good assembly.
And so forth. The point is that there are surely more questions than one is likely to think of. A rehearsal, albeit a dry rehearsal, along with thought and experience, will cause these issues to become apparent so you can prepare for them.
Glue up is game time, but you want no doubt as to the outcome. Rehearse victory.


That’s a great way to think about the process and the questions you’ve brought up are key. Seriously, glue manufacturers should link to this post.
Thanks T.
But what are the chances?
Rob
Hi Rob,
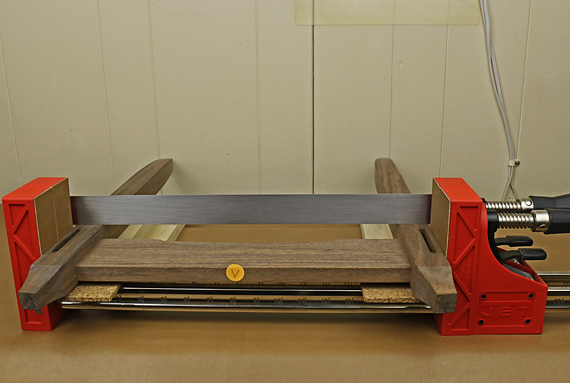
That second picture gave me a ‘duh’ moment. I think the steel straightedge is to ensure the legs stay parallel. I wish I saw this before I glued my table legs up (and of course, slightly our of parallel)!
Thanks for your thoughts; a little bit more knowledge gained.
Steve
Thanks, Steve. Yea, you can use that check during dry assembly but also during glue up to make sure the clamp pressure is creating a true assembly.
Hopefully, the tenons have been cut parallel to the faces of the rails, the mortises are cut square to the faces of the legs, and the mortised faces of a leg are square to each other. Also, the tenon shoulders are cut true and meet the leg cleanly on both sides of the rail.
The straightedge shows that the faces of the two assembled legs are in the same plane. Since the mortises are perpendicular to that plane, we know we’re on the way to a square assembly – no surprises.
Rob