Archive for ◊ February, 2018 ◊

Author:
• Wednesday, February 28th, 2018

drafting cabinet

Groundbreaking furniture artist and craftsman Wendell Castle passed away last month at 85. Woodworkers are probably most familiar with his stacked-laminated wooden tables and chairs, but whether working in plastic, bronze, or wood, his immense design vocabulary produced so much for us to explore.

I do not possess design talent anywhere close to the same universe that this man had, and only some of his work actually appeals to me. The late Sam Maloof’s description of himself as a “woodworker” resonates with me more. Nonetheless, I find Castle’s outlook inspiring.

In an interview conducted by the late Neil Lamens, discussing his intense approach to design, I recall Castle saying something that stuck with me: “If you’re always hitting the target, it’s too close.”

Wow. That says so much.

Creative design is not easy, nor should it be. It is not about making something new and different for the sake of “different,” but rather it is trying hard to get out what you want to say and what you want to make – what you really, very much want to be there. This is true even for those of us who are more in tune with the subtle grace of James Krenov’s work than the bold statements of Castle’s work.

Moreover, Castle’s thought is reassuring. If a design that seemed promising, and has even gone on to be refined and built, did not quite hit the mark I hoped for, I can take heart knowing that much has been gained in the attempt.

The work and inspiration of Wendell Castle will live long and wide.

Category: Ideas  | One Comment
Author:
• Friday, February 16th, 2018

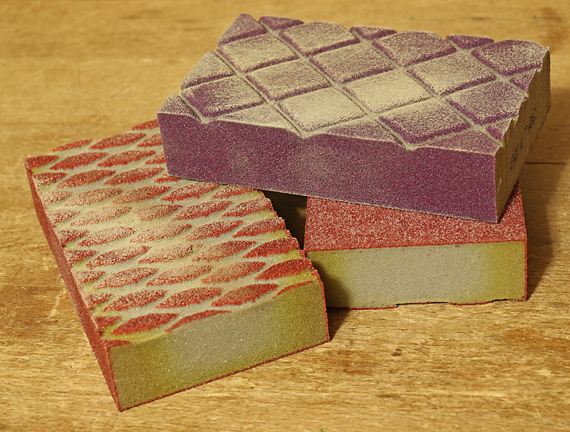
3M sandpaper

Sanding doesn’t get a lot of respect in the woodworking world, perhaps because it is a rather boring job, and hand planing seems, by contrast, so refined. Nonetheless, sanding is an important step in building many projects, so it pays to take advantage of technological advancements.

3M’s Pro Grade Precision sanding sheets seem to cut faster than any others that I have tried. I can really sense the sharpness of the “proprietary, precision-shaped ceramic mineral” abrasive biting the wood. Of course, this is not a controlled test, but it is enough to make me reach for these sheets first. 3M’s labeling is a bit confusing – this product is an upgrade from their “Pro Grade” paper, which uses aluminum oxide abrasive.

I had reported earlier that I didn’t find the grippy backing of 3M’s sanding sheets particularly helpful, but my experience since then has shown me different. The “No-Slip Grip” backing does grip rectangular cork blocks better than regular paper backing, and makes sanding easier. Even better, it holds very well in the slots of the shop-made, all-cork curved blocks that have become a staple among my tools for curved work. This backing is also significantly more durable than paper backing.

I continue to find 3M’s remarkable Ultra Flexible Sanding Sheets (on the left in the photo above) to be wonderful for working detailed curves. The durability of the film backing and the grit itself far exceed that of paper-backed sanding sheets for this work. They are available in 100, 150, 220, and 320-grit, and in 4 1/2″-wide, 7″-long sheets and 10 1/2-foot rolls.

3M sanding sponges

I previously reported that I hadn’t found any sanding sponges to be useful. I’m still not a big fan, but 3M’s Pro Grade Precision “ultra flexible, dust channeling” sponges are pretty good for smoothing in some sculptural work. An important distinction, sanding sponges do not afford the tactile control, nor do they have the moxie of rasps for shaping. They also break down too fast for their cost. Their main advantage is they are easy to hold as you smoosh them over irregular shapes. Of the two types shown, the larger diamond pattern has been more durable.

You can find all of these products at home center stores. As usual, I relate only my direct shop experience with tools, unsolicited and uncompensated. I just want to help you make things.

Category: Tools and Shop  | Tags:  | One Comment
Author:
• Sunday, February 11th, 2018

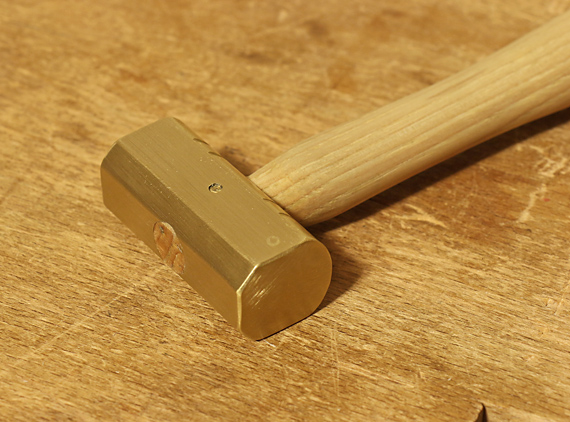
brass plane iron adjustment hammer

This modified brass hammer is superb for adjusting plane blades. It shares the functional advantages of a small Japanese octagonal steel hammer, but the brass is kinder to blades.

I created the quasi-octagonal shape from the original cylindrical head of a Grace USA 8-ounce brass hammer using an 80-grit belt on the Ridgid oscillating vertical belt sander. There was no need to remove the head from the handle. I dressed the corners with a mill file, and then finished everywhere with a medium-grit SandFlex block.

I crowned one face (shown) for use on the body of a wooden plane. I left the other face flat. A tiny engraved circle on each side of the hammer indicates the crowned face.

The flat sides allow better access and contact of the hammer face to parts such as wooden wedges, the sides of a plane blade, and the chipbreaker of a Japanese plane. The small diagonally-oriented sides permit access to small blades in tight areas such as in a small shoulder plane.

I like this hammer better than any of the cylindrical or square hammers sold for the same purpose. It also retains its general use when a lightweight, soft-metal hammer is needed. You can find the Grace hammer for less than $20.

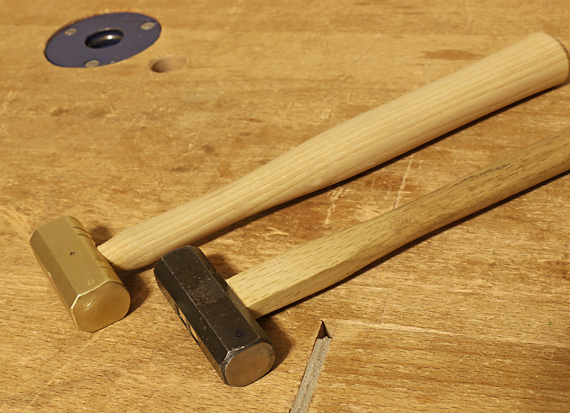
The modified brass hammer is shown below, along with a steel Japanese hammer.

plane iron adjustment hammers

Category: Tools and Shop  | 2 Comments
Author:
• Saturday, February 10th, 2018

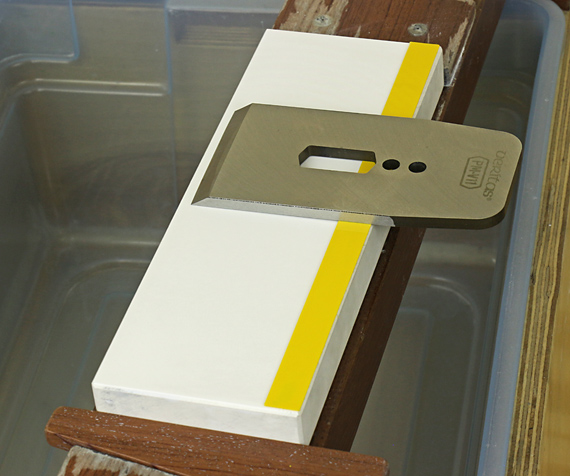
ruler trick

A strip of 0.020″-thick plastic shim stock, about 1/2″-wide and the full length of the stone, facilitates the Ruler Trick. The plastic is the same thickness and width as the 6″ steel ruler I had been using, but the blade slides on it more smoothly, and it allows use of the full length of the stone.

I lightly and uniformly scuffed the bottom of the plastic with 80-grit sandpaper, stroking perpendicular to the direction of the blade motion used in executing the ruler trick. I used fine sandpaper to soften the corners of the long edges of the plastic where the top meets the sides. This preparation, plus the low friction of steel on plastic, makes this plastic “ruler” surprisingly stable on the stone.

The Ruler Trick, taught by David Charlesworth, removes the “wear bevel” of a plane blade with greater speed and accuracy than by working the back of the blade fully flat against the stone. In other words, it helps in the necessary task of accurately creating two planes of steel that meet at a sharp edge. It is useful for nearly all plane blades but particularly valuable, almost essential, for bevel-up blades.

With the blade elevated on one side of the stone by 0.020″ and the edge reaching 2″ across the stone from the inner edge of the plastic “ruler,” an angle of only about 1/2° is created on the “flat” side of the blade. [tan-1 (0.020/2) = 0.57°] This amount has no significant effect on the bevel angle of the blade, nor on the attack and clearance angles of bevel-up and bevel-down planes. The facet is very narrow, perhaps 1/32″-wide, created with just a few strokes on only the finest stone.

[Addendum, February 14, 2018, updated: I received the April, 2018 (#238) electronic issue of Popular Woodworking magazine today, and note in the “Tricks of the Trade” section on page 12, a reader contributed essentially the same “trick” to the magazine as I have described here on my blog. He used plastic from a milk jug. His trick also appeared in the November 2016 PW.

The PW contributor obviously came up with the idea independently of my writing. I do believe I also came up with the idea independently, but now I think it’s possible that I was influenced by what I probably saw earlier in the November 2016 issue. I really am not sure. Therefore, I credit Jonathan White, the PW contributor, for the idea.]

Category: Techniques  | Tags:  | 8 Comments