Board orientation
When gluing up flatsawn boards to make a panel, is it important to alternate the growth ring orientation of the boards? The short answer is no.
In general, I suggest go for the best appearance. The reasoning usually given for alternating heart and bark faces is that the full depth of the cupping in any season is confined within each board, and thus is particularly helpful in unrestrained panels. The case usually given for orienting all the boards alike is that cupping will want to produce one large curve, which is more easily kept flat in, for example, a leg-and-apron table.
There is truth to both assertions, though unless appearance strongly dictates one or the other, I tend to favor alternating the boards. Just thinking geometrically (see the endgrain photos below), I wonder if the restraint of a presumptive large arc of like-facing boards is inordinately stressing the joints in tension on the heart face of the panel in the dry season, and vice versa in the humid season.
You can avoid the issue by using quartersawn or near-vertical riftsawn boards. With flatsawn boards, you can minimize problems by assembling the panel from equilibrated boards in a workshop in the midrange of humidity, using narrow boards, choosing species with a low T/R ratio and volumetric movement, and avoiding aberrant boards such as those with crook or substantial twist.
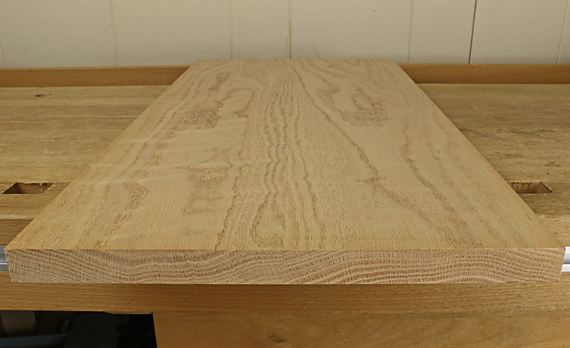
If you alternate the heart and bark faces of flatsawn boards, pay attention to the grain orientation if you plan on planing the glued up panel by hand or machine. Look at the glue up in the top photo. The board on the left will be planed away from the viewer – “pith side, plane with the points” – and so will the board on the right – “bark side backwards.” (Thanks to R. Bruce Hoadley for the mnemonics.) In the photo below, the endgrain growth rings are also alternated but the proper planing directions of the faces are opposing. Thus, if you alternate rings, you’ll probably also want to alternate the cathedral points.

You also have to pay attention to grain direction if heart and bark are not alternated but the choice is more apparent. The boards in the photo below are correctly oriented in this regard (plane toward the viewer).

The camber question and how to check the joint
This is one of those perpetual arguments among woodworkers. Here’s my view.
I aim for just a trace of camber (hollow), simply as a one-sided tolerance. I do not want any kissing in the central length of the joint, which might create separation tension across the joint line at the outer ends where it is most likely to open. I would be satisfied with two perfectly flat edges but that is nearly impossible to reliably observe.
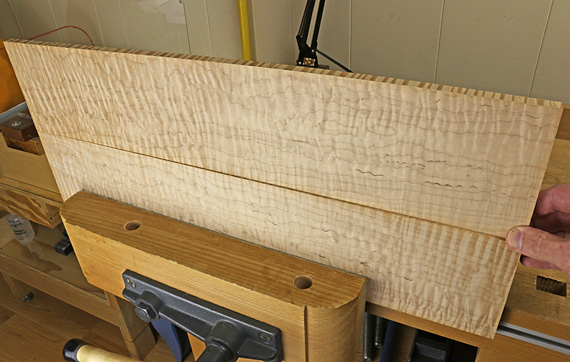
With any method of planing the edges (options discussed in the next post), I want to finish with a continuous shaving to ensure there are no localized bumps or troughs in the edge. Then the best test of the joint is to set the edges against each other as in the photos below.
Move the upper board by its end. It should barely pivot at the opposite end as in the first photo below. The gap in the middle of the closed joint should be nearly invisible but you know it is there by the pivot.
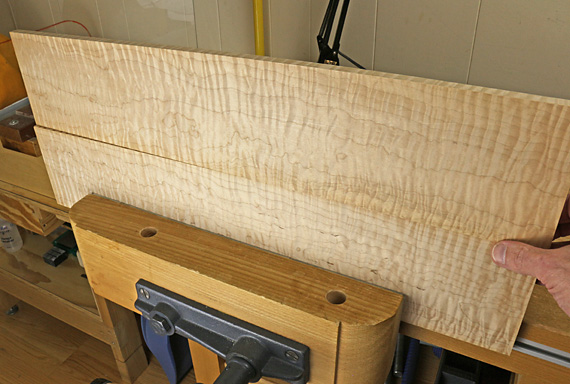
In the second photo below, the pivoting shows that the boards are kissing within the length of the joint. No good.


Also, check for twist within the joint by gently trying to rock the top board across opposite-end corners of the joint. Significant twist of the joint faces against each other will produce a subtle but surprisingly detectable rocking.
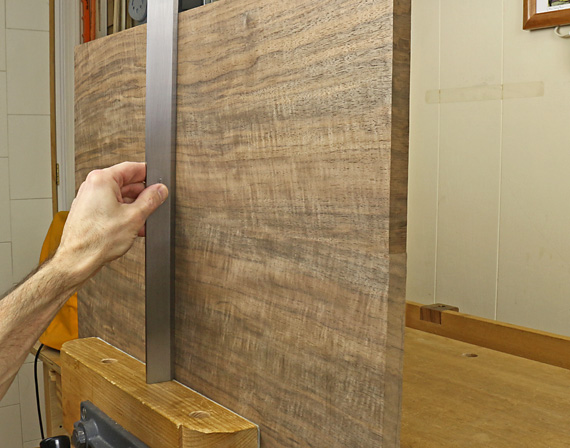
Check for flatness in a few places as below, again being aware of any rocking. Ultimately, this is far more sensitive than directly checking if the joint surface itself is square to the face of the board.
If all is well, you know you have a joint that wants to be together and is not being forced into submission by clamp pressure.

Some woodworkers like to produce a more pronounced camber to be able to clamp the joint with a single clamp across the midpoint of the length of the joint. I acknowledge that this can work but unless one has a shortage of clamps, I consider this to be an unnecessary and awkward method with several disadvantages for most work.
Also, making a substantial camber in the joint on the assumption that insufficiently equilibrated wood will dry faster at the ends is basically starting off on the wrong foot.
Upcoming: options for hand planing, and more.


“Pith side, plane with the points” and “bark side backwards” are new catchwords for me and I like them! Great post.
Very well thought out, and very well said. I assume that in subsequent posts you’ll be speaking more about the amount of camber you use and how you create it. A few more strokes in the middle of the boards?
Thanks Tico and Bailey.
Bailey,
You really need no more than a barely detectable amount of camber – just enough to ensure that there is no convexity within the length of the joint. The swing method described in the post is a very sensitive way to judge this. It is simply a one-sided tolerance rather than an attempt to create a specific amount of camber. Stated another way, the barely detectable camber is there just to be sure that you do not have the opposite situation.
Remember too, that this assumes the wood is evenly at equilibrium moisture content.
Rob