Archive for ◊ March, 2016 ◊

Author:
• Tuesday, March 29th, 2016

handplanes

Hand plane?

I almost always use a hand plane for the final preparation of the wood surface prior to edge gluing.

To hand plane to a final edge as efficiently as possible, I prepare the edge on a well-tuned jointer, my Hammer A3-31, or in a few cases, my cabinet saw. By doing the power tool work accurately, it can take as few as two shavings with the hand plane to finish the edge. Yet they are important shavings because they produce the truest edge and leave the best quality surface for glue adhesion, unmatched by even the best machine.

A production shop using a dedicated ripping setup with a power feeder can produce excellent edges directly from the saw but they are no better and often not as good as those produced by a skillful small shop woodworker finishing with a hand plane. For less critical work, the edge from a tuned small-shop tablesaw may suffice but for high-end work I always use a hand plane, which affords the most control of the process.

Which plane?

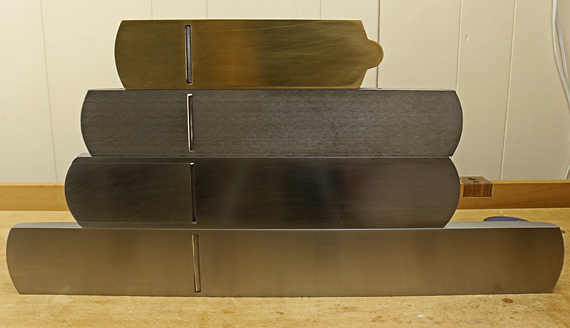
The photo above of the plane soles shows, from the top, a #4 smoother, a #5 bevel-down jack, a Veritas bevel-up jack with its longer infeed sole, and a 22″ #7 jointer with a 2 3/8″ wide blade. Unless you are doing only small work, it is worth having the jointer because its length will bridge valleys and level hills and so make it much easier to produce an accurate edge. You may prefer the massive 24″ #8 jointer with its 2 5/8″ blade but the #7 seems to suit my mostly medium-scale work.

It is important to realize that a very sharp blade is essential for accuracy. As the blade dulls, accuracy suffers because the edge deflects more, the shavings have to be thicker, and you have to push the plane harder with less control.

Methods

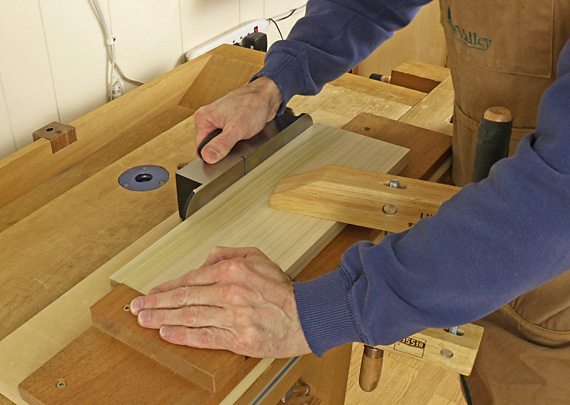
For boards up to about 2 feet long, especially if they are 1/2″ or less thick, I find that long grain shooting is the most efficient method. Close the two boards like a book and plane both edges at once so any deviation from 90° is self-correcting when the edges are later joined. Thicker boards can be planed individually, each in its book-match orientation to achieve the same benefit. Occasionally, the grain directions won’t work out but usually you are working on an edge with minimal figure runout and thus without a strong directional grain angle.
long grain shooting

You don’t even need a shooting board because the plane sole rides on the work piece, not on the edge of the shooting board. A flat bench top would suffice. Clamp the boards so they don’t shift. Use a shooting plane or an appropriate bench plane.

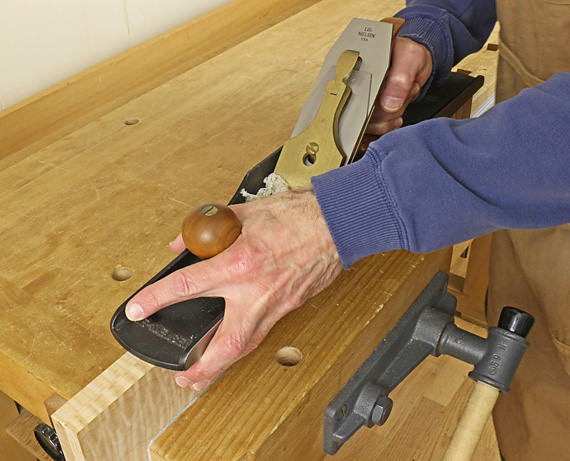
Similarly, you can plane two boards at once held book-closed in the front vise of the workbench, as shown below. If you have done a good job machining the edges and align them together accurately in the vise, the combined width will give consistent support to the plane while the self-correcting geometry will ensure a good joint.

I spread my front hand widely across the plane to be able to sense any lateral tipping of the plane. I am not really using my fingers as a 90° fence but simply aim for consistency along the length of the cut. Errant tipping of the plane will introduce twist in the planed surface and an inaccurate joint.
edge planing

If planing two boards at once is unmanageable due to their thicknesses or lengths, plane each edge individually. Use a deadman or a jig in the tail vise to support the lead end of a long board while the opposite end is in the front vise.

Then, one option is to plane freehand, using your front hand as a fence. Your goal is to keep the sole of the plane at a consistent angle, hopefully 90°. Check your progress with a square. If your last shaving was the full width of the edge but the square shows the edge is a bit off, do not make the correction by taking a guess and tilting the plane differently. Rather, maintain the same supposed 90° and shift the plane laterally to use the slight camber of the blade edge to take a thicker shaving from the appropriate side. Since there is likely to be some systematic error in your attempt at 90°, it may help to plane the mating board in a self-correcting orientation, if possible.

I prefer to use my shop-made plane fence to get the job done faster and more predictably. Below, the fence is attached with three hand bolts entering tapped holes in the sidewall of my Lie-Nielsen jointer plane. Lee Valley makes plane fences. This method has worked for me for 30 years.
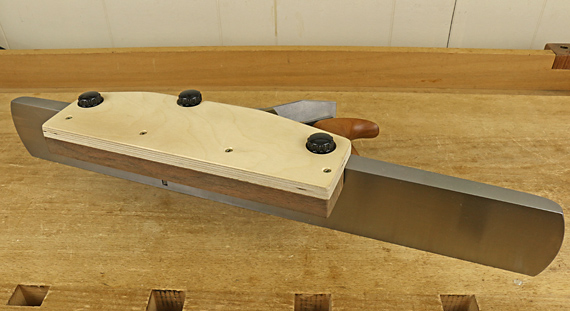
jointer plane fence

Note that even with the fence method I still use a slight camber in the blade edge. This prevents any possibility of a concave (or supposedly straight) blade edge producing joint surfaces that kiss in the interior of the joint with hairline gaps at the outsides.

Use the method that gets the job done for you with the work at hand. With all these methods, try to finish with a full-length shaving.

Upcoming: edge joint alignment, clamp setup, and more.

Category: Techniques  | Tags:  | 3 Comments
Author:
• Saturday, March 12th, 2016

edge-to-edge joints

Board orientation

When gluing up flatsawn boards to make a panel, is it important to alternate the growth ring orientation of the boards? The short answer is no.

In general, I suggest go for the best appearance. The reasoning usually given for alternating heart and bark faces is that the full depth of the cupping in any season is confined within each board, and thus is particularly helpful in unrestrained panels. The case usually given for orienting all the boards alike is that cupping will want to produce one large curve, which is more easily kept flat in, for example, a leg-and-apron table.

There is truth to both assertions, though unless appearance strongly dictates one or the other, I tend to favor alternating the boards. Just thinking geometrically (see the endgrain photos below), I wonder if the restraint of a presumptive large arc of like-facing boards is inordinately stressing the joints in tension on the heart face of the panel in the dry season, and vice versa in the humid season.

You can avoid the issue by using quartersawn or near-vertical riftsawn boards. With flatsawn boards, you can minimize problems by assembling the panel from equilibrated boards in a workshop in the midrange of humidity, using narrow boards, choosing species with a low T/R ratio and volumetric movement, and avoiding aberrant boards such as those with crook or substantial twist.

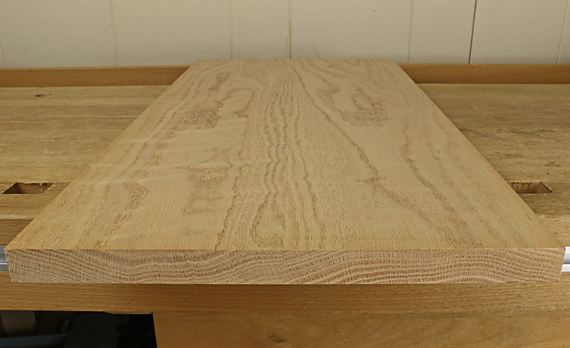
If you alternate the heart and bark faces of flatsawn boards, pay attention to the grain orientation if you plan on planing the glued up panel by hand or machine. Look at the glue up in the top photo. The board on the left will be planed away from the viewer – “pith side, plane with the points” – and so will the board on the right – “bark side backwards.” (Thanks to R. Bruce Hoadley for the mnemonics.) In the photo below, the endgrain growth rings are also alternated but the proper planing directions of the faces are opposing. Thus, if you alternate rings, you’ll probably also want to alternate the cathedral points.

growth rings

You also have to pay attention to grain direction if heart and bark are not alternated but the choice is more apparent. The boards in the photo below are correctly oriented in this regard (plane toward the viewer).

growth rings

The camber question and how to check the joint

This is one of those perpetual arguments among woodworkers. Here’s my view.

I aim for just a trace of camber (hollow), simply as a one-sided tolerance. I do not want any kissing in the central length of the joint, which might create separation tension across the joint line at the outer ends where it is most likely to open. I would be satisfied with two perfectly flat edges but that is nearly impossible to reliably observe.

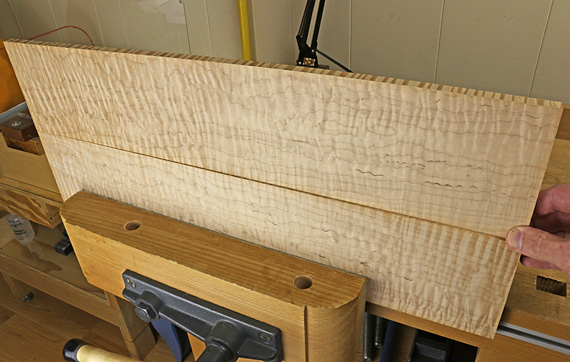
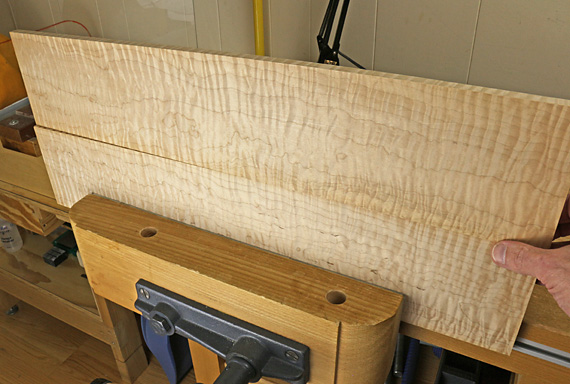
With any method of planing the edges (options discussed in the next post), I want to finish with a continuous shaving to ensure there are no localized bumps or troughs in the edge. Then the best test of the joint is to set the edges against each other as in the photos below.

Move the upper board by its end. It should barely pivot at the opposite end as in the first photo below. The gap in the middle of the closed joint should be nearly invisible but you know it is there by the pivot.

In the second photo below, the pivoting shows that the boards are kissing within the length of the joint. No good.

edge joint test

poor edge joint

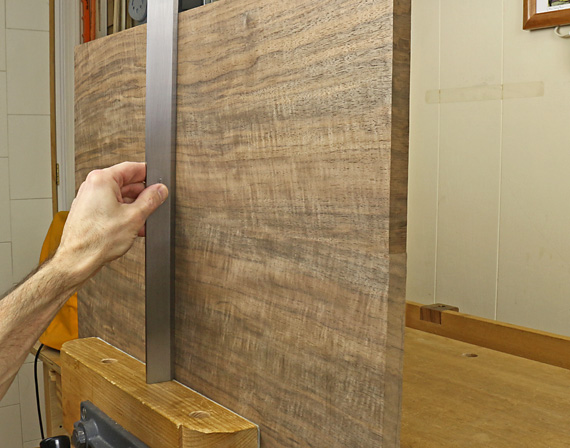
Also, check for twist within the joint by gently trying to rock the top board across opposite-end corners of the joint. Significant twist of the joint faces against each other will produce a subtle but surprisingly detectable rocking.

Check for flatness in a few places as below, again being aware of any rocking.  Ultimately, this is far more sensitive than directly checking if the joint surface itself is square to the face of the board.

If all is well, you know you have a joint that wants to be together and is not being forced into submission by clamp pressure.

edge joint test

Some woodworkers like to produce a more pronounced camber to be able to clamp the joint with a single clamp across the midpoint of the length of the joint. I acknowledge that this can work but unless one has a shortage of clamps, I consider this to be an unnecessary and awkward method with several disadvantages for most work.

Also, making a substantial camber in the joint on the assumption that insufficiently equilibrated wood will dry faster at the ends is basically starting off on the wrong foot.

Upcoming: options for hand planing, and more.

Category: Techniques  | Tags:  | 3 Comments
Author:
• Friday, March 11th, 2016

edge joint

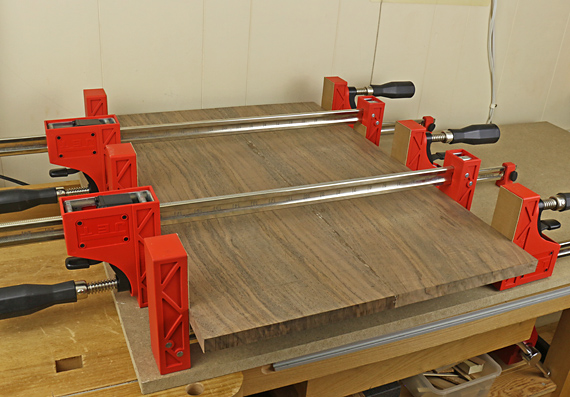
From tabletops to drawer bottoms, edge-to-edge joinery is found throughout furniture making, so it is worthwhile to explore the issues involved in preparing, cutting, and gluing up these joints.

For most of the steps there are a variety of good approaches, particularly based on the size of the joint and the available tools. The outright errors usually come from injudicious wood selection or inattention to the key tolerances in the joint.

As we woodworkers can’t help but notice, edge joints that have opened up can be found everywhere. But why? After all, if the bonded glue line is really as strong as the wood itself, it should not have any more propensity to split than the adjacent wood.

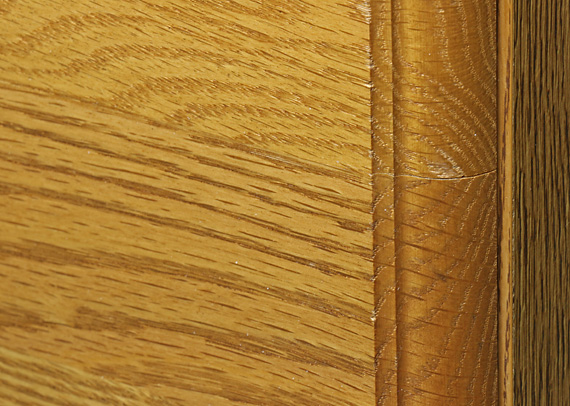
One of the large drawer fronts at the factory-made red oak desk where I am typing has a small edge joint failure. A cross grain conflict with the particleboard sides is stressing the solid wood front but why is the split at the glue line?

split edge joint

Whether due to luck or skill, pieces that I made 25 years ago have fully intact edge joints but, again, why?

So let’s think about this fundamental joint in a short series of posts.

Keep in mind that a little split here and there usually does not affect the function of the piece. My workbench, which I’ve used for more than 30 years, has several splits in its top that don’t bother me one bit. In fact, they seem to function as built-in stress relievers that probably help maintain the remarkably consistent flatness of the top throughout the seasons.

Wood selection

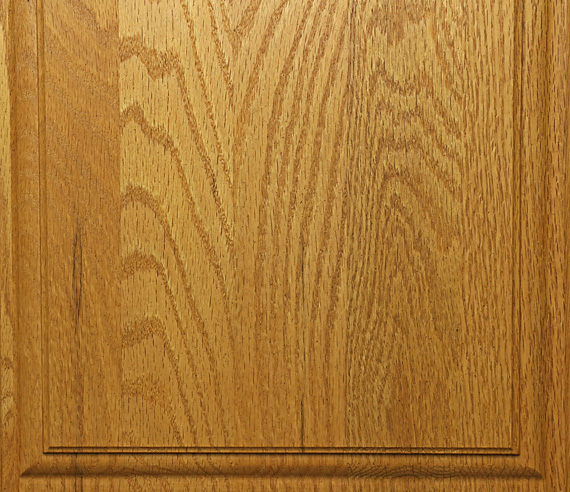
It is surprising how often we see mismatched glueups in otherwise fine work. A door panel with flatsawn cathedral figure running out at a glued edge adjacent to straight rift figure looks like it came from a factory, not the shop of a craftsman. Below is a factory-made door panel that is devoid of human finesse.

poor wood selection

It is best to match the figure at adjacent edges and generally avoid edge runout of flatsawn figure. Join rift to rift and quartered to quartered. Cathedral figure boards are best joined where there is rift figure beyond the width of the arches – ideally where the figure lines are nearly straight. Where this is not possible, try to have the figure lines flow into each other across the glue line. In this way, attention is not called to the joint line and the completed panel looks harmonious.

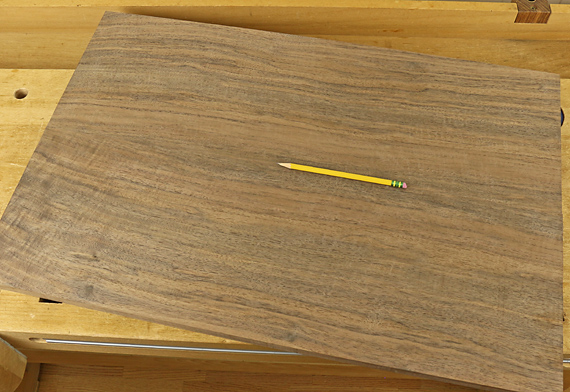
Below, even in this book-matched panel where the halves are necessarily mirror images of each other, the boards blend together and the joint line (indicated by the pencil) is barely detectable.

book match edge joint

Joining a quartered-grain edge with a flatsawn-grain edge, for example, not only looks poor but the thickness of each board at the glue line will undergo different seasonal change because of the different orientation of the growth rings. This can produce a tiny but disconcerting step on the surface at the joint line. The joint is stressing itself from this conflicting movement.

In summary, join similar edges to produce visual and structural harmony.

Next: Should you alternate the growth ring orientation of flatsawn boards in a glued up panel? Also, we’ll consider the camber question.

Category: Techniques  | Tags:  | 3 Comments
Author:
• Thursday, March 10th, 2016

blog

Every once in a long while on this blog, your devoted scribe sweeps off the sawdust to see how this little blog is doing. According to the stats counter program, Heartwood has, since its inception, received about 2.5 million legitimate visits (i.e. humans, not crawlers, robots, and so forth) and more than 7 million page views.

The main message here is: thank you, dear readers. Special thanks to those who have posted comments. I will not be shy about encouraging comments – they add interest for all readers, and give me a sense of connection with woodworkers out there. I also enjoy the many woodworking questions emailed by readers, though when appropriate, I suggest present the inquiry as a comment on the blog so the information can be shared among readers.

Content on Heartwood now includes almost 160,000 words, which is the length of two to three non-fiction books, and more than 800 original photographs. Remember to check the Series Topics tab (under the header photo) for groups of posts on single topics. In the past year, I’ve posted about one-third less than usual, due to less available time, but not due to running out of things to say. I’m going to try to pick it up soon. As always, I’ll offer real-deal content “from the sawdust and shavings of my shop,” not armchair woodworking.

Blogging (by the way, I’ve never liked that word; it sounds like something you do uncontrollably when you’re ill), including woodworking blogging, is certainly not as vibrant as several years ago. Other media, particularly social media and video posting have taken their shares of the communications universe. Still, I think a good blog is a useful and enjoyable medium to share woodworking information and ideas, and interest on this one does not seem to have waned.

Thus, again, thank you, readers.

Coming up is a series on edge-to-edge joints. Happy woodworking.

A.M.D.G.

Category: Ideas  | 8 Comments