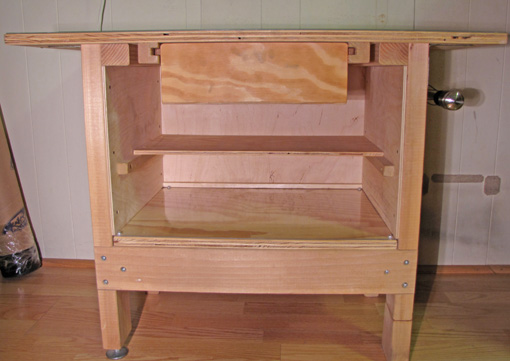
The base frame is 23 7/8″ wide, 15 3/8″ deep, and 24 1/2″ high, built using the straightest, driest, clearest 2x4s I could find at the local home center.
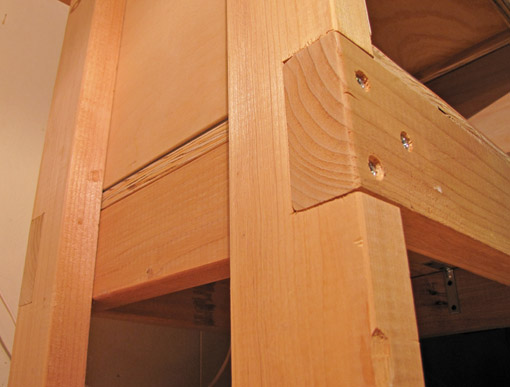
The lower front and back rails are notched into the legs. The lower side rails are simply butt-jointed and screwed from the outside to the front rails, and from the inside to the legs. Use glue and #12 or #10 x 3″ deep-thread screws. A leveler is installed on the front left leg.
The spliced sections on the lower right legs are evidence of some of the evolution of the bench. There had been heavy-duty locking casters there, but I found I did not need them, and they slightly decreased the rigidity of the structure.
The 2×4 upper side rails are notched into their widths to accept the tops of the legs, and are glued and screwed in place. There are no front or back top rails. The back and sides are closed in with sturdy 1/4″ 5-ply, glued and screwed to the 2x4s for rigidity.

The top measures 33 7/8″ wide x 19 1/2″ deep, and is centered laterally but overhangs the front of the frame by only 1″. The surface of the lower shelf is 10 1/2″ above the floor. Both are 3/4″ exterior-grade SYP 5-ply attached with strong steel L-brackets. The top is also screwed to the upper side rails from underneath.
An important feature is the 3/32″ polycarbonate sheet over the top and lower shelf to protect them from water. (I use waterstones, but the surfaces should be likewise protected from oil if you use oilstones.) Acrylic can also be used. The top sheet is secured with small stainless steel flat-head wood screws, carefully countersunk, which is nicer than the round head aluminum screws and tiny rubber washers that I used for the lower shelf.
The upper (inner) shelf, 3/8″ 3-ply, is spaced 5 1/8″ above the lower shelf and is 10″ deep. It is screwed to simple side supports that are screwed all the way through into the legs.
The top surface of this sharpening bench is 25 1/4″ above the floor. This is what works for me (at 5’9″) with the box-basin-bridge apparatus (which I will detail later) for hand sharpening, and the Tormek machine. I can work comfortably, bringing body weight to bear as needed.
The height is a critical issue, but everyone is different and so you must decide what will work for you. I suggest, as the most reliable approach, going through the same sort of process that I have recommended for deciding on a workbench height. Yet, if after building and then using your bench for a while, you find that you misjudged, don’t worry, you can always shorten the legs or even splice on some extra.
The drawer is 15 3/8″ deep overall with a 12 1/2″ wide x 4 1/8″ high front. The construction is simple rabbet and groove using exterior plywood, glued and screwed. The front and back are 3/4″ thick, the sides 1/2″, and the bottom 3/8″. Inside depth is 3 3/16″. The drawer is side-hung, using 1/2″ x 1/2″ cherry rails that fit in matching grooves in the 1 3/8″-square oak supports, which are screwed to the top from underneath.
Go heavy duty on everything with this. This sharpening bench is the type of tough, practical, non-fussy shop fixture that I like. I think it also has its own rugged good looks that fit in well in a woodshop.
Next: the box, basin, and stone-holding bridge apparatus.


Do you have any problems with capillary action allowing water to go underneath your poly?
Hi Ralph,
No. Puddles, drips, and spray do not go through the poly, and, for whatever reason with this setup, don’t end up near the edge of the surfaces where water could seep into the seam. It would be best to seal the seam with clear siliconized caulk. However, I never got around to doing that and I haven’t had a problem.
Rob
Thanks for not just dropping out of sight during your recovery. I was really looking forward to your presentations next weekend (NWA Showcase). Even though our tastes differ I find your wisdom and insight inspiring. If one were to just begin at the start of your posts and practice what you cover, it would be a pretty good course for free! Hopefully NWA next year.
Interesting – I have been thinking of dedicated shop space for sharpening. Thanks for sharing.
Peter,
I really regret not being able to do the NWA. Next year, I hope.
Jeff,
Great. This setup is inexpensive and takes very little area.
Rob