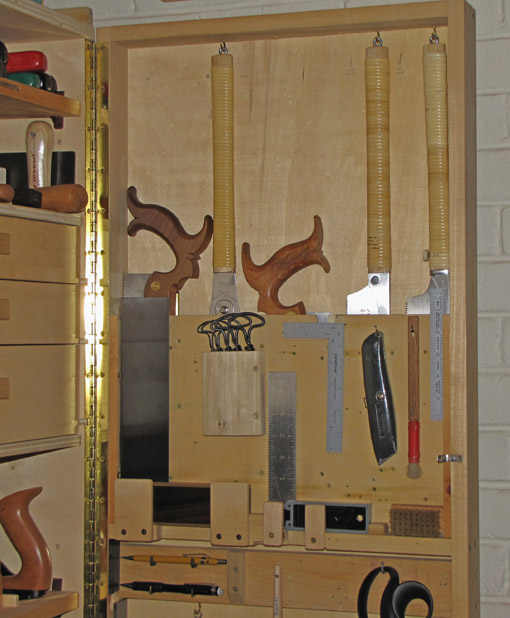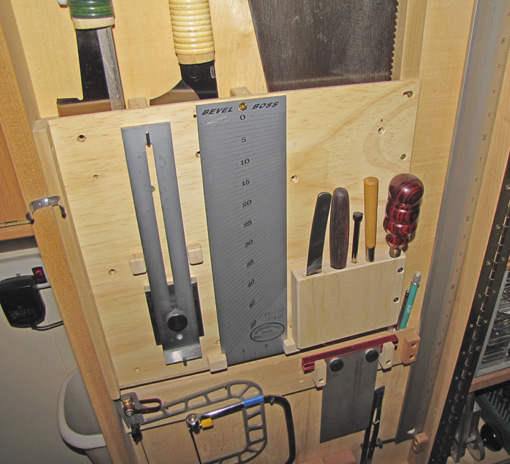
The doors of the cabinet, as mentioned in the first installment of this series, are built from 1x3s and 1/4″ plywood to give a usable depth of 2″. This depth creates more room and more options for storage than in a flat door.
The photos, above and below, show the saw storage system. A 1/4″ plywood panel is secured to the door stiles with wood cleats and screws to create a pocket approximately one inch wide (front to back). This pocket is divided into specifically sized sections for the saws using narrow wood strips that are held in place only with screws that go through the panel (not through the front face of the door).
This system works to hold Japanese saws, using a hooks and eyes, as well as Western backsaws which are simply inserted point down into their slots. Even the big Disston D-7 has a home, using a fitted cleat for the handle which can be seen in photos in the previous two posts.
The outer faces of these panels have space for many other tools including squares in their own notches, blocks that hold gimlets and marking tools, and small rules held with magnets.
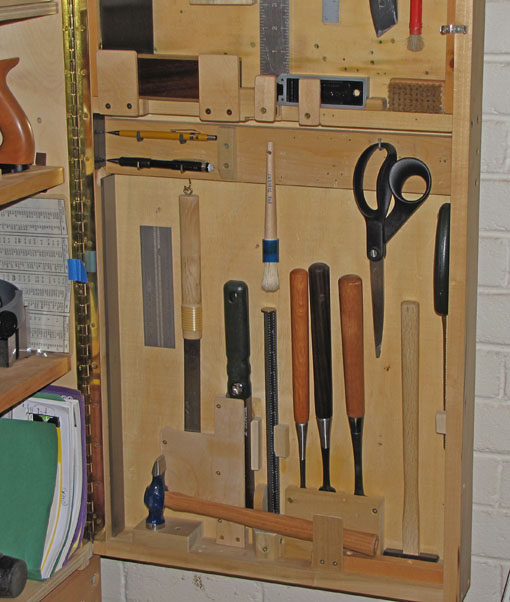
Everything finds its protected place and there is no need to use annoying saw guards and tool sheaths. Each tool can be removed and returned without moving any other tools. (The fret saw is the sole exception.) Furthermore, the arrangements can be changed, and they have been, many times, as you can tell by the holes.

The photo, below, shows the lower section of the right-side door. The 18″ Starrett bevel-edge straightedge is held in place by a rare-earth magnet. Near its upper left corner, a shallow hole drilled into the stile allows a finger to get under the tool’s corner to lift it out. Three paring chisels sit in their fitted block. A Warrington-style hammer has its own fitted parking spot. An azebiki and a flush cut saw have their pockets.

The main idea is to be creative and flexible in making spaces for the tools. Over the years, I’ve added, discarded, and especially upgraded various tools. While I do less of this now, it does continue, and so the tool cabinet is repeatedly modified. By the way, I have only tools that I use to make things; I’m not interested in collecting tools.
Next: a look at the shelf arrangements.


I hope to remember these two key points-
“tools can be removed and returned without moving any other”
“the tool cabinet is repeatedly modified”
Any thoughts on tool holders that swing or pivot to access tools?
Tim
I can’t wait to see what the drawers are like. Also my thoughts on a stand up and floor tool chest – stand up tool chest rules.
ralph
Tim,
My favorite tool holders require only one hand to get the tool to the bench. Of course, that is not always the case but I like to set it up that way when possible.
Ralph,
Yup, I agree!
Thanks for reading and for your comment, Tim and Ralph.
Rob