That title may make my spam-comment filter work overtime. Anyway, this post continues the discussion of managing figure in wood. Let’s look at the orientation of the annual rings in the rectangular blanks from which curved legs will be cut. Short sections of Douglas fir will be used to illustrate the principles.
All of this refers to legs which curve in three dimensions (planes). The curves may be cut on all four faces (e.g., a cabriole leg) or just two adjacent faces. Legs in which the curves are cut only on two opposite faces are curved in only two dimensions (picture the leg sandwiched between two flat sheets of plywood) and are a somewhat different matter. Bent lamination legs are an entirely different matter. Please do not ask me about legs which alter the time-space continuum.
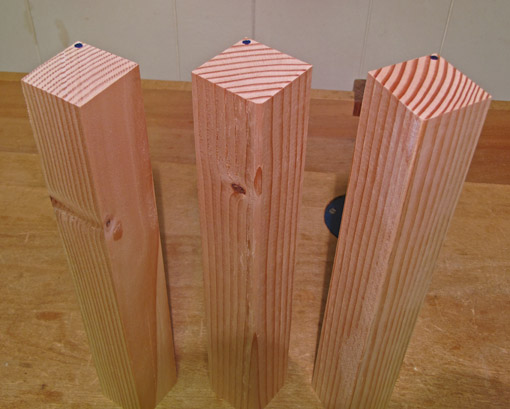
The photo above shows the three possible basic orientations. The dot on the end grain indicates the inside corner of the legs. The two faces adjacent to this corner usually each have a flat portion where the aprons are attached with mortise and tenon joints.
In the three legs, from left to right, consider the endgrain patterns:
- The annual rings are approximately parallel to one face and perpendicular to the other, producing one flatsawn face and one quartered face.
- The annual rings are approximately 45° to all four faces and run “across” the inside corner.
- The annual rings are approximately 45° to all four faces but run parallel to an axis from the inside corner to the outside corner.
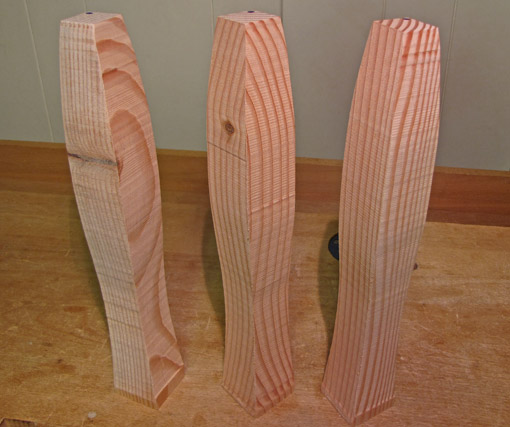
For simplicity, I cut the curves into two adjacent faces. The effects would be the same if curves were cut into all four faces such as in a cabriole leg.
Let’s look at the results.

The leg on the left is bad news. The irregular figure produced by cutting a curve into the flatsawn face is unpleasant in itself, and the inconsistent figure among the faces distracts from the shape of the leg.
The middle leg is an improvement but, to my eye, the figure lines fight the curves of the legs. There is too much run-on and run-out of the annual ring lines.
I like the leg on the right. By cutting the blank from approximately 45̊ riftsawn stock and orienting the growth rings in this way relative to the inside corner, a good lookin’ leg arises. The shape of the leg (though uninteresting in this example) coordinates with the figure.
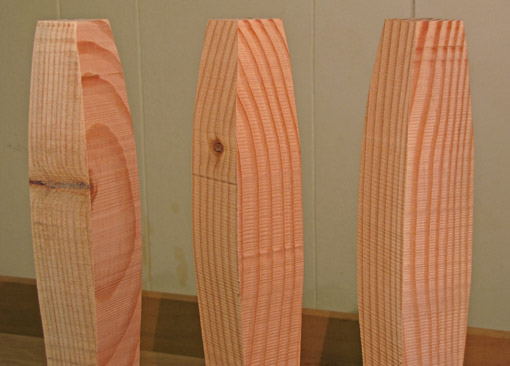
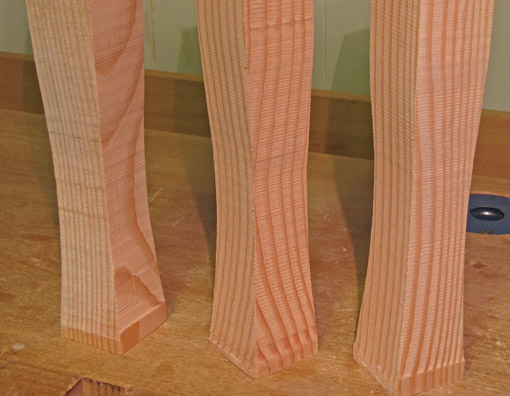
Here are closer views:

Note that another disadvantage of the leg on the left is the exaggerated consequence of a small knot intersecting the cut line. Small pin knots, such as are common in cherry, can be difficult to avoid, but the middle leg demonstrates that they will have much less consequence with that grain orientation.

It is hard to find a thick, purely riftsawn board from which to make leg blanks, but most fairly wide flatsawn boards contain some effectively riftsawn stock toward the sides. I examine the end grain and face grain and carefully select the best sections of such boards. I pay attention to the straightness of the figure along the length of the board, recutting the edge to “straighten” the figure lines if necessary. I also try to somewhat coordinate bends in the figure with bends in the leg design.
Of course, you can choose however you like to use figure, but the key is to be aware of it and manage it. Making your design and the beauty of the wood work together, each enhancing the other, can bring class, beauty, and quality to your woodworking projects.
Happy woodworking to you.


Fine Woodworking has a short video featuring Jim Budlong from The College of the Redwoods that that really demonstrates this concept.
http://www.finewoodworking.com/SkillsAndTechniques/SkillsAndTechniquesArticle.aspx?id=30007
James,
Thanks. I had not seen that video but he nicely demonstrates the same points as I’ve made here.
Rob