Archive for ◊ August, 2011 ◊

Author:
• Wednesday, August 31st, 2011

Here is some help with pencil lines on dark wood. Though knife lines can be modified to produce the advantage of a physical feel for the correct location of a tool such as a chisel, most layout in woodworking is done with pencil lines. Marking out the tails for tails-first dovetailing and curved layout lines for bandsawing are examples.

Graphite pencil lines have a bit of sheen which helps their visibility but I still find them difficult to see, particularly if the line is along the grain on a wood like Claro walnut, which is dark and has color variations. So, motivated particularly by my love of Claro, I have experimented with various white or light-colored pencil and ink lines.

I tried Japanese ink “brushes” and very fine point drafting pens. I do not like marking out in ink because I do make mistakes and have no immediate plans to cease, so no ink for me.

I have scoured art supply stores and experimented over the years with various white pencils, occasionally trying bright yellows and other colors. Most are too soft to retain a sharp point for a practical amount of work.

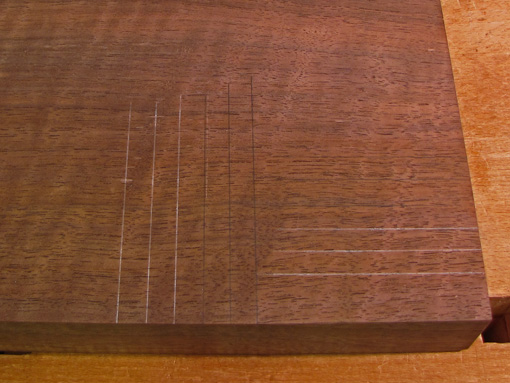
The best pencil I have found is the Sanford/Prismacolor Verithin White #734. It can be sharpened to a point that is nearly as sharp as a #2/HB graphite pencil. It wears faster than a #2 but the point holds up well enough, especially if used with a light touch. It makes a nicely visible line on walnut. It is not as easily erasable as graphite, but decently enough using a white “plastic” eraser. They cost from 39 cents to a dollar apiece, depending on the quantity and the store.

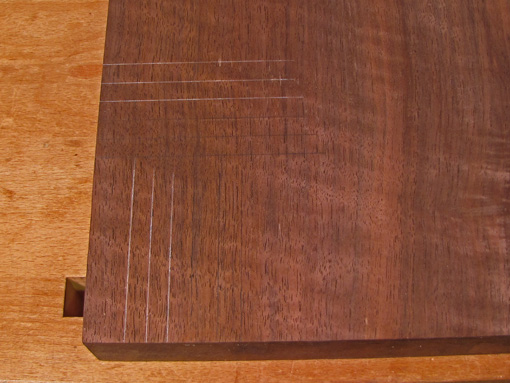
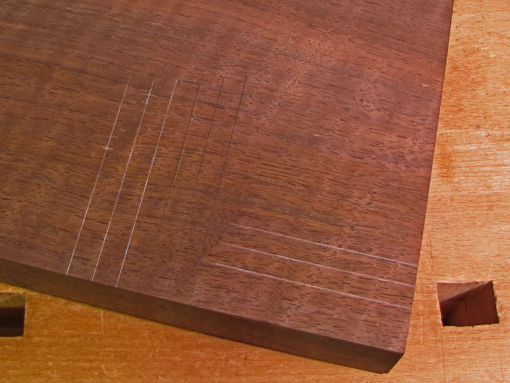
The top photo shows sets of three lines of #2/HB graphite and #734 White going across and along the grain, made from a single sharpening of each pencil. The graphite lines along the grain are barely visible just above the white lines. The photos below show the same lines photographed from different angles.

An alternative is a white 0.5 mm mechanical pencil refill stick made by Pergamano and available from McAllister’s. I have not tried these because they cost $10 for 10 sticks and I would be concerned that they would break easily. Also, the point of the Prismacolor pencil can be easily altered using sandpaper. This is a more fussy job with a less durable result using 0.5mm lead.

No matter what instrument is used for layout, visibility and accuracy are greatly enhanced by using proper lighting. The two simple rules are strong and adjustable. Strong mostly means close, and the light source must be moveable to avoid glare and to cast shadows only in favorable locations. Every effort should be made to set up good lighting.

White #734 sharpened, I’m ready to indulge in Claro.
Category: Techniques  | 11 Comments
Author:
• Thursday, August 25th, 2011

I usually approach the completion of a project with hesitancy because I know that, for better or for worse, this is as good as the thing is going to be. I no longer can do anything to improve it, except for marketing, and must accept it. Competing with this is the sense of wanting to get the damn thing out of the shop because I’ve already put enough sweat into it.

Another, more important, very distinct, feeling comes over me. Readers, maybe you can relate. I have a sense of separation from the piece. It is now out of my hands and has a life of its own without any further influence from me. It feels almost as if someone else might have made it.

Well, isn’t that the point of creativity, to make something that stands on its own and is appreciated for what it is apart from its maker? Yes, attention is rightfully now on the object, not its maker. People will, to varying degrees, like or dislike the object. The object is not you, so don’t take the praises or winces too personally. Even though you made it, in this sense it’s not yours anymore and doesn’t need you. Hopefully, it will even outlive you.

This view is in contrast to that of the painted, pierced chic “arteests” of today who seem to prefer that everyone dwell on them more than on what they have made. I believe that we as artists (artisans, craftsmen, woodworkers, whatever you prefer) should be humbled by the degree of mystery that lies in making things.

Yes, this work is personal, but consider the words of James Krenov, “. . . the worth of such things is their whole content . . . [to be] seen – and lived with, in a coming together of sense and observation that will bring quiet joy long after the maker is forgotten.”

It is good to build good things.

Category: Ideas  | 2 Comments
Author:
• Tuesday, August 16th, 2011

These thoughts started to gel as I was browsing a craft exhibit of many wonderful pieces. There were also a few that didn’t quite measure up, at least in one man’s opinion. I wondered what, apart from preferences in style, had formed my view of an object as a creative success or as falling short.

Further, I supposed these considerations could help me with my work. “I work wood, therefore I am??”

At the core of creativity is the development of a powerful, compelling, rich idea. By “idea,” I mean more than a whim or an attractive notion. I mean a driving, guiding force with enough energy to result in a creation. I like the word “concept” for this. Without it, a creative effort really doesn’t stand a chance.

When designing a new piece, I wonder why would anyone, including me or a client, really care about this. One way out is to make ostentatious nonsense or to be different for its own sake. No, I want to make refined work that elicits the “quiet joy” of which Krenov wrote.

Moving ahead, a clear concept produces economy of intent and execution. The artist/craftsman grasps the essence of what he desires to create, and thus driven, marshals the skills and focus to make it be. To get the job done, the intent must coordinate with workmanship and this must be conscientiously sustained throughout the construction process. In other words, consistency of intent should engender consistency in workmanship so that one reflects the other.

OK, nice lines on paper that I’ve got here but I better be able to pull this off. I must have the skill and mental focus to carry this through because no one puts up scale drawings in the living room.

The result of all of this, we hope, is harmony of all the aspects of the piece – form, wood, color, details, and so forth. This is pleasingly evident when viewing the piece. It is so readily evident that it will likely make the viewer blissfully unaware of the sweat it took to get to the final product.

By contrast, inconsistency and disharmony are readily evident. Think brown shoes with a tuxedo (inconsistent intent) or a suit that would look great except for an awkward fit that can’t be ignored (inconsistent workmanship).

I better be clear about where I’m going with this because I’m going to invest a lot of work in it. More than hope that it will “come out good,” I’ve got to think and believe that it will.

More than merely theoretical meanderings, this is the stuff that makes a piece produce that good “Ahhh” feeling. It is a formidable job to have a good idea, recognize and develop it, then sustain it as you execute it with consistent workmanship. I am grateful to be able to make things in wood, it is fun, and at times exhilarating, but I do think it is truly difficult to do well.

Stay with it, you can do it. “Unity and variety,” as Maestro Heath used to say.

Category: Ideas  | 6 Comments
Author:
• Friday, August 05th, 2011

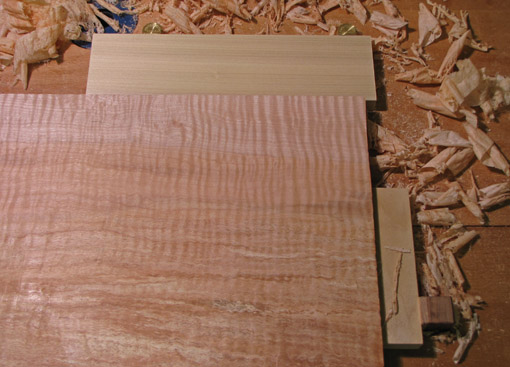
As discussed in the previous post, one of the keys to successful work with the jack plane is the use of a vigorous diagonal stroke. To stabilize the board from the pressure in multiple directions, I like to use Veritas Bench Pups, Bench Anchors, and Wonder Pups in various configurations, usually along with regular bench dogs, as shown in the photo above. Other options for use of these handy devices and shop-made stops at the right and left sides of the workbench are discussed in these two earlier posts.

Beware when planing thin boards, say under ½”, which can flex. It may be necessary, for example, to place shims, such as blue tape or veneer, under a convex surface facing the bench for a similar reason that you would not place a non-flat surface on a thickness planer machine bed. Likewise, it is often necessary to place shims under the high corners of a twisted board.

To set the blade projection, I use these steps: I sight from the front of the sole, with light adjusted to reflect off the thin flat at the rear of the mouth (I file that flat when I set up a new plane). I advance the blade enough to see it to correct the lateral adjustment, then back off the projection to a minimal amount. I start stroking the plane on the wood, back and forth, gradually advancing the blade, often using my left hand on the feed screw and my right on the tote. I’ve found this method gives better results than using sight alone, or running a narrow scrap against the blade.

The long infeed length of the Veritas BU jack makes it feel almost like a jointer. It’s easy and natural to move the plane back and forth rapidly without lifting it, like scrubbing the wood. This gives excellent tactile feedback to be able to sense when the surface is approaching flatness.

The Veritas BU jack has some other nice features. The lack of a cap iron (“chipbreaker”) makes swapping blades very easy. I find the little set screws on each side of the plane near the mouth help to quickly position the new blade. The mouth opening can be adjusted in seconds to accommodate different shaving thicknesses. This is far easier than adjusting the frog on a bevel-down plane. I also like the Norris-type combined feed and lateral adjustment mechanism, though some woodworkers do not.

I strongly suggest getting rid of the awful handles that Veritas puts on their planes and get a set from Bill Rittner – I think you will find that they dramatically improve the feel of the plane.

These features make the Veritas BU a good choice for your workhorse jack plane. That said, I also have a 30-year-old Record #5. They each have their advantages, I use both of them regularly, and will not be parting with either. If you want me to declare a winner, I can only say that there’s more than one good way to do most everything in woodworking. I hope these posts will help you find your way.

[These endorsements are unsolicited and uncompensated.]

Category: Tools and Shop  | 2 Comments