The utility of a tape measure is mostly early in the building process, later steadily diminishing as most parts are cut in relationship to other parts or structures that are already in the project rather than to absolute dimensions. In general, we only measure when we have to. It is usually safer and more accurate to relate one part directly to another. This allows the effect of small absolute inaccuracies to cancel.
Nonetheless, when you are choosing boards at the wood dealer, breaking down stock to approximate sizes, and dimensioning a project’s primary structural parts, such as the length of a table leg, the tape measure is on duty. So let’s take a look at this humble tool.
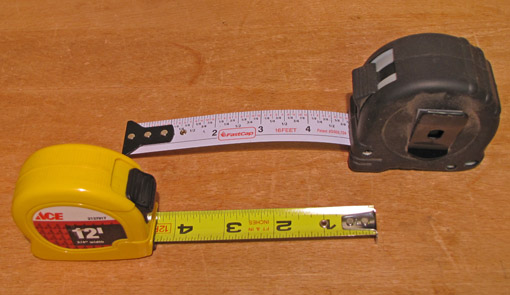
In choosing a typical cupped-blade tape, I think for most furniture makers, an 8 or 10-foot tape with a ½” wide blade is too short and too floppy. It certainly will not do the job when sorting boards at the wood yard. On the other hand, a 25-foot tape with a 1″ wide blade is fine for that but seems too big in the shop where the deeply cupped blade and heavy case are cumbersome for marking out. A 12-foot tape with a 3/4″ blade is a good compromise. It has enough overall length, adequate stand-out stiffness, and is fairly convenient to mark from – the blade can be rocked so the edge meets the wood to eliminate parallax when marking. Look for a tape with neat, fine increment lines. I’m happy with my Ace Hardware model, pictured above.
Most tapes read left to right – hook it at your left, pull out the tape toward your right and the numbers are facing correctly toward you. Tapes that read right to left are marketed to be more convenient for right-handers, like me. The idea is that you pull the tape toward your left with your left hand, the numbers are facing you correctly, and your right hand makes the mark. I find the standard left-to-right tape is just fine since the tape is used in many different ways and it does not bother me to read it upside down sometimes.
The zero point accuracy of the hook varies from tape to tape so check it against a quality steel rule. Assuming the incrementation is accurate (a dubious proposition), if the tape is reading short, the hook can be shimmed with a bit of tape on its inside face. If it is reading long, you can try to file the inside face but that’s difficult. The more practical way to manage layout is to simply use one tape for all the related parts of a project. The tiny absolute errors almost never matter and the consistency will make all be fine.
When the marking reference is on a surface, meaning that the tape is not hooked over the end of a board nor is the end butted against something, you’ve got to start the measurement somewhere on the tape and the using the end is awkward at best. Let’s say you want to measure and mark 32 ½” starting from a line on the wood. Do NOT place the 1″ mark at the reference line thinking that, sure, you’ll remember to mark at 33 ½”, because you will NOT. Well, at least I will not. Instead, I use the 10″ mark on the tape for zero and mark at 42 ½”. True, I could make a mistake and be 10″ off, but that really does not happen because that error would be visually obvious. Give it a try; it works reliably for me.
Also consider the flat tapes from Fast Cap. While this is not a tape for the wood yard because it has no stand out stiffness at all, it has advantages in the shop because it lays flat on the work and effortlessly eliminates parallax. I have the 16-foot “Standard Story Pole Flatback” model, pictured above, which has a clear zone on the bottom of the tape which is easy to mark with a pencil and is erasable. In addition, this is an overall well-made tool with other convenient features. Again, though, don’t mix tapes for related parts of a project; choose one and stay with it.


For anyone looking around at alternatives. I’ve been happy with this one for a long while now. Just fwiw (I have no stock or any connection to Klein):
http://www.service.kleintools.com/Tool/PRD/Category/Power-Return%20Steel%20Rules%20-%20Polished%20Chrome%20Case%20LEVELS-MEASURING-STLRULCHRM
Thanks, Sean.
Klein seems to make good stuff but I still wouldn’t automatically trust the zeroing of the hook.
Rob
I’m with you on tape width, reading direction, and burning 10″ on surface measurement, but 12′ is a little short for me. I prefer a 16′ tape. The Stanley Leverlock (Stanley 30-812) is my tape measure of choice. I really like that the default configuration of this unit is that the tape is locked. I don’t like having to move a slider with my thumb in order to lock and unlock the tape. A simple squeeze on the Leverlock retracts the tape – easy!
Yea, that looks like a good one, Carl. Thanks.
Rob
Home Depot was having a sale on 16′ standard (to us) and metric tape rules one day for $1. I picked one up, brought it out to the truck, measured it against a known good measure and it was good. Went back into the store and bought 5 more.
Now I’m set for awhile. Acutally I haven’t lost one yet. So SWMBO has a good measure also.
I think this was a bargain.
–Steve.
I spent quite some time looking at tapes….. my winner was a tape made by “Tajima Tools” which was recommended to me by a local carpentry shop (of all places!)
They have them on amazon. Highly recommended.
http://www.amazon.com/Tajima-G-16BW-Standard-Scale-Measure/dp/B0036ZJL60/ref=sr_1_2?ie=UTF8&s=industrial&qid=1303013411&sr=8-2
Thanks for the tip, Dave, and thanks for reading.
Rob