In nearly all of my woodworking projects, there are curves that can make or break the design. These are almost always curves without a constant radius, so I am relying on what looks “right” to my eye. I really sweat this aspect of the design process.
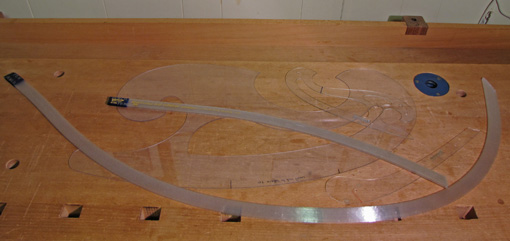
Acu Arc flexible curves are my favorite tools for laying out curves. French curves in regular and Woodhaven’s giant sizes are also helpful for sections of curves.
I do not like flexible rules or laths for laying out curves because it is awkward or impossible to control the contour in mid-curve. The curve is determined by the endpoints and at least one intermediary point and is then subject to the material properties of the layout device which may not produce the desired contour. I rarely use trammel points or a compass.
To design curves in a project, I start by gathering ideas and drawing in my sketchbook. I refine the promising sketches with scale drawings, repeatedly erasing and redrawing. To produce a full size mock-up, the results get transferred onto wood by measuring the key points and laying out a smooth curve using the Acu Arc. Sometimes I go from sketches to drawing directly on the wood. The mock-up is refined with spokeshaves, planes, and especially rasps.
I spend a lot of time looking at the mock up, leaving it, and returning to see how it strikes me at repeat visits. The bottom line: when it looks right and feels right, it is right, and that is a happy woodworking moment!
I transfer the key dimensions of the mock-up and drawing to make a template in quarter-inch MDF, using the Acu Arc again to refine the final layout. MDF works better than plywood, solid wood, or cardboard since it holds a clean edge and there is no grain to distract my eye or tools. The edges of the template should be square if it will be used on both faces for legs or as a template for router work.
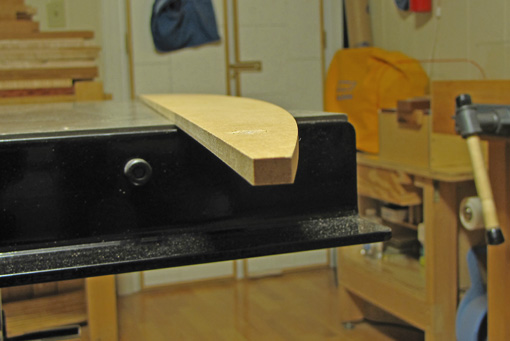
Looking down the curve, as shown in the photo below, is a remarkably sensitive way to see bumps and lumps that must be eliminated to “fair the curve.” Running one’s hand along the curve, like a sleigh ride over the hills, is also a very good way to sense smooth transitions and detect lumps and bumps which must be removed.

The Acu Arc has a natural tendency to produce a curve without bumps as you shape it to your wishes. Then you can hold it on the wood, and trace only a nearby section of the curve with a pencil, hold it further along, trace more, and so forth, proceeding incrementally. It is stiff enough to hold its shape when it is carefully lifted and turned over to form the mirror image curve on the adjacent face, as is usually done for making legs. It is made of translucent colorless plastic but I would prefer opaque plastic that would show the curve better against the background of the wood.
The AcuArc is available from Highland Hardware in 24″, 48″, and 72″ lengths, and from Lee Valley in 18″ and 36″ lengths. (The top picture in the online LV catalog shows the pencil too far from the hold-down hand – the Acu Arc will move.)
I label the templates, save them, and sometimes reuse parts of them in other projects. In due time, a style develops, and, who knows, maybe someone will notice.


Hi Rob,
The Acu Arc is new to me. I’ve used thin lath for the most part and agree that it is awkward to manipulate. Thanks for this.
Tico
Hi Rob,
Really enjoy and appreciate your blog. In reading this one, I was wondering if you ever use CAD for your designing?
Chris
Tico,
I think you’ll find the Acu Arc helpful.
Chris,
I’m learning SketchUp but it keeps getting pushed to the back burner. Eventually . . .
Thanks for reading,
Rob