Archive for ◊ December, 2009 ◊

Author:
• Wednesday, December 23rd, 2009

I imagine it is possible to do good woodworking with mediocre tools, but who would want to if better options are available? Yet, it would be a rare woodworker who enters the craft with a full set of tuned, high quality tools.

Trying to coax good performance from a fundamentally poor tool is futile. A chisel made of lousy steel or a table saw with a wobbly arbor will never work well. Stay away from these.

At another level there are tools that are OK. They usually get the job done, maybe without a struggle, though not often with ease. These tools are not likely to inspire confidence. A woodworker reaches for this kind of tool not with eagerness but for lack of something better. Practically, however, used with a bit of finesse, these tools may be good enough, or maybe they just allow us money left over to buy other tools or to eat. My drill press falls into this category. That’s life, and so on.

Then there are the tools you really want, those that inspire confidence and are dependable. These are the shop players that you give the ball to in crunch time. While no one would reasonably contend that tools alone make the craftsman, these tools can help make you a better craftsman and are likely to extend your skill and range as a woodworker. Get them on your team.

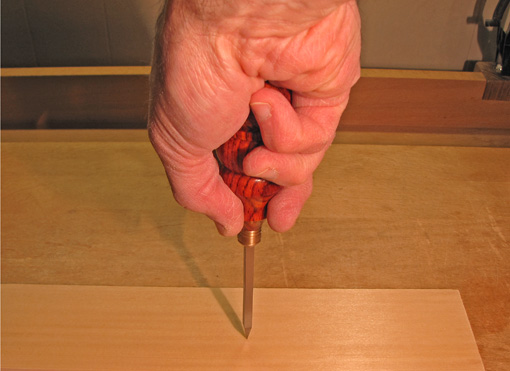
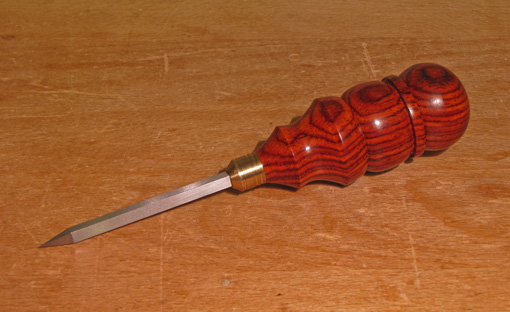
The odd thing about all of this is that these thoughts gelled due to my recent experience with a very simple tool, a birdcage awl, also called a square blade awl. I had been using a widely available “OK” version without feeling particularly deprived. Then, at a recent Lie-Nielsen Hand Tool Event, I was demonstrating at a bench next to Bob Zajicek and his array of Czeck Edge tools. I knew it was only a matter of time – I picked up one of his awls, tried it out, and . . . so that’s how the song should be sung! I could feel how this type of tool should really work. The handle is more than beautiful; it facilitates placing, pressing, and twisting the tool. The precisely formed edges of the blade do the actual cutting and allow it to fly into the wood.
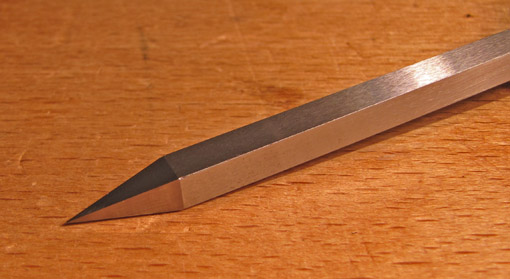
So I bought it, and back home in the shop it is becoming a go-to tool for a variety of tasks including marking and starting holes, boring small holes, and other marking tasks. An excellent tool!
[As with other tool reviews on this blog, this is unsolicited and unpaid.]

Author:
• Friday, December 11th, 2009

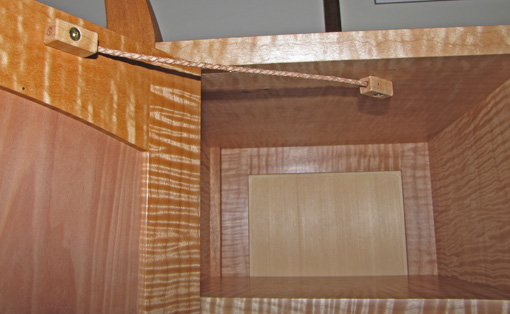
In designing cabinets and boxes, it is often necessary to limit the travel of a door or lid. Hardware options include folding stays, sliding stays, chains, and various types of supports. While some are purely practical and some more elegant, I did not feel any of the manufactured choices I was considering for this pair of small doors was in keeping with the overall nature of the piece. The problem was the metal itself – hard, noisy, overbuilt, and, well, metallic.

I wanted this component to be quiet and organic, so I did some experimenting and came up with a wood and leather concoction that functions well and complements the overall piece. It is also simple.

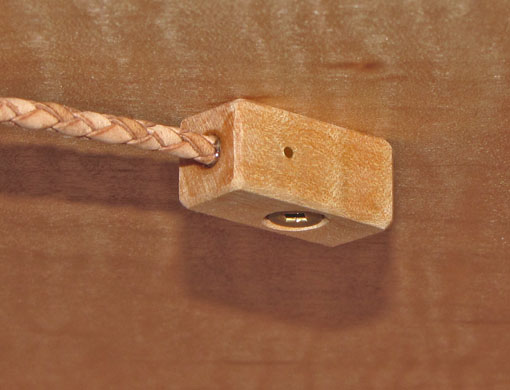
Braided bolo leather cord, 1/8″ diameter, in a tan color that matches the wood, is epoxied into a 1/8″ diameter hole going fully through the length of a 1″ x 7/16″ x 7/16″ maple block. To further secure the cord, a brass 0.050″ wire brad (local Ace Hardware) is gently tapped through a slightly undersized hole crossing the width of the near portion of the block and passing through the cord. The pin is clipped and filed flush at each end. A small countersunk screw attaches the block to the door or cabinet interior.

Experimentation will show where to place the blocks, considering these factors:

  • the desired limit of the door opening
  • a balance between putting the blocks too far away from the hinge side where the cord will be too obtrusive, and too close to the hinge side where too much leverage placed on the cord risks breaking it
  • the blocks must not bump into each other when the door is closed
  • there must be room for the cord to easily tuck away without curling too much when the door is closed (also, avoid twisting the cord)
  • what looks right

The diameter of the cord, up to ½”, and the sizes of the blocks and fasteners would be adjusted according to the overall size of the piece. I sized the components as seemed right for these doors which are about 16″ x 10″. In testing, I was able to break the 1/8″ cord with a strong pull but it certainly is adequate for its task in this project.

I think the bit of desperation involved in the genesis of these stays ultimately helped produce a unique touch to the piece.

Author:
• Sunday, December 06th, 2009

Illustrated here are several uses of the system of holes, Pups, Anchors, and stops described in the previous post. The simplicity of the layout engenders versatility. If it was tailored too narrowly to specific tasks, much of the creative range of the system would be sacrificed. As it is, introducing a piece of scrap wood here and there can effect solutions to the continually evolving work-holding demands of new woodworking projects.

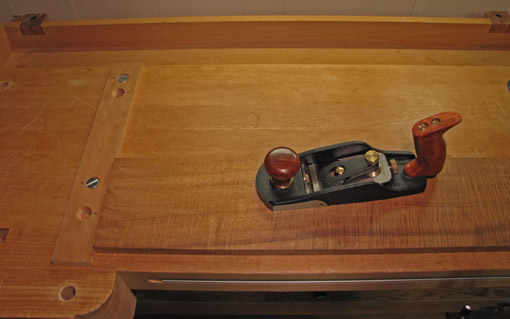
On the left side of the bench, a nice piece of scrap wood acts as a planing stop. It is secured to the bench with countersunk 1/2-13 flat head blots that go into the removable Anchors positioned in holes in the bench top. I prefer the recessed bolts because I am uneasy with protruding metal in the vicinity of a moving hand plane.

Note that the “nice scrap” has an extra pair of holes that allow it to be used in a pair of holes parallel to the length of the bench with Anchors in them. The two pairs of holes in the nice scrap serve as permanent templates for producing other Anchor accessory pieces as needed. This kind of stop is also useful for work with the Domino joiner.

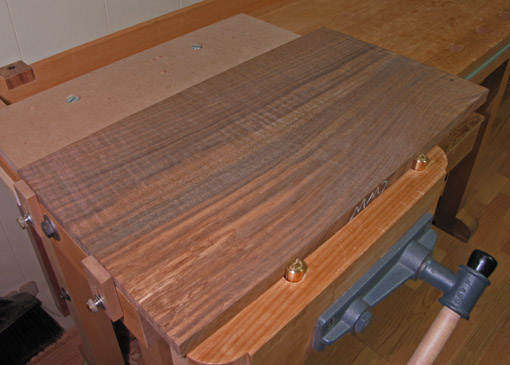
The photo below shows a board blocked on three sides using the stops on the left side of the bench, Pups in the vise chop, and a piece of scrap bolted into Anchors. Note that the pair of holes in the scrap are offset to one side, giving two effective projection widths from the Anchor points. Think of these scraps as extended dogs.

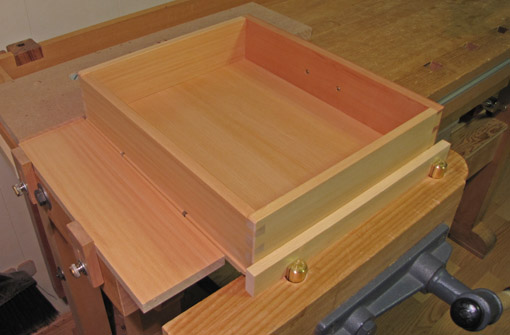
The photo below shows a drawer held in position with creative use of Pups, Anchors, and scrap wood. In this arrangement the top edges of the front and two sides can be planed without the work budging.

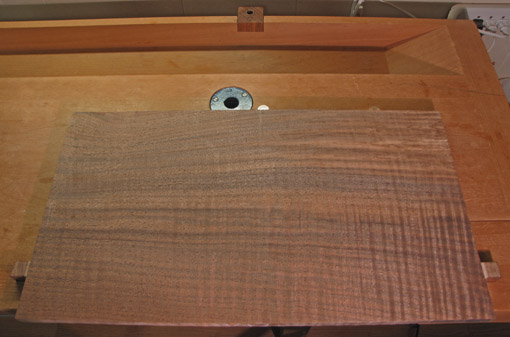
On the right side of the bench in the photo below, the regular bench dog and tail vise system is used in conjunction with two Pups in their holes (prairie dogs?) that prevent lateral shifting of the work. This is an alternative to the setup on the left side of the bench and it can also accommodate options with Anchors. This three-sided blocking of the work piece is handy, for example, when scrub planing diagonally across the board, which might be necessary for this piece since it is too wide for my  machine jointer. These systems are also especially handy for planing door frames which inevitably involves frequent changes in direction of attack with the plane.

The main point is that there are surely undiscovered variations and creative adaptations of this system that will evolve as the work demands. With a minimum of hardware and alteration to the workbench, its foundation is simple and easy the way I like it.

Author:
• Wednesday, December 02nd, 2009

Holding short, wide boards or intermediate assemblies such as drawers and cabinet doors can be awkward on traditional-style workbenches. Attempting to solve these problems, I have been gradually altering my bench to incorporate two helpful products made by Veritas: Bench Pups and Bench Anchors. This involves drilling 3/4″ holes in the bench top with considerable forethought. As with any redesign of a basic tool, true success can be declared only after a long time of use encountering a wide variety of jobs. So, I have tried to research and anticipate well and, so far, so good.

A Bench Pup is a 2 3/8″ long, round, brass bench dog that fits in a 3/4″ hole. A Bench Anchor is essentially a portable 1/2-13 threaded insert that is secured in a 3/4″ hole by means of an expansion system. While the function of the Pup is simple and obvious, the Anchors allow an unlimited variety of stops, boards, and accessories to be secured to bench surfaces. I also added two shop-made dogs on the side of my bench.

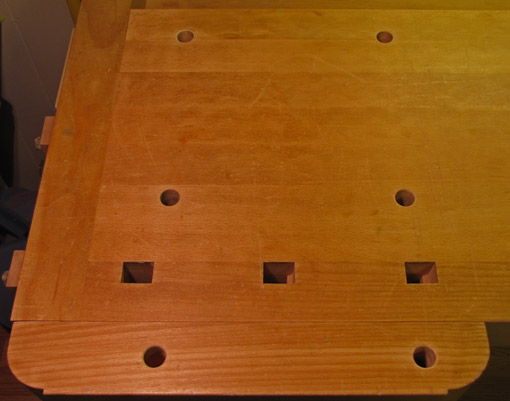
Let’s start at the left side of the bench. I wanted a planing stop but not the typical wide slide-up stop at the left end of the bench. The problem for me with that design is that the front vise gets in the way of my left hip when planing. Furthermore, the vise handle is at just the right height to bump into parts that I’d rather not have bumped. This causes me to crane over the work piece, creating lower back stress. So, the first two holes were placed in the bench top near the right end of the front vise. There the Anchors can be placed and a ½” board with countersunk holes can be secured into them with flat head bolts.

The next step is to permit those two holes to do double duty working with the front vise. Two more holes are placed in the bench top, each equidistant from the vise face with one of the first two holes. Then two more holes are placed in the vise chop, equidistant from the face and each in line with one of the pairs in the bench top.

I wanted the holes in the bench top to go fully through to allow access to the Pups and especially the Anchors from underneath. Now, it would have been nifty to arrange the four holes in the top at the corners of a perfect square which would allow one hole spacing to be used in auxiliary boards, but the constraints of my bench and vise hardware did not allow this.

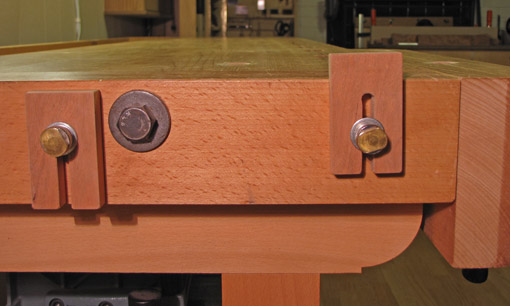
Two shop-made slide-up dogs were added to the left end of the bench. These are secured with 1/4-20 finger bolts that enter threaded inserts planted in the side of the bench.

Now to the right side of the bench. Two holes were placed parallel to the row of square bench dog holes, one slightly to the right of the closing point of the tail vise, and the other about 7″ to the left of the first.

With these alterations to the workbench, I tried to make each hole contribute as much versatility as possible. The next post will show a few of the possibilities for holding work with this system.

The reason I titled this “More workbench upgrades” is to reference an article that I wrote for Popular Woodworking magazine, November 2007 (#165), pages 57-61, “Upgrade Your Workbench,” which readers may find helpful for more ideas on the most important tool in the shop. Back issues are available on the PW site and a short video relating to the article is also on the site.

The little hole drilled into the face of the Bench Pup allows one to lever it up with a small screwdriver or hex key. Thanks to Alejandro Balbis! – who contributed this tip to the December 2009 Popular Woodworking.