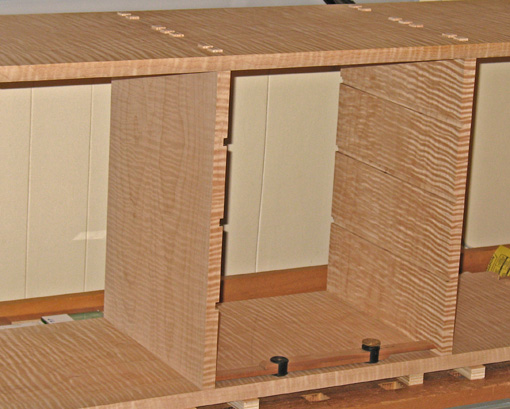
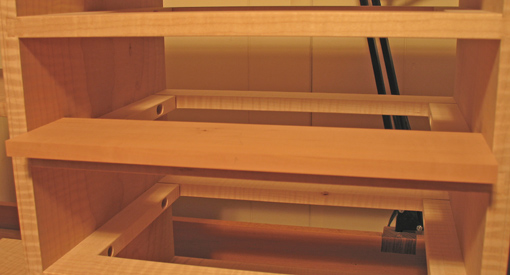
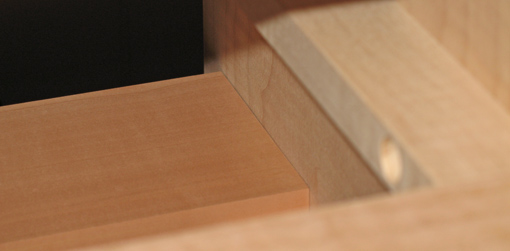
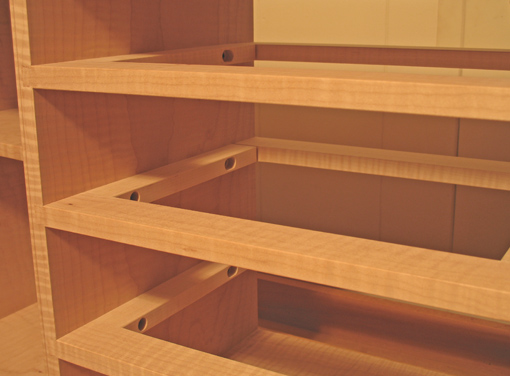
Thoughtful planning and careful workmanship in constructing the case that will house the drawers will pay off later. The web frame construction in this solid wood design, only one of many ways to create a drawer case, will serve to illustrate some key principles. In this project, each runner is set in a dado in the vertical partition which forms the side of the drawer housing. A tenon at the front of each runner is glued into a mortise in the front divider. The runner is screwed to the partition near the front and is slot-screwed near its back end. The rear end of the runner has a tenon which is fitted without glue into a mortise in the back divider. This arrangement allows the case sides to move unrestrictedly with seasonal moisture content changes.
Whatever the form of case construction there are some important points to monitor. The width of the drawer housing should slightly widen toward the back of the case. This allows the drawer to be pushed in and pulled out smoothly without binding. Ideally, as the drawer is pulled out almost to its limit, the sides will gently tighten against the housing. It is futile to measure this tiny widening with a tape or rule. Instead, cut a piece of scrap or use a pinch rod setting so it just fits the width (or gently binds) at the front of the housing. Then slide it toward the back where you want it to “release” and slide freely. The clearance is perhaps 1/64 inch; I don’t measure it. At least ensure that the housing does not narrow toward the back.

In the photos below, getting a bit ahead of ourselves here, I’m showing how a fitted drawer front laid flat is snug against the sides at the front but has clearance at the rear of the case. (Fitting the front is covered later in the series.)


It is easier than it might seem to achieve this sort of tolerance. For this project, I cut the joints, then dry fitted the vertical partitions and performed the testing process as described above. Then I disassembled the case and simply hand planed away some thickness on the inside surfaces of the partitions according to the indications of the testing. I reassembled the case and retested. After the case refinement was completed, I ran the dadoes and constructed the web frames.
A few more things require attention. The surface on which the drawer rides should be free of twist. This is mainly controlled by cutting the dadoes for the runners symmetrically in each partition. The front to back consistency of the height of the housing is less important but the height should not decrease toward the back. The front opening ideally should have four 90 degree corners, but don’t worry, small errors can be compensated when sizing the drawer front.
These same general principles can be applied to fitting solid wood drawers into other case designs, such as frame and panel, plywood, and veneered constructions, though the planning steps required to implement them will be different. For this series, I will stay focused on one example of a solid wood project.
Next: how fitting the drawer front is the key step.


This is the first I have heard of having the drawer housing widen slightly at the back, but it makes good sense. I wish I had thought about that before I built my dresser!
I’m looking forward to your next post.
Hi Amos,
The concept is from traditional drawer making exemplified by Alan Peters and other great teachers.
Thanks for reading.
Rob
Very informative and nicely written. Enjoying your blog very much, and looking forward to seeing more of the piece you’re building; it looks very nice so far. Thanks!
Jeff
Thanks for reading, Jeff.
Rob
Hi Rob,
I have a comment about the sequence of removing material from the vertical partitions for some clearance and running the dado housings. It would occur to me to run the dadoes, either over blades or with a router jig laid on top, before the subtle amount of material is planed away, insuring that the opposing surfaces on the insides of the vertical dividers you will run dadoes in are truly parallel and that the front and back horizontal runners are the same length. Once completed, then plane for the clearance. What would be the advantage the other way?
Thanks for an interesting and important discussion.
Best,
Tico
Hi Tico,
I think it could be done in either order.
After the planing adjustment, the insides of the dividers will not be parallel to each other; they will diverge a tiny bit, as viewed from above, like a “V”. They will hopefully be flat, square to the top and bottom pieces, and not twisted. The back dividers, which are optional, will be a tiny bit longer than the front dividers, so they are fit seperately from them.
I may be making this sound much harder than it is.
Rob
Hi Rob,
I just found your wesite and I really enjoy it.
Would it be possible to simply mortise the runners into the front and back dividers – no dados, no glue, no screws. Perhaps pin the runner tenon in the front divider. Would that be strong enough for anything beyond a small cabinet?
Is the purpose of the dado to keep the runner from twisting?
John
Hi John,
Thanks for reading.
Those are good questions regarding the case construction. I didn’t elaborate on that in the drawers series because I wanted to stay on topic, but here’s some more information. I hope I will make it clear enough without illustrations.
Yes, you could simply dry mortise the runners into the front and back dividers as you describe. In that case, I would at least drive a single screw through the runner, at its midpoint, into the partition. This will give the runner some support and prevent it from shifting. This would still allow seasonal movement of the case.
The main reason I used dadoes is to provide definite registration for all components of the web frame during construction. Ironically, in relatively small work like this, everything has to be just right for it to fly. They also give good support for the runners and keep them nice and flat.
Here’s what I did. It is not apparent from the finished piece, but, prior to assembly, I cut shallow dadoes in the vertical partitions all the way through, end to end. Then the case is assembled.
Then, I cut the male dovetails on the ends of the dividers with a shopmade jig on the router table. Next, on the router table, I cut tongues on the runners, and, using the same bit depth settings, on the inner half of the ends of the dividers. The work is planned so that the tongues are fully contained within the base (narrowest part) of the dovetail. The parts left rounded by the router bit are squared and the tongues on the end of the dividers are shortened, both tasks easily done by hand.
The dividers are then slipped into the dadoes up to the point where the dovetail meets the partition. The dovetail sockets are then marked out directly from the male dovetails and cut by hand. This was the hardest part of the process.
The remainder of the construction is described in the post.
Is this the “best” way? I don’t know, but it worked well for me in this project. Read Bill Hylton, Will Neptune, and many others for many other methods.
Rob