Archive for ◊ May, 2009 ◊

Author:
• Thursday, May 21st, 2009

Trick question. It depends. This post will discuss factors in the amount of camber in the edge of a plane iron with attention to an under-appreciated trigonometric quirk.

The slight convexity or “camber” in the edge of a smoothing plane iron should allow the production of airy shavings that are thickest in the middle, say .001″, and feather out to nothing at a little less than the width of the blade. This produces imperceptible scallops on the wood surface and avoids square-edged tracks or “gutters“.

A similarly small, or perhaps a bit more, camber in the edge of a jointer plane blade allows one to bring down the “high” side of an out-of-square edge without tilting and destabilizing the heavy plane. The camber should be positioned at the center of the blade projection so the plane can be shifted toward the high side of the board’s edge to remove a slightly thicker shaving there.

For jack planes, more camber lets this workhorse take thicker shavings without producing gutters. The more pronounced camber also makes it easier to direct the plane’s cut at the high spots on the surface of a board being dimensioned.

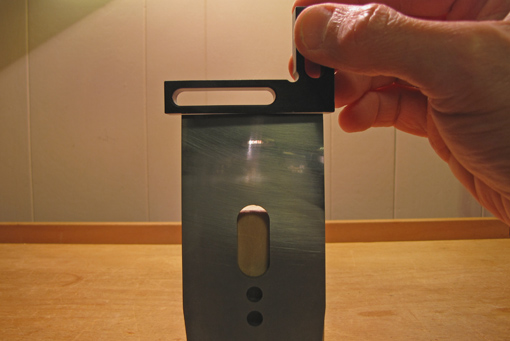
When grinding and honing a plane blade, I check the camber by setting the blade’s edge on a small aluminum straight edge and holding it up to the light to look for the tiny gaps that gradually enlarge from the center to the sides of the blade. (I never measure this amount so I cannot answer the question posed in the title of this post.)

Now some trig. Let’s say the camber – the depth of the convexity of the edge – is .005″. When this blade is installed on a 45 degree frog in a bevel-down plane, the actual functional convexity is reduced. Think of it this way: if the blade were laid flat and you viewed it toward the edge, there would appear to be no camber at all. The functional camber is reduced by the sine of the bed angle.

sin 45* x .005″ = .0035″

Look what happens in a bevel-up plane with a 12 degree bed:

sin 12* x .005″ = .001

Therefore, I sharpen more camber into a blade for a low angle bevel-up plane than for a bevel-down plane to achieve the same functional amount of camber. The camber that you observe sighting 90 degrees to the face of the blade will mostly disappear when you install the blade in a 12 degree-bed, bevel-up plane and sight down the sole to observe the camber. Compensate for this by being generous with camber in the sharpening process. A more direct approach during the sharpening process is to check the camber against a straightedge with the blade tilted at the bed angle.

Again, I do not measure these things but rely on my eye, experience, and especially feedback from the work. Of course, sometimes I’m off, usually by over-cambering. However, since the middle of the blade is thus destined to dull first, it is easy to reduce the camber on the next honing.

There are undoubtedly other factors affecting shaving thickness, such as blade sharpness, blade edge deflection, and wood grain, so it is most important to monitor the performance of the plane and make adjustments when you resharpen.

You can use trial and error or a set of leaf gauges to work this out to your liking. Like just about everything else, there’s more than one good way. Use the principles and find your way.

Category: Techniques  | Tags:  | 9 Comments
Author:
• Wednesday, May 13th, 2009

Here are some brief thoughts on these tools and a good excuse to own both.

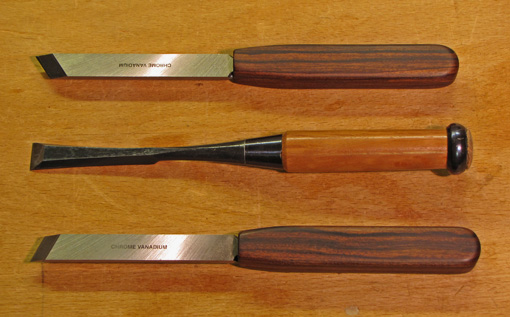
Skew chisels are handy for getting into acute angles, such as the sockets of half-blind dovetails, as well as for easy access to square corners, such as cleaning out a hardware mortise. The skew chisels pictured above are available from Lee Valley, $27.50 for the pair, nothing fancy. They are about ½” wide and come with sturdy, though unattractive, hooped handles. For fun and aesthetics, I made Hondouras rosewood replacement handles intended for pushing, not striking. The edge forms a 65 degree angle with the length of the chisel on the acute side.

An interesting tool sits between them, a Matsumura “bachi nomi” or fishtail chisel, available from The Japan Woodworker in various sizes, $39-$53. The 5/8″ edge forms an 86 degree angle with each side. This allows use in many tight spots but is not sufficiently acute to easily clean out lap dovetail sockets. The geometry of the bach nomi makes it more amenable to striking than that of the skew chisel.

These two types of tool, one common, the other unusual, have some overlap in their function but I feel both are worth owning, especially since I am a big fan of Japanese chisels in general.

Category: Tools and Shop  | 4 Comments
Author:
• Wednesday, May 06th, 2009

The previous post discussed preparing the edge joint for thin boards.

The second problem involves clamping the joint. Because these are thin boards it is desirable to align the edges as accurately as possible to avoid a significant loss of thickness in the final product. More vexing is the tendency of the joint to explode when clamping pressure is applied. This problem is akin to trying to control the writing tip of an 8 inch long pencil held only by the eraser.

I like #20 biscuits for aligning 3/4″ edge glue ups and #0 biscuits could work for ½” boards, but for the 11/32″ boards shown here I would be concerned about biscuit swelling and show-through. Splines are a hassle which I gave up on long ago. The same goes for those elaborate clamps that use wooden battens to apply pressure on the face of the glue-up while the clamp screws apply pressure to the joint. One option that I have not tried but looks good is the Plano Clamping System.

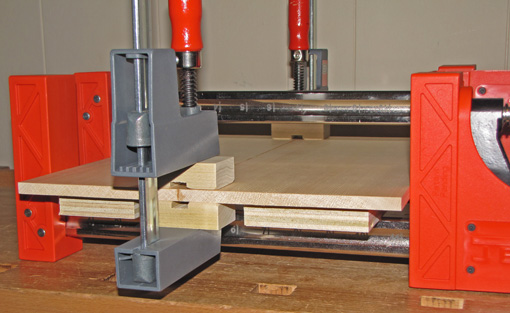
Here is a simple solution that works for me. The boards rest on 3/4″ MDF or plywood platforms. After applying glue and bringing the joint together, I apply just light pressure with the bar clamps. Then I clamp small blocks, with cutouts to vault the glue squeeze-out, across the joint near the ends. I push or tap near the middle of the joint to align it there. Then I apply final pressure with the bar clamps.

There are surely many other methods for edge joining thin stock, notably from instrument makers. I’ve described simple, shop-tested methods that I use. Best wishes for your woodworking.

Category: Techniques  | Tags:  | 5 Comments
Author:
• Monday, May 04th, 2009

Edge joining thin boards, in the 1/4″ to ½” range, presents two special problems, both easily surmounted with the methods described here. These are usually fairly short pieces of wood, such as for panels and drawer bottoms, which permit alternative methods.

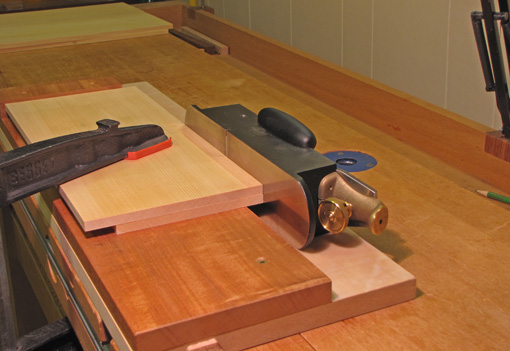
First, it is difficult to plane a straight, square edge using the usual procedure of clamping the board in the front vise and running a bench plane along the edge. The narrow edge provides little purchase to balance the plane consistently square to the face. The solution is the shooting board. I bring the two boards together, like closing a book, and align the working edges. Then I set the pair on the shooting board platform with the edges extended slightly beyond the shooting board’s running edge. The plane is, of course, used on its side, but the sole only touches the edges of the work pieces. Hold the boards firmly or use a clamp. Planing the two edges simultaneously in this manner negates any slight discrepancy from square.

In setting up for an edge joint, care must be taken to match and orient the boards properly. It may not be possible to meet all of these criteria with the available stock, but the first two should not be compromised.

  • Join edges with similar cross-sectional grain orientation, rift to rift, quartered to quartered, flatsawn to flatsawn. Dissimilar edges, such as quartered and flat, will seasonally move differently in thickness to create a step at the joint surface and possibly stress the joint.
  • Avoid figure runout or dissimilar figures at the edges of the boards. For example, do not juxtapose cathedral figure lines running off the edge with riftsawn straight figure. Make it look good. This is partly related to the above.
  • The surface grain of the boards should run in the same direction to facilitate planing the glued-up board.
  • The grain on the edges should run in the same direction when the boards are “folded”. This will make the edges easier to plane simultaneously, but is not a factor for thicker boards that are planed separately.

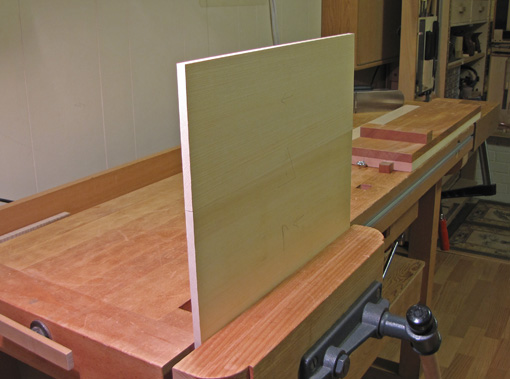
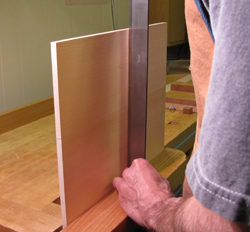
For the enduring question to plane the edge straight or concave, my simple answer is this: I aim for a straight edge allowing the least possible concavity but zero convexity (a one-sided tolerance). The ultimate test is to stand one board on the other and swing the top board. It should barely pivot at the ends, never in the middle. It must also not rock due to twist in the edges. Finally, a straight edge placed along the surfaces should predict a flat glue up. (Contrary to the appearance in the photo at right, I have five fingers on my left hand.)

When joining flatsawn boards I usually look for the nicest appearance and do not worry specifically about whether the heart and bark faces alternate or not.

By the way, it took me longer to write this than to make an edge joint. In the next post, I’ll describe a method to solve problems in clamping the joint.

Category: Techniques  | Tags:  | 2 Comments