Archive for ◊ April, 2009 ◊

Author:
• Tuesday, April 28th, 2009

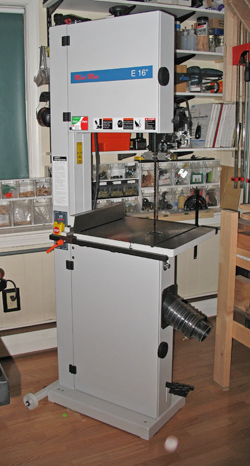
To a woodworker tooling up a new shop or upgrading an established one, I suggest the second major machine acquisition should be a good quality bandsaw. Nope, not a table saw, not in the number two slot. True, the table saw rips and crosscuts very well but is far less versatile.

The great freedom afforded by a good bandsaw can change your relationship to wood. Here’s a sampling of some bandsaw work:

  • cut curvy legs from 12/4 mahogany
  • resaw a 10″ figured board into bookmatched panels
  • make your own 3/32″ veneer
  • select out furniture parts from stock irrespective of their orientation to the original edge of the board
  • cut tenons
  • cut and dry some wood from a tree felled in your backyard
  • try some sculptural work
  • rip laminates for bent lamination work
  • cut out cartoon characters and toys for your kids

A bandsaw will generally not rip as cleanly as a table saw, but with an excellent blade it does a surprisingly good job that is just a very few hand plane passes away from finished. For clean, accurate, consistent crosscutting, it must be conceded that the table saw is the clear winner. Still, the shooting board can take care of that issue. Nonetheless, if I had to give up one of these two machines, there is no doubt the table saw would go because the lack of a bandsaw would be far more limiting to my range of designs and work.

The bandsaw also takes up much less shop space than a typical table saw. There is an additional, hard to define virtue of bandsawing. It is the machine work that I liken most to hand tool work. I feel in touch with the cutting action and in control of the work, unlike with the table saw where, after the setup for a cut, the machine essentially rules. A bandsaw is also way more just plain fun to use than a table saw, jointer, or planer.

I would strongly suggest a steel frame saw in preference to a cast iron version. While a review of specific machines is beyond the scope of this post, I suggest to look for at least 10″ cutting height, preferably 12″ or more. Lower priced steel frame saws in the $800-900 range, such as the Rikon 10-325 or Grizzly G0457, are not more expensive than a quality cast iron model plus a riser block. Better still, move up to a Minimax or Agazzani.

So just as my New England Patriots (to raise the hackles of lots of readers) produce consistent winners by building the roster based on players’ value and versatility, go ahead and add a quality bandsaw early on in your woodworking lineup. Just remember, the pursuit of perfection is fraught with agony. (Yea, yea, I know: 18-1.)
Category: Tools and Shop  | 14 Comments
Author:
• Sunday, April 26th, 2009

New woodworkers setting up their first shops may wonder which major machines should be purchased first, second, and so forth. Similar issues confront experienced craftsmen looking to upgrade their machine arsenals. Answers to tool questions such as these must always take into consideration the type of projects planned, the methods and skills used, and shop space. Furthermore, quality woodworking is a very personal endeavor which precludes definitive answers in matters such as these.

This discussion applies to the type of woodworking that I think is done by many readers: building mostly furniture and accessories, using a combination of machines and hand tools. Examples of projects, for necessity or just for fun, include tables, chests, jewelery boxes, bookcases, and maybe a chair, using mostly straight but also some curved or sculptural elements. It is assumed that money and time are limited. (Good bet, I think.)

My suggested first major power tool is the portable thickness planer. Why? It accomplishes very well a difficult, essential task with relatively little expense and shop space.

For $350 to $650, one can buy a machine that will perform its job at a very high level. Most woodworking projects start with flat boards of uniform thickness. So why not buy a jointer first? A jointer with the analogous quality and versatility as a portable thickness planer would cost far more, and its tasks are far easier to do by hand than is thicknessing.

A flat surface prepared by hand, preceding thicknessing, can be done reasonably quickly and does not have to be pretty. It may even contain residual furrows from a scrub plane and tearout, so long as it does not contain cup, bow, or twist. Thus it can register properly against the bed of the thicknesser for the other side to be planed, then the board is flipped, and so forth.

Spending much more money on a good jointer, or worse, buying a cheap or narrow jointer destined for early obsolescence, will produce a flat face but leave the arduous task of hand thicknessing. The portable thickness planer quickly frees the woodworker from some of the most limiting habits in woodworking – using pre-dressed wood and defaulting to 3/4″ stock.

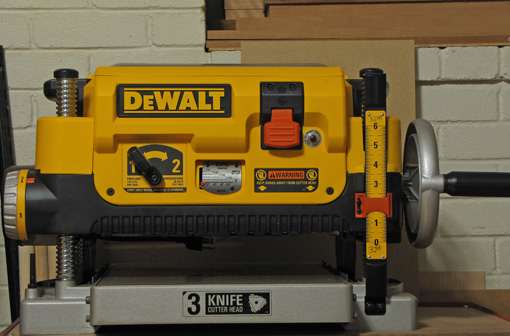
I like my DeWalt DW735. I use it with a dust collector but its blower allows use without one, making it easier to start up a shop.

Next: suggested major machine number two. More money, of course, but here comes the fun. Big hint: it’s not the table saw.

Category: Tools and Shop  | 6 Comments
Author:
• Thursday, April 16th, 2009

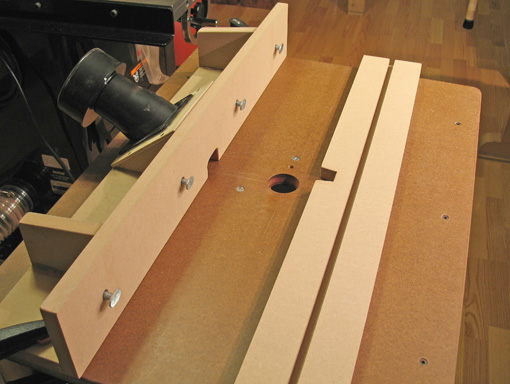
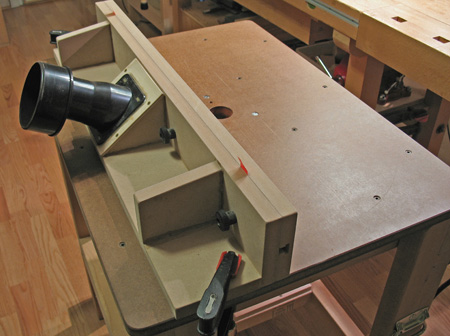
The fence for the router tableuses a removable face with a T groove in its back. Four T bolts penetrate the vertical piece of the base fence, and the heads slide in the groove. The face is secured using knob nuts on the bolts.

The base fence is constructed from two pieces of 4″ x 28″ MDF, glued and reinforced with 90 degree MDF braces set in with epoxy glue. At the center is a cutout, about 1″ high x 1 ½” wide x 1 3/8″ deep, in the horizontal and vertical components to allow dust to escape. Surrounding the cutout, on the back side of the fence, are two MDF 90 degree triangles with a 1/4″ plywood cover. The cover has a large hole, around which is attached a plastic face plate with a dust port. Attached to this is an adapter to fit a 4″ dust collection hose.

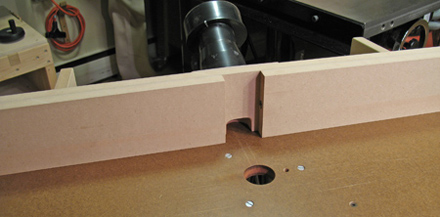
The removable fence has a smaller trapeziodal cutout, 1 1/8″ at its base and 7/8″ high. This accommodates most of the bits I use. Among the advantages of the removable fence face is the option to create additional facings with larger or zero-clearance cutouts. Another option is a split fence facing where the halves can be separated to make room for taller/wider bits. The outfeed half can be also be shimmed for edge jointing. Rockler carries all the fittings required to construct this fence.

When building this fence I tried hard to make it flat and square, knowing, however, that I could later tune it to tolerances of at least .002″, with a “highly sophisticated” microadjustment device: shims. The squareness of the fence can be tuned by placing tape shims under the base fence. The straightness can be tuned by placing plastic or brass shims between the facing and the base fence.

The fence is held to the table with an F clamp at each end. I don’t miss having a fancy microadjuster on the fence. I learned woodworking using hand tools and this has fostered habits of working as directly as possible, using consistency, not dead-on absolute measurements, to make parts fit. I prefer to bring the part to which I am fitting right up to the bit and fence and set them from that. Often this involves using test pieces and incrementally approaching a good fit.

In some cases, if the trial is off a bit and I want to correct it by a measured amount, I might measure the trial cut with a dial calipers, and make the fence adjustment with a leaf gauge and a block. Tiny changes can be made by pivoting the fence at one end and measuring at the other, resulting in a movement at the bit location of half the measured amount.

The important thing is not to mistake this low-tech shimming and matching for sloppiness. This is an intuitive, simple, but highly accurate way to work. Furthermore, you can feel the level of accuracy to which you are working, in much the same way as sawing to a line when cutting joints by hand.

Yup, simple, and it works. Complicated can be so boring.

Author:
• Tuesday, April 07th, 2009

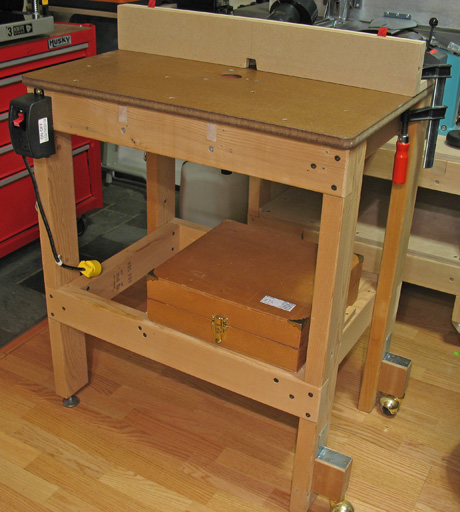
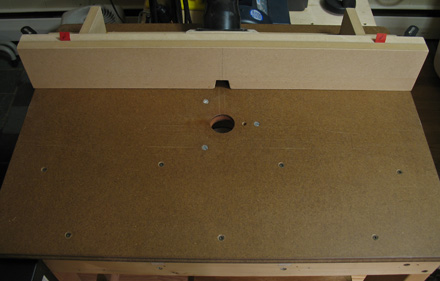
No drop in plate, no router lift, no storage cabinets, no micrometer fence adjuster. So what does this router table have going for it? It’s simple and it works. You cannot buy this one from a catalog. Really, I have nothing against all those gizmos, and maybe they’re right for you, but I don’t think using them will produce better woodwork from my shop.

Overall dimensions are 28″ wide x 20″ deep x 33″ high. The frame is constructed from straight, dry 2x4s joined with half-laps, glue, and 3″ screws. Steel “L” brackets hold the two casters just a bit above the floor when table is planted, so the wheels can engage when the table is slightly lifted from the opposite side to move it about. One leg has a leveler. An electrical switch is located at the upper left of the frame. Most of my bits are stored in the box which I slide out of its cradle before using the router table.

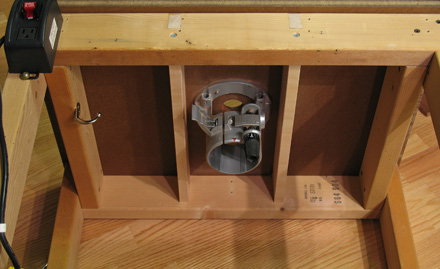
Looking from underneath, you can see two cross supports half-lapped in place to form additional support for the top. After constructing the frame, I used a hand plane, straightedge, winding sticks, and a fair dose of patience to ensure the top edges of the frame composed an accurately flat plane upon which to attach the top.

The top is 3/4″ MDF, toughened with a few coats of oil-varnish mix, screwed to the base. An extra Bosch 1617EVS base always stays screwed underneath. In this decade I haven’t found use for a bit too big for the 1 5/8″ hole which is centered in the top. (Maybe I’m just boring.) The top is ridiculously flat and never sags. (Which keeps me happy.) There is a small hole near the bit opening for a rarely used starter pin.

Yes, I must squat to put the router motor in the base – it’s ok. While down there, it is easy get a good angle of view to set the bit height with a rule, a reference block, or most likely, a previously made part of a project. The Bosch base has a simple micro-adjuster with 1/256″ (about .004″) gradations allowing precise readjustments after running/measuring a test piece. The same Bosch motor is used in a second base for hand held work.

So far we’ve got an inexpensive, extremely stable, accurate table. I credit router expert Pat Warner for this general philosophy of the router table, with modifications. My fence, however, is much simpler than his and will be discussed in an upcoming post.