• Thursday, January 29th, 2009
I spent an enjoyable few hours last week at the Museum of Fine Arts in Boston. Viewing thousands of years of exciting art is a great way for a woodworker, or any creative person, to exercise and sharpen the aesthetic sense. I imagine at least one or two motifs drifted into my brain, unbeknownst to me, as silent seeds to later germinate into a project idea. A bargain for a bit of lost shop time.
Though I do not make period furniture, it was inspiring to behold pieces by Seymour, Townsend, and their contemporaries. From the other side of the world, the MFA has a fabulous collection of old Chinese furniture, displayed in a beautiful, peaceful setting that is hard to leave. Woodworkers will particularly enjoy the permanent “Please Be Seated” program which consists of chairs and benches by modern masters distributed throughout the museum on which visitors are welcome to park their carcasses. Go ahead, have a seat on a Sam Maloof bench!
I could not avoid some perplexity as I stood in the 19th – 20th century American section where a Maloof chair and a Wendell Castle music stand sit peacefully below a Jackson Pollock piece of art hanging on the wall, his “Number 10, 1949“. Well, I suppose I should not criticize what I don’t understand, but I do know what I like. I guess if the chair had only three legs, rendering it functionally useless, and it made you wince, then it would be far more valuable as art. I don’t know, maybe I’m too hung up on beauty. I’m glad I’m a woodworker.
Visual high art often seems excessively marketed, valued, and analyzed. Contemporary fine woodworking, on the other hand, seems to suffer from a general lack of understanding and appreciation by a large portion of society, and is consequently usually undervalued.
There, I’ve done it, opened a whole can of worms.
• Thursday, January 15th, 2009
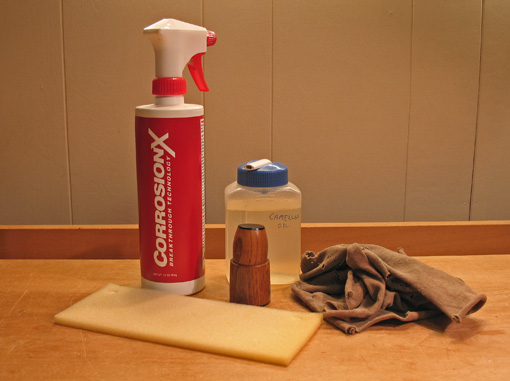
In general, I have nothing against oxygen; I use it on a regular basis. I just do not like its predilection to hook up with the iron in my tools. Like all tool folk, I hate rust. Hoping to prevent this unholy molecular union, I’ve tried many methods and products over the years. Here are the proven performers: three non-toxic, virtually problem-free products.
Camellia oil. This gets wiped onto all my hand edge tools and some steel measuring tools with either an oily rag or an oil rub, a wad of soaked felt in a wooden cup. This very light oil has a pleasant fragrance, and only a minimal film is required to prevent rust. I’ve never had any problems with the oil interfering with gluing or finishing since I use a quick cleaning wipe on edge tools before putting them to wood. Freshly sharpened tools get oiled promptly after the water is wiped off, but I make sure oil stays away from my Shapton stones. One 8 ounce bottle lasts a few years for me.
Corrosion X. I use this on cast iron machinery surfaces and for other power tool applications. I much prefer it to the several other products I’ve tried, including Boeshield and Top-Cote. I wipe it on and rub it in infrequently, when I think of it, perhaps every few months. The manufacturer claims Corrosion X is non-toxic, non-carcinogenic, nonflammable (in the pump spray form), has no silicon, and has only 8.6% VOC. I find it has only a mild odor.
Bull Frog Vapor Corrosion Inhibitor. This is a yellow foam pad, about 10 inches square, containing the non-toxic, odorless VCI chemical which settles on metal in an invisible layer only a few molecules thick. The pad is rated to protect 50 cubic feet of enclosed space. I cut it into several proportionate size pieces to protect the contents of various tool cabinets and boxes. This is cheaper than buying smaller strips. It lasts at least one year and works well without a hint of problems.
Here in the Northeast US summers can get very humid. An electric dehumidifier in the shop keeps humidity moderated for the sake of my tools as well as the wood.
This multi-pronged approach has kept rust at bay in my shop. I hope it helps in yours. Go Rust Busters!
• Tuesday, January 13th, 2009
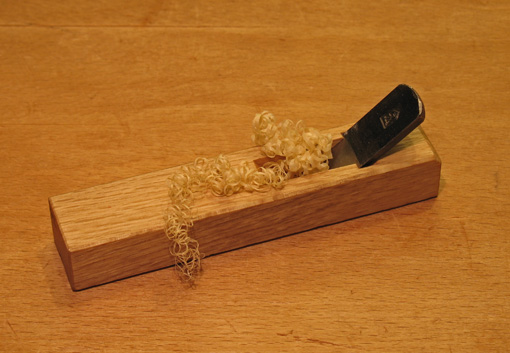
These simple but very effective little planes come in a variety of blade types and contours. I love ‘em.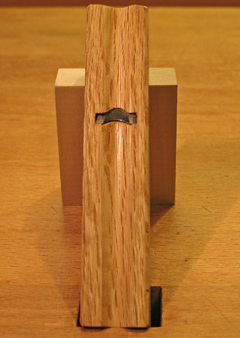
The 9 mm round over plane is, ounce for ounce, one of the most useful tools in my shop. The good quality laminated steel blade is a wedge fit in the 4 3/4″ body and is easily adjusted with light hammer taps. To get a solid feel for the cutting action, I grip the plane with my thumb and fingers on opposite sides near the mouth. It cuts a rounded chamfer which gives a slightly softer look than a plain flat chamfer. To hone the bevel side of the blade, I use a 5/8″ dowel covered with sticky-back 3M micro-abrasive film. This plane is about as simple and problem free as a tool can be.
I use the mini rabbet plane on the pull stroke for trimming the shoulders of small tenons where a metal plane might be unwieldy. The projection of the laminated blade must be adjusted carefully, but lacking a chipbreaker, this is an easy task. The skewed blade produces a smooth cutting action while the long length of sole in front of the cutting edge allows for secure registration of the plane prior to entering the cut. The sole and sides are easily tuned on a flat surface with sandpaper.
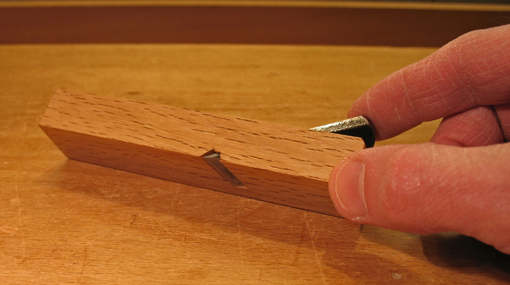
These tools are good examples of “just enough” design – they work beautifully with no frills. Japanese mini planes earn their place on the tool roster. They are available from many suppliers, including Hida Tool, who carry a good selection.
• Friday, January 09th, 2009
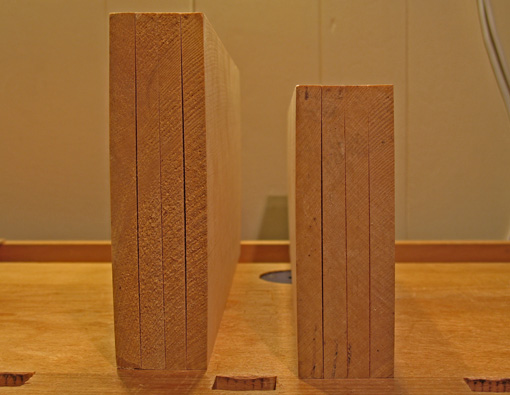
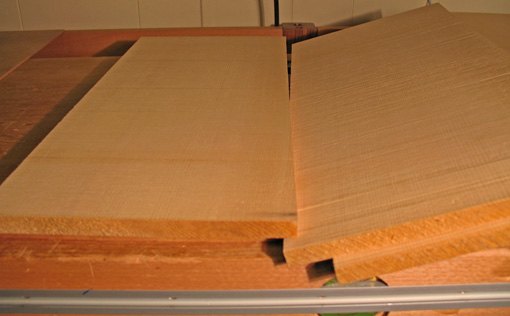
These boards, about 7 inches and 5 ½ inches wide, were originally a bit over 2 inches thick and were resawn into four slices. I had monitored the moisture content of the original boards over a few months in the shop and was confident they had equilibrated to the ambient humidity. Immediately after resawing, the inner slices measured the same moisture content as the outer slices, proving there was no moisture gradient through the thickness.
The photos above show the slices immediately after resawing, set up in their original positions. Note the inner boards are flat, but the outer boards are mildly cupped, concave on their inner faces. This immediate distortion is due to internal stresses in the wood, not moisture changes.
I could have predicted this by using the method discussed in a previous post on this blog. Of course, I did not follow my own advice. Notice the outer right board in the wider set. I sawed it too close to the desired finished thickness and now I will lose some thickness after flattening away the distortion. Had I properly anticipated the distortion with the prong sample method, I would have made the outer slice thicker to compensate. Having been reminded of my lesson, I did this when resawing the narrower board.

The steel rules lying across the slices of the wider board show the inner slice is flat while the outer slice has about a 3/64 inch cup. That’s not so bad, but the total loss of thickness is double that amount after both faces are flattened. A moisture gradient through the thickness of the original board, if it had been present, could have exacerbated the problem.
This is yet another reminder (note to self) to understand and watch the wood. That’s always good advice.
